August 15, 2021
Something big has been cooking for a while, and we’re excited that we can finally reveal it to you.
We now have a video editor where you can annotate your video projects with the most accurate detail.
This release also allows you to save queries. So let’s jump right in!
Video project
Create video project
Creating a video project is the same as creating a Pixel or a Vector project. The only difference is in the first step where you need to choose Video with attached URLs as the annotation type. Learn how to create video projects here.
Attach video URLs
You can import videos by linking them from external storages. The linked videos are displayed in SuperAnnotate, but they are not stored in our local servers.
sa.attach_video_urls_to_project(
    project = "Project Name",
    attachments = "./videos.csv",
    annotation_status = "QualityCheck")
superannotatecli attach-video-urls --project “Project Name/Folder Name” --attachments “./videos.csv” --annotation_status “QualityCheck”Video editor
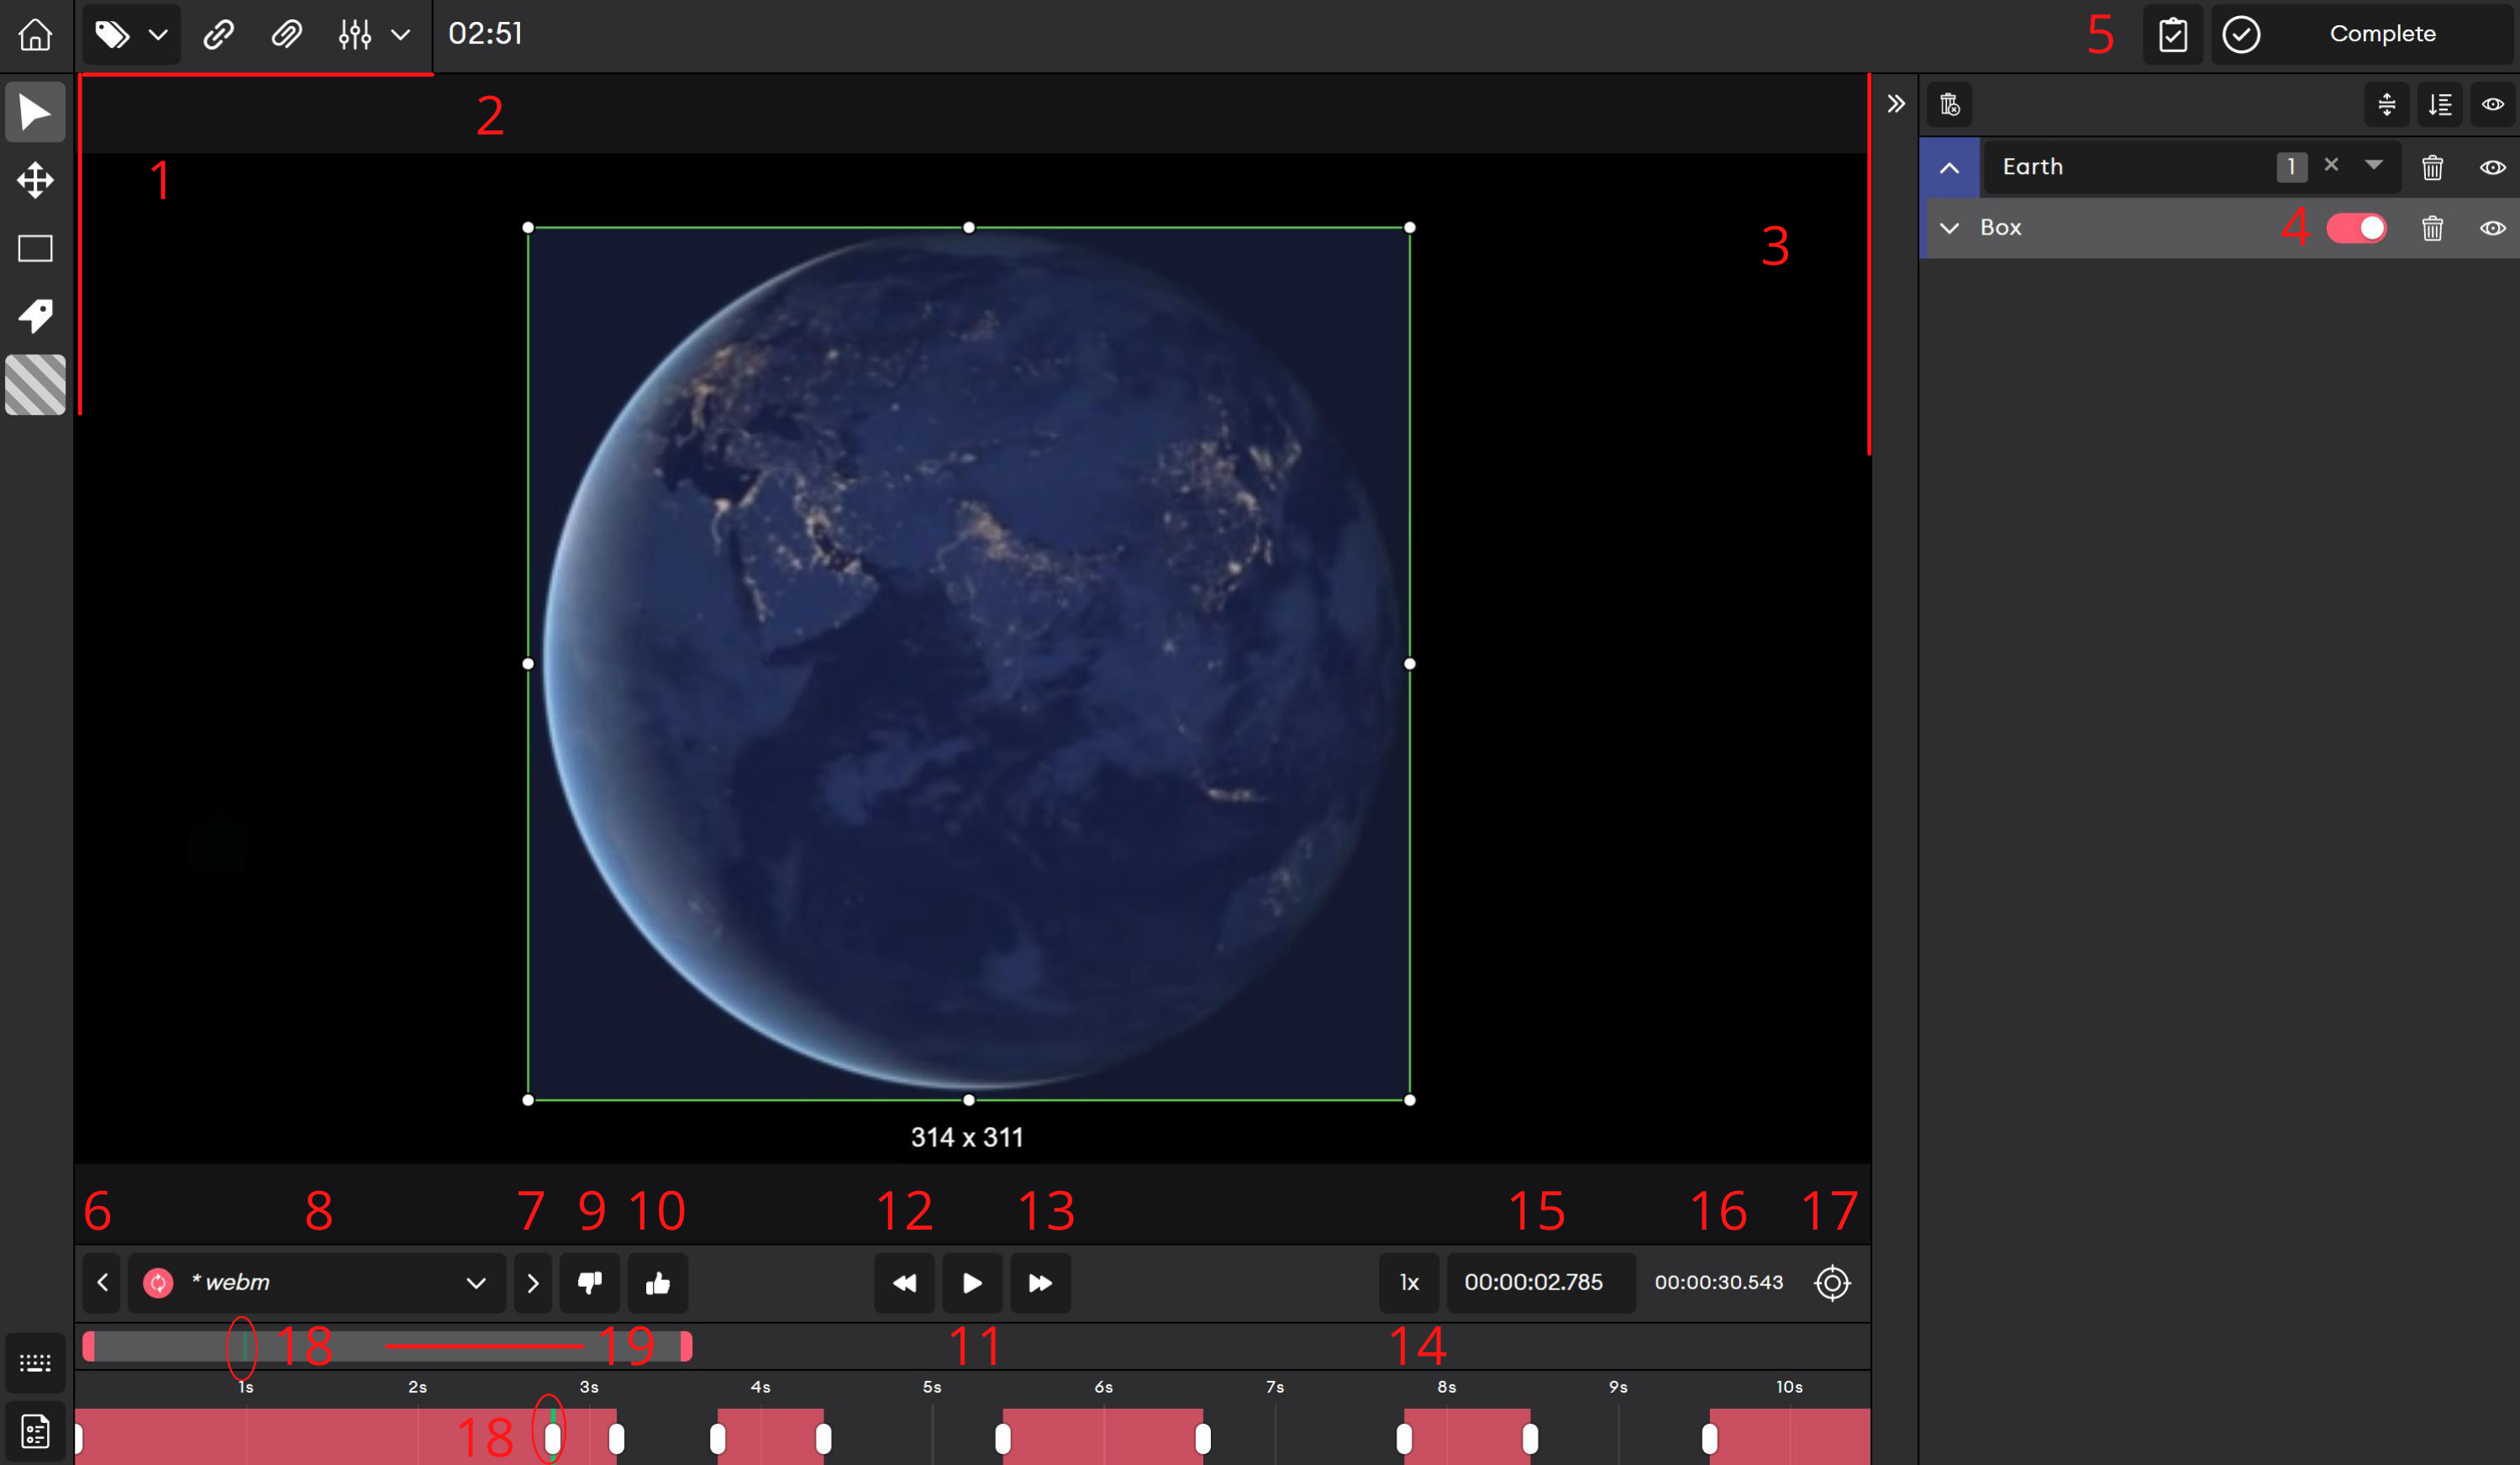
Meet the video editor
Once you get to know the basic functionalities, you’ll be ready to make the best of the video editor.

Tool | Description |
|---|---|
1 | Tools panel |
2 | Time spent in the editor per user |
3 | Instances panel (referred to as the right panel throughout the documentation) |
4 | Interpolation toggle |
5 | Status change |
6 | Switch to the previous video |
7 | Switch to the next video |
8 | List of videos in the project |
9 | Disapprove video |
10 | Approve video |
11 | Play/Pause video |
12 | Jump 1 second backward |
13 | Jump 1 second forward |
14 | Video speed |
15 | Jump to X timestamp |
16 | Total duration of the video |
17 | Go to current time |
18 | The green lines shows the current time |
19 | Timeline. Resize it by dragging the slider to change the unit of measurement of the video duration. |
Create an instance
You can only annotate using bounding boxes in the video editor.
To create a bounding box, select the bounding box icon in the left panel or press X.
When you create an instance, it will be applied to the frame where you created the instance and onwards.
To limit your instance to a certain frame:
- Draw a bounding box. The instance will be interpolated till the end of the video.
- Pause the video where you want your instance to end.
- In the right panel, turn off the interpolation toggle that corresponds to the instance.
Learn more about annotating in the video editor here.
A white icon appears on the timeline whenever you change the location of an instance. The icon is located at the point in time where you made the change.
Approve/Disapprove video
- To approve a video, select the thumbs up icon in the bottom panel.
- To disapprove a video, select the thumbs down icon in the bottom panel.
- Only Team Admins, Team Owners, Project Admins, and Customers can approve and disapprove videos.
- Annotators and QAs cannot approve or disapprove videos.
- You cannot approve or disapprove frames or instances.
- The status of a video does not change after it is approved or disapproved.
Assign class and attribute
You can assign a class/attribute to an instance in three ways:
Method 1: Right-click on an instance and choose a class/attribute from the drop-down menu.
Method 2: Select an instance and choose a class/attribute from the drop-down menu in the right panel.
Method 3: You can assign a class to an instance before annotating it. Follow these steps:
- In the left panel, select the class selection tool.
- Choose a class.
- Annotate the instance.
The same instance (bounding box) can have multiple attributes.
To assign multiple attributes to the same instance:
- Assign an attribute to an instance.
- Pause the video where you want to add a new attribute.
- Add a new attribute. The new attribute will be interpolated till the end of the video.
- Pause the video where you want the new attribute to end. You can choose to add a new attribute or turn off the interpolation toggle.
A white icon appears on the timeline whenever you add a new attribute to an instance. The icon is located at the point in time where you added the attribute.
Queries
Save query
- Select the hamburger icon in the input field.
- Select Save query.
- Enter a query name.
- Save.
Edit query
- In the top panel, select the bookmark icon.
- Hover over the query you want to edit.
- Select the edit icon.
- Change the name or the query, or both.
- Save.
See saved queries list
To see a list of your saved queries, select the bookmark icon in the top panel.
Viewers with the dataset’s public link cannot see save queries.
Delete query
Method 1:
- In the top panel, select the bookmark icon.
- Hover over the query you want to delete.
- Select the delete icon.
Method 2:
- In the top panel, select the bookmark icon.
- Hover over the query you want to delete.
- Select the edit icon.
- Delete.
Permissions
Project contributors that have access to the explore feature can view, edit, and delete queries.
What do you think of the updates? We’d love to hear your feedback.
We have a blog. Follow us to stay updated.