Annotation
There are five types of instances in the Video or Audio Editor: Bounding Boxes, Polygon, Polyline, Point, and Event. Use Events to annotate conditions such as weather or noise.
To move around an image while annotating, you can click and hold the scroll wheel and move the mouse, or you can use the
W,A,S, andDkeys on the keyboard. PressWandSto go up and down, and pressAandDto go left and right.
Bounding Box
Create Bounding Box
To add a Bounding Box:
- In the left panel, select the Bounding Box tool or press
Xon the keyboard. - Draw a Bounding Box.
When you add a Bounding Box, it will be added to a number of frames starting from where it was created.
To limit a Bounding Box to a specific timeframe:
- Select the Bounding Box.
- Hover over the first or last keyframe of any instance.
- Drag the keyframe to the left or the right to resize the instance.
Add instance section
A Bounding Box can have multiple sections on a timeline. To add a section of a Bounding Box, click where you want to add it on the timeline and click the + button next to the instance in the right panel.
A white icon appears on the timeline whenever you change the location of an instance. The icon is located at the point in time where you made the change.
Delete Bounding Box
To delete a Bounding Box:
- Select the instance.
- Press the
Backspaceor theDeletekeys on the keyboard.
Polygon
Create Polygon
To create a Polygon:
- In the left panel, right-click on the Bounding Box and select Polygon or press
Zon the keyboard. - Click where you want to start outlining the object.
- Outline the object using clicks.
- Finish the annotation by clicking the starting point.
When you add a Polygon, it will be added to a number of frames starting from where it was created.
To limit a Polygon to a specific timeframe:
- Select the Polygon.
- Hover over the first or last keyframe of any instance.
- Drag the keyframe to the left or the right to resize the instance.
Add instance section
A Polygon can have multiple sections. To add a section of a Polygon, click where you want to add it on the timeline and click the + button next to the instance in the right panel.
Edit Polygon
You can add points and remove points.
To add a point, click anywhere on the Polygon's border.
To reshape a point on the Polygon, you can click and drag it.
To reshape a Polygon by multiple points:
- Select the Polygon you want to reshape.
Ctrl + left-clickand drag to select points in an area, or useCtrl + left-clickto select multiple points on the Polygon individually.- Click and drag one of the points to reshape the selection.
Remove a point
To remove a single point on a polygon:
- Click on the corresponding polygon.
Shift + Double clickon the point you want to remove.
Delete Polygon
To delete a Polygon:
- Select the instance.
- Press the
Backspaceor theDeletekeys on the keyboard.
Polyline
Create Polyline
To create a Polyline:
- In the left panel, right-click on the Bounding Box and select Polyline or press
Lon the keyboard. - Click where you want to start outlining the object. If you want to annotate an irregular shape, you need to create multiple lines that are connected to each other. In this case, you can click to start a new line that goes in a different direction.
- Finish the annotation by double-clicking.
When you add a Polyline, it will be added to a number of frames starting from where it was created.
To limit a Polyline to a specific timeframe:
- Select the Polyline.
- Hover over the first or last keyframe of any instance.
- Drag the keyframe to the left or the right to resize the instance.
Add instance section
A Polyline can have multiple sections. To add a section of a Polyline, click where you want to add it on the timeline and click the + button next to the instance in the right panel.
Edit Polyline
You can add points and remove points.
To add a point, click anywhere on the Polyline.
Remove a point
To remove a single point on a polyline:
- Click on the corresponding polyline.
Shift + Double clickon the point you want to remove.
Delete Polyline
To delete a Polyline:
- Select the instance.
- Press the
Backspaceor theDeletekeys on the keyboard.
Point label
Add point label
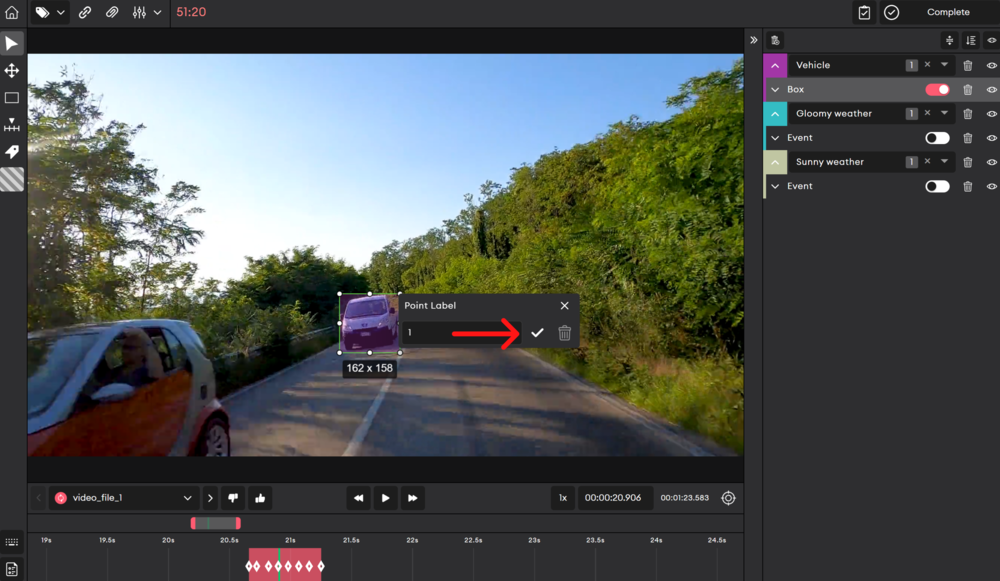
To add a point label:
- Select a Bounding Box.
- Right-click on a point.
- Type a name.
- Click the checkmark.
A white icon appears on the timeline whenever you add a point label to an instance. The icon is located at the point in time where you added the point label.
Delete point label
There are 2 ways to delete a point label:
Method 1:
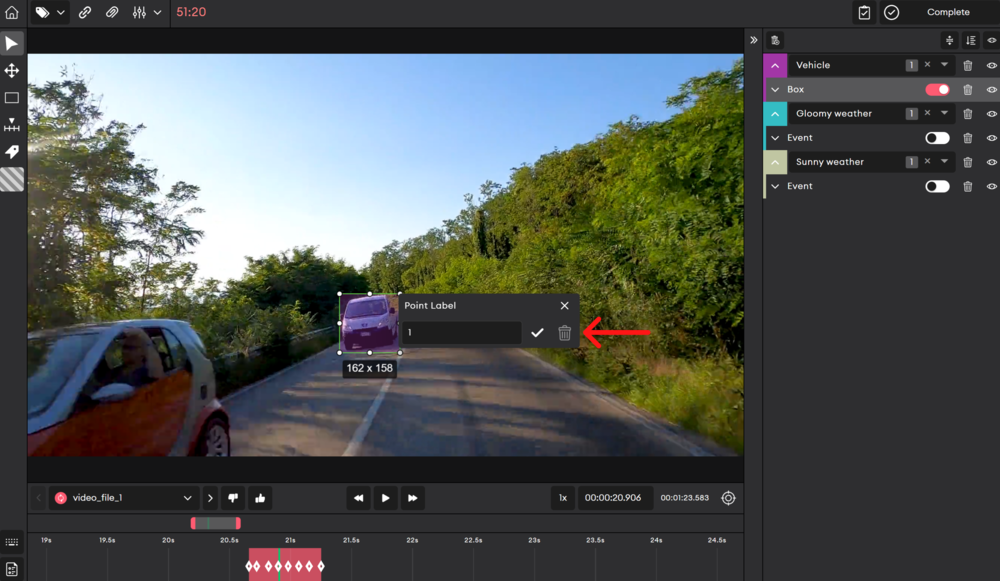
- Select an instance.
- Right-click on a point.
- Click the delete button.
Method 2:
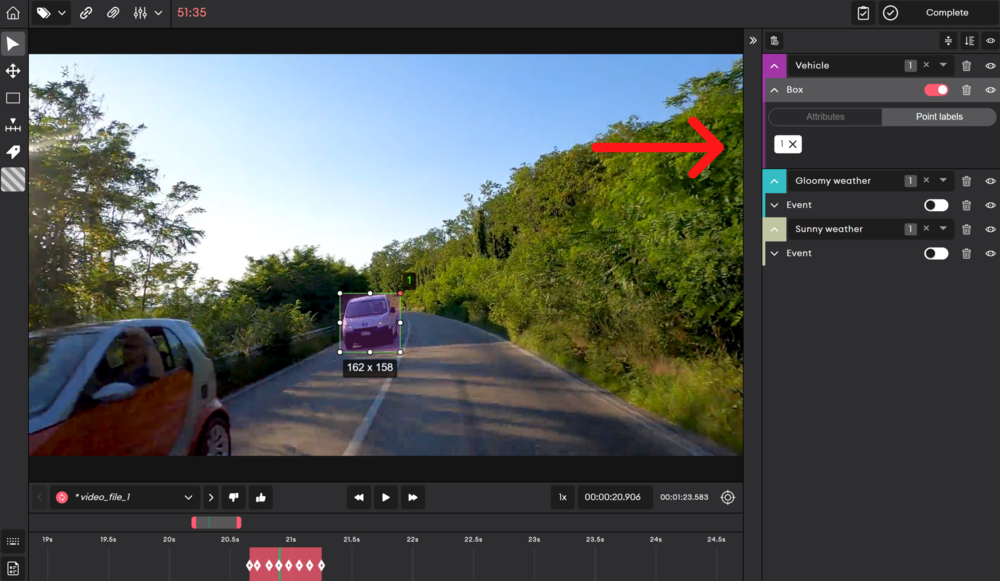
- Find the instance in the right panel and expand it.
- Click Point labels.
- Delete the point label(s) you want.
Point
Add Point
To add a Point:
- In the left panel, select the Point tool or press
Pon the keyboard. - Click where you want to add the Point.
When you add a Point, it will be added to the frame where you created it and some of the few following frames.
To limit a Point to a specific timeframe:
- Select the Point.
- Hover over the first or last keyframe of any instance.
- Drag the keyframe to the left or the right to resize the instance.
To make an instance section shorter on the timeframe:
- Select the instance.
- Select the point in the timeframe where you want the instance section to end.
- Press the
BackspaceorDeletekeys on the keyboard.
Add instance section
A Point can have multiple sections. To add a section of a Point, click where you want to add it on the timeline and click the + button next to the instance in the right panel or press I on the keyboard.
A white icon appears on the timeline whenever you change the location of an instance. The icon is located at the point in time where you made the change.
Delete Point
To delete a Point:
- Find the instance in the right panel.
- Click the corresponding Delete button.
To delete all the instances in an item:
- In the right panel, click the delete button.
- In the popup, choose Yes.
Split object
You can split an object into two objects from the timeline. This will help you correct annotations.
To split an object:
- Select the object you want to split.
- On the timeline, right-click where you want the object to be split.
- Click Split object or press
/on the keyboard.
The object will be divided into two separate instances, placed on the right and left of the green line.
About the new object
- The creation time is when the object was split.
- It inherits all the properties of the split object. For example, class, attributes and position.
Split section
You can split an object’s section on the timeline.
To split a section:
- Select the object you want to split.
- Hover over the timeline to line up the green line where you want to split.
- Right-click on the timeline and click Split section, or press
\on the keyboard.
When you hover over the timeline, you will see a green line indicator. When you split the section into two, the divided sections will be placed on either side of the green line.
Event
Use Events when you want to detect a condition, not an object, such as weather. For example, you can’t use Bounding Boxes to classify snow, rain, or fog. That’s a case where you need to use Events.
You can also use Events when the location of your object isn’t necessary. For instance, if you need to indicate that there are people in a room, but you don’t want to track them, you can use Events instead of Bounding Boxes.
Create Event
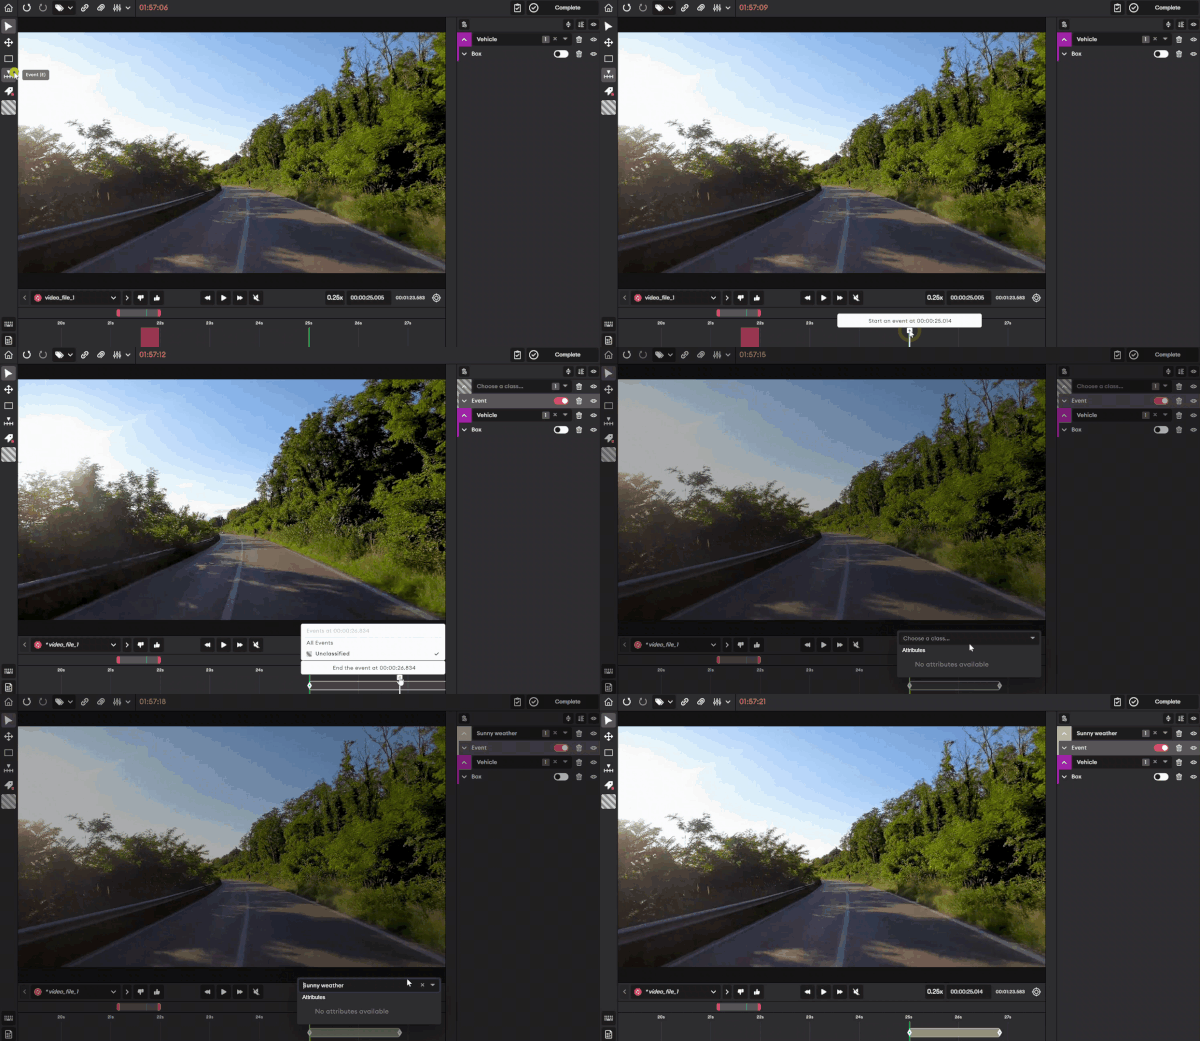
To add an Event:
- In the left panel, select the Event tool or press
Eon the keyboard. - Hover over the timeline and place the cursor where you want the Event to start.
- Click on the + button to add the event to the timeline.
To add an Event with a specific time frame:
- In the left panel, select the Event tool, or press
Eon the keyboard. - Hover over the timeline and place the cursor where you want the Event to start.
- Click and drag the time frame you want to highlight with this Event.
To add an Event or a section in the timeline, you can also press I on the keyboard.
To modify the timeframe of an Event:
- Select the Event on the timeline.
- Hover over the first or last keyframe.
- Drag the keyframe to the left or the right to resize the Event.
Add instance section
An Event can have multiple sections. To add a section of an Event, click where you want to add it on the timeline and click the + button next to the instance in the right panel.
View Events
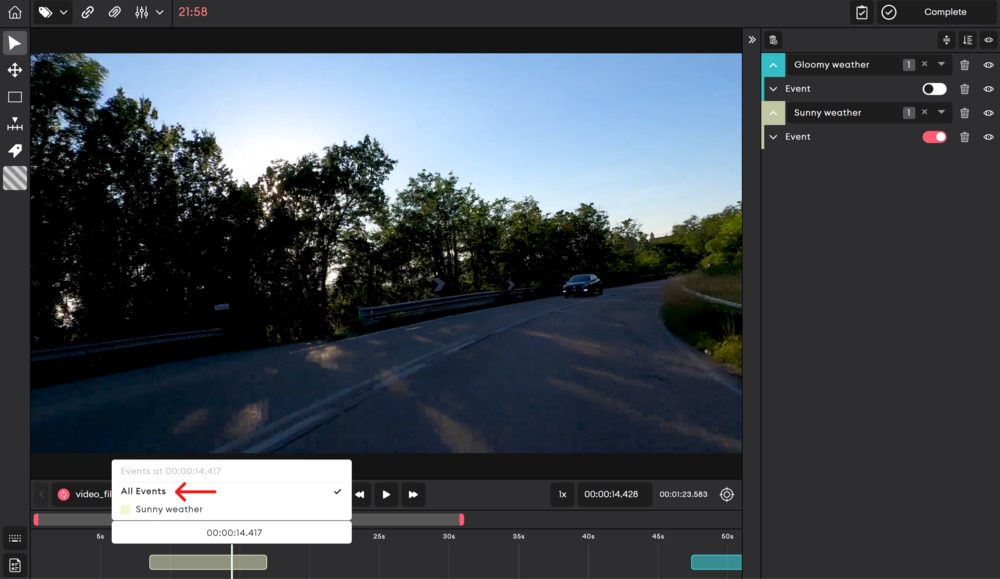
To view all the Events:
- Hover over any Event on the timeline.
- Click All Events.
The list shows all the Events that appear at the mentioned time. In the image above, the Event that appears in the list is “Sunny weather” because it is the only Event that is present at 00:00:14.417.
When you click All Events, you’ll be able to see all the Events on the timeline in addition to the Bounding Boxes.
Edit Event
To edit an Event:
- Right-click on the Event.
- Edit the class/attribute(s).
Delete Event
To delete an Event:
- In the right panel, find the Event.
- Click its corresponding delete button.
To delete the Events that have the same class:
- In the right panel, find the class whose Events you want to delete.
- Click the delete button next to the class.
To delete all the Events:
- At the top of the right panel, click the delete button.
- In the popup, choose Yes.
Navigate layered instances
If you want to select an instance that is overlapped by a number of other, larger layers, you can hold down the Alt key on the keyboard and left-click on the layer. It will select the top layer first, then clicking again will select the next layer below. Keep clicking this way until you reach the layer you want.
Group instances
You can add multiple instances to a single group to indicate that several instances belong to one object. For example, you can group all instances of limbs that belong to one person.
There are 3 methods to group instances.
Method 1
- When in the Video Editor, select one or multiple instances.
- Right click on them to open a pop-up.
- Go to the Group tab.
- Under Group ID, you can assign the instance(s) to an existing group. To create a new group instead, click the + button or type a unique name in the field and press
Enteron the keyboard.
Method 2
- When in the Video Editor, select an instance.
- In the right panel, find the instance and expand it.
- Go to the Group tab.
- Under Group ID, you can assign the instance(s) to an existing group. To create a new group instead, click the + button or type a unique name in the field and press
Enteron the keyboard.
With this method, you can only add instances to a group one at a time.
Method 3
- When in the Video Editor, select one or multiple instances.
- Use the shortcut
Ctrl + Gto automatically assign them to a new group.
Ungroup instances
There are 3 ways to ungroup instances.
Method 1
- Select the instances you want to ungroup.
- Right click on them to open a pop-up.
- Go to the Group tab.
- Click X next to the group name.
Method 2
- Select the instance you want to ungroup.
- In the right panel, expand the instance.
- Go to the Group tab.
- Click X next to the group name.
Method 3
- Select the instances you want to ungroup.
- Use the shortcut
Ctrl + Shift + G.
- Instances can be filtered by group to be viewed separately.
- Pressing
Shift + Gcan show/hide Group ID labels.
Stretch instance
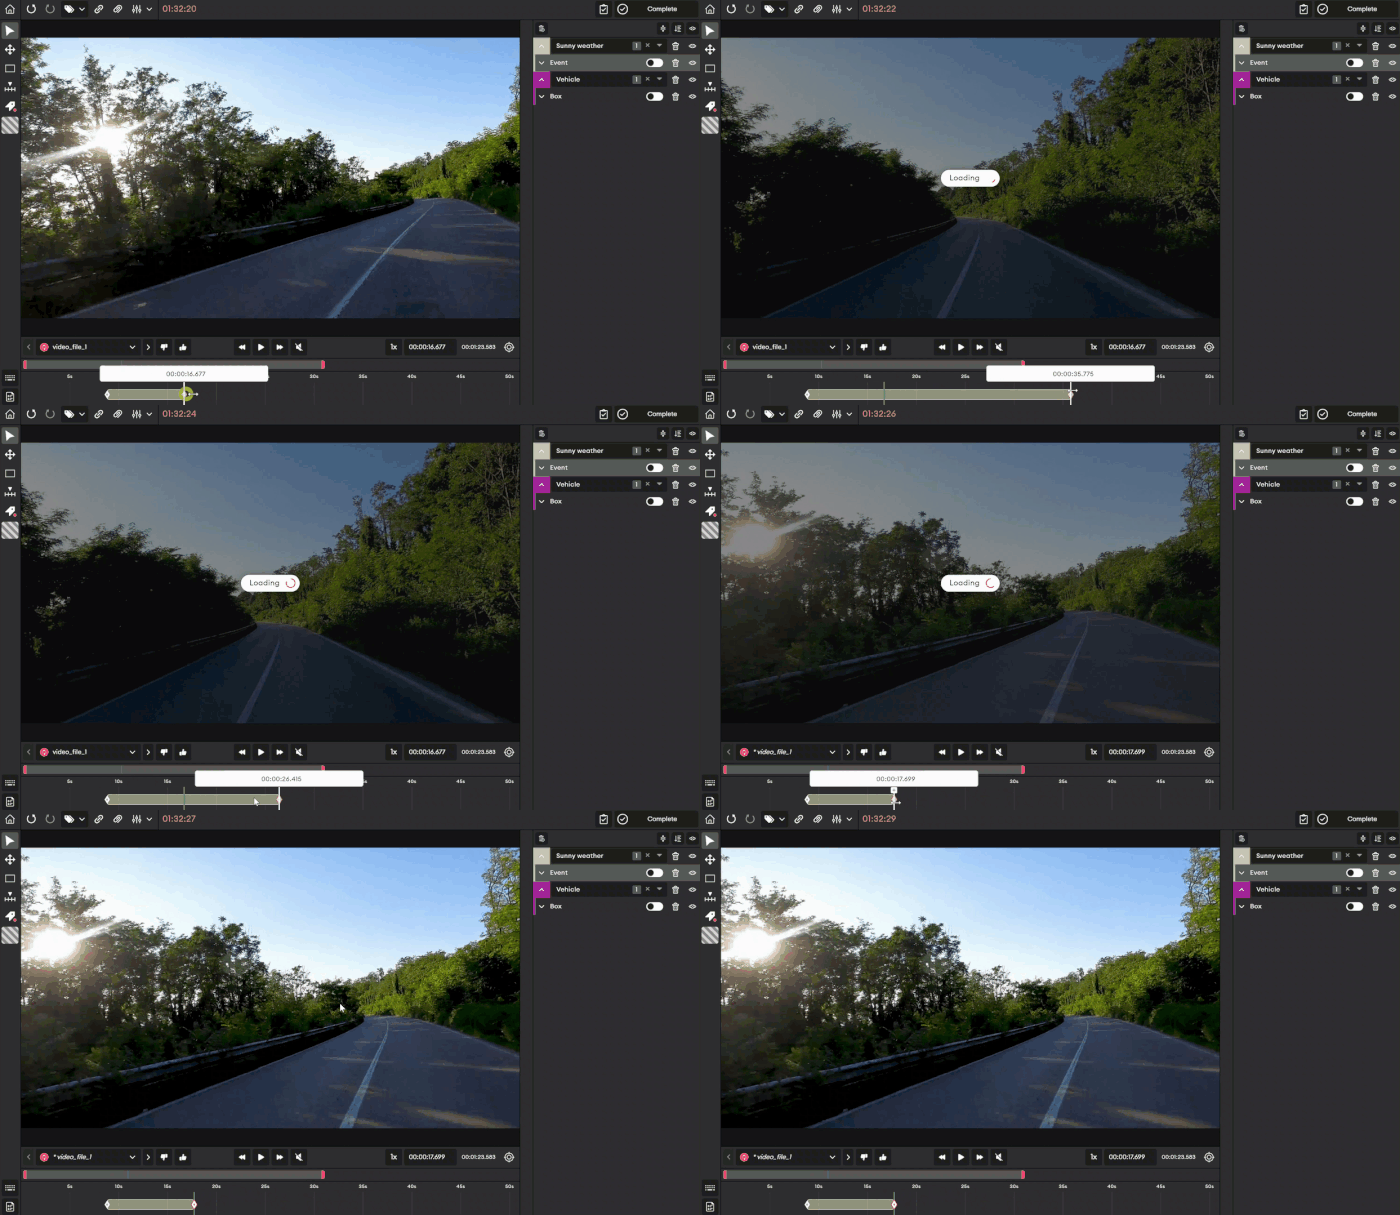
To stretch a Bounding Box or Event on the timeline:
- Select an instance in the right panel or double-click on the instance in the timeline.
- Hover over the first or last keyframe of any instance.
- Drag the keyframe to the left or the right to resize the instance.
You can’t drag a keyframe over another keyframe.
You can drag a keyframe inside an instance to change its timestamp.
Keyframes
Keyframes are the diamond icons on either end of an instance, as viewed in the bottom panel. They indicate that a modification has been made to an instance. This modification can be adding one or multiple attributes, changing the location of the instance, and changing the size of the instance.
When an attribute is added to a keyframe, the keyframe will show as a circle icon, and the attribute will be applied to the event up until the next keyframe (or the end of the event, if there are no other keyframes in between).
Jump between the keyframes of an instance
To jump between the keyframes of an instance:
- Select one or multiple instances.
- Press
Shift + →on the keyboard to go to the next keyframe andShift + ←to go to the previous keyframe.
The shortcut doesn’t work if the instance is hidden.
Delete keyframe
To delete a keyframe:
- Select a keyframe.
- Press the
Deleteor theBackspacekeys on the keyboard.
- You can’t delete the first and last keyframes of an instance.
- When you delete a keyframe, any associated changes made (moving an instance, adding an attribute to the keyframe, etc.) will also be deleted.
Zoom in/out video timeline
To zoom in the timeline, place your cursor on the timeline and scroll up your mouse wheel or swipe up on your touchpad.
To zoom out the timeline, place your cursor on the timeline and scroll down your mouse wheel or swipe down on your touchpad.
Custom object creation length
When creating an object, it will span the full length of seconds or frames of the video. You can set a custom maximum value for this:
- In the Video editor, click on Settings to open the dropdown.
- Next to Object creation, type in a value.
To remove the maximum value limit, delete the input value you had typed in.
Custom time length to jump forward and backward
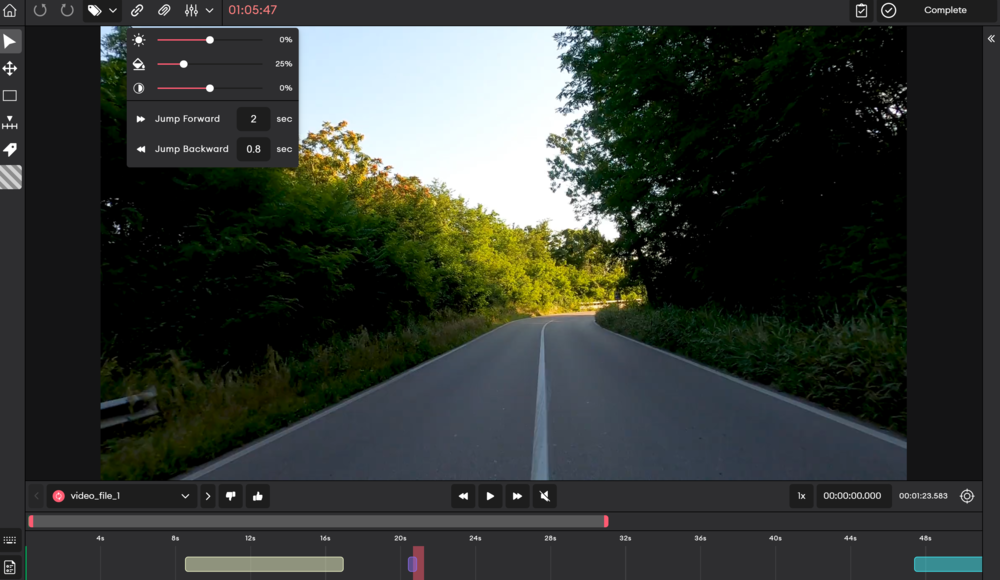
To adjust the time length to jump forward or backward:
- In the top panel of the Video or Audio Editor, click the settings button.
- Type a number in the boxes corresponding to Jump forward and Jump backward. You can type decimals.
- Click outside the dropdown menu to apply the changes.
Updated 10 months ago