Classes
Classes are a way to identify your items and instances, and categorize them further by using Attributes.
You can create three types of classes:
- Object – a class which is used for object instances.
- Tag – used to classify items as a whole.
- Relationship – a class that allows you to link instances together by further classifying their correlation.
You can create and manage classes and attributes by going to the Classes section of the Setup tab. You can find this under FineTune in the left panel.
Create classes and attributes
To create a class:
- Click + New Class.
- Type in a class name in the field.
- On the right, choose an option: Object, Tag, or Relationship.
- Create an attribute group (Optional).
- Click Save.
Creating an attribute group:
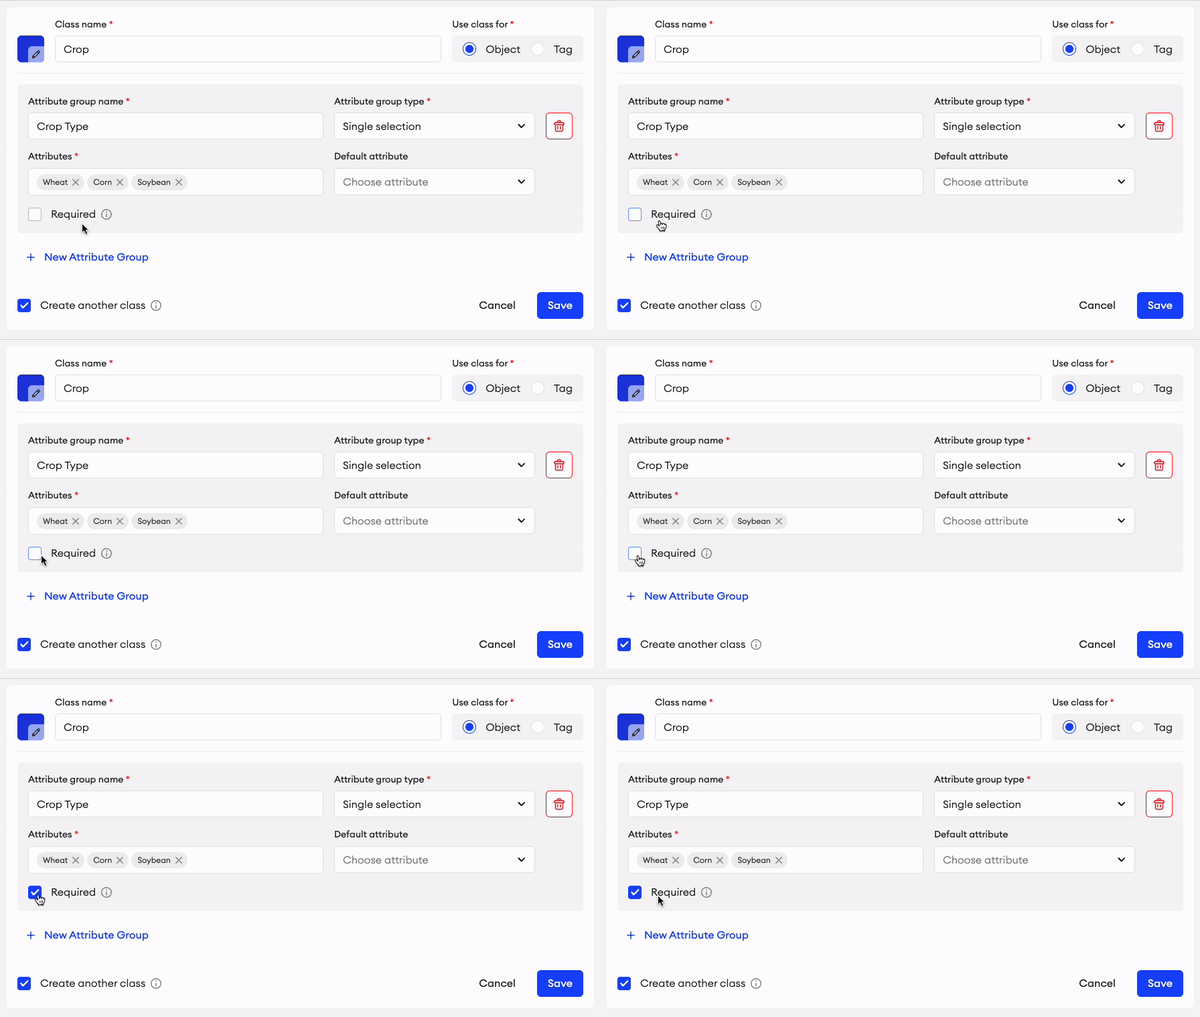
- When setting up your class, click + New Attribute Group.
- Type in a name for your attribute group.
- Select the attribute group type from the dropdown:
- Single selection: A list of attributes that you can select one from.
- Multiple selection: A list of attributes that you can select multiple options from.
- Text input: A field that requires manual text input.
- OCR input: A field that works with Magic Box and allows manual text input. Usable with Objects only.
- Numeric input: A field that requires manual numeric input.
- Add one or multiple attributes by typing their names in the Attributes field.
- You may choose a default attribute which will be selected when assigning the class (optional).
- For Image and Text projects, you may choose to make the attribute group a mandatory field by checking the Required box to ensure that no important attributes will be missed during the annotation stage (optional).
- Click Save.
Character limitationThe character limit for the Text input and OCR attribute group types is 3000.

About required attributes
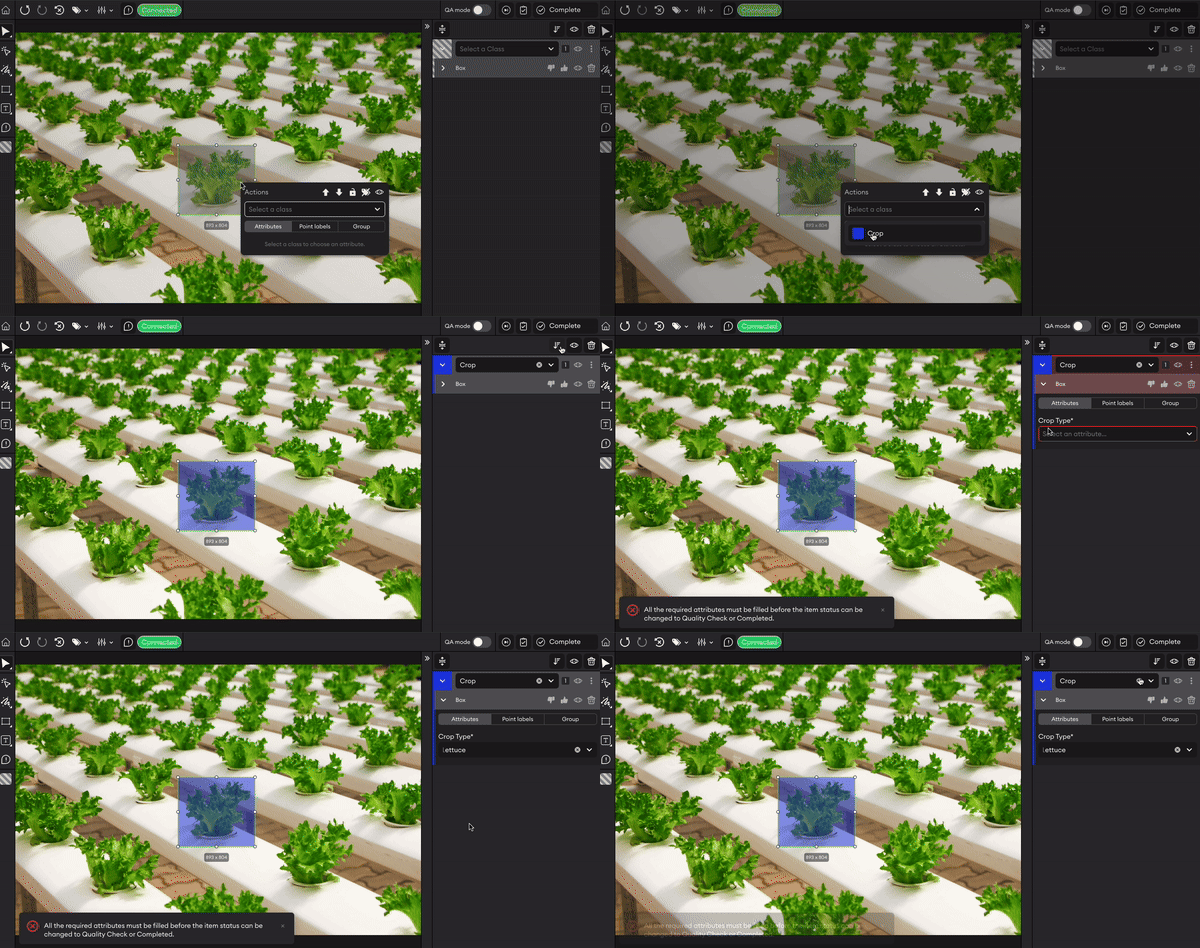
- Required attribute groups must be given a value before the item can proceed to Quality Check or be set to Completed.
- You may check or uncheck the Required box of an attribute group after it’s already been created. If you make the attribute group Required after it has been used in an item, when editing that item, you must fill in the required attributes in order to submit the annotation.
- You can still complete items with empty attribute group values if you do from the Explore tab.
- Users with the role of Project Admin or higher can complete items even if a required attribute field is left empty.

Deleting an attribute group:
- In the Classes tab, find the class that contains the attribute group you want to delete.
- Click Edit.
- Find the attribute group and click the corresponding Delete button.
- Click Save.
Import classes
There are two methods you can use to import pre-established classes: From computer and From existing project.
To import classes from your computer:
- When in Classes, click Upload.
- Select Upload from computer.
- Click Choose file or drag and drop the JSON file for your classes.
To import classes from an existing project:
- Click Upload.
- Select From existing project.
- Choose the project you want to import classes from.
- Click Import.
Edit or reorder classes
You can edit classes after they’ve been created or imported, including any attributes they might have.
To edit a class:
- In the Classes tab, find the class you want to edit.
- Click the Edit button.
- Make your necessary changes and click Save.
To reorder classes:
- Click Reorder above the list of classes.
- You can choose from Reverse order or Custom order.
- If you select Custom order, you will see a pop-up.
- In the pop-up, click and drag classes by the reorder button
⋮⋮. You can also click Move to top to send a class to the top of the list. - When you’re done, click Save.
Delete classes or attributes
To delete classes:
- In the Classes tab, find the class you want to delete.
- To delete the class, click the corresponding Delete button.
To delete a class’s attributes:
- Find the class you want to delete the attributes of.
- Click the Edit button.
- You can delete an attribute group by clicking the corresponding Delete button. If you only want to delete attributes within an attribute group, then you can click the X button next to the attribute name.
- Click Save.
- If the class is assigned to an instance, the instance will become unclassified.
- If the class is assigned to an item, it will be removed from that item entirely.
JSON file of imported classes
{
      "name": "Dog",
      "color": "#4e7b3a",
      "type": "object",
      "attribute_groups": [
        {
          "name": "Position",
          "group_type": radio,
          "attributes": [
            {
              "name": "Labrador"
            }
          ]
        }
      ]
    }
Description:
- "name": string - Class Name.
- "color": string - Class’s hex color code (e.g. #000000).
- "type": string - Class type. It could either be
objectortag. - "attribute_groups": array of objects - List of all the attributes:
- "name": string - Attribute Name.
- "group_types": The values can be:
radio,checklist,text, ornumeric. Learn more. - "attributes": array - List of attributes.
- "name": string - Attribute name.
More on "group_type"
- This key is not required.
- If it’s missing, then the key will have the
radiovalue after being uploaded.- The values
textandnumericare invalid for Image (Legacy) Projects.- The JSON will be considered invalid if:
- The group_type value is incorrect.
- If the attribute group type is
radioorchecklist, and the attributes list is missing.- If the attribute type is
textandnumeric, the attributes list isn't required. If anything else is specified, then it’ll be ignored.
JSON file of exported classes
{
      "id": 1006843,
      "project_id": 72432,
      "name": "Cat",
      "color": "#bc1616",
      "type": "object",
      "createdAt": "2022-01-04T22:44:49.000Z",
      "updatedAt": "2022-01-05T00:13:11.000Z",
      "attribute_groups": [
        {
          "id": 214061,
          "class_id": 1006843,
          "name": "Breed",
          "group_type": 0,
          "createdAt": "2022-01-05T00:09:12.000Z",
          "updatedAt": "2022-01-05T00:09:28.000Z",
          "attributes": [
            {
              "id": 1142810,
              "group_id": 214061,
              "project_id": 72432,
              "name": "British Shorthair",
       "count": 0,
              "createdAt": "2022-01-05T00:09:31.000Z",
              "updatedAt": "2022-01-05T00:09:31.000Z"
            }
          ]
        }
      ]
    }
Description:
- "id": integer - Class ID.
- "project_id": integer - Project ID.
- "name": string - Class Name.
- "color": string - Class’s hex color code (e.g. #000000).
- "type": string - Class type. It could either be
objectortag. - "createdAt": string - The time the class was created.
- "updatedAt": string - The last time a user updated the class.
- "attribute_groups": array of objects - List of all the attributes:
- "id": integer - Group ID.
- "class_id": integer - Class ID (must be the same as “id”).
- “name”: string - Attribute Name.
- “group_type”: string.
checklist- for multiple selection.radio- for single selection.text- for text input.ocr- for OCR input.numeric- for numeric input.
- "createdAt": string - The time the attribute group was created.
- "updatedAt": string - The last time a user updated the attribute group.
- "attributes": array of objects - List of attribute values:
- "id": integer - Attribute value ID.
- "group_id": integer - Group ID (must be the same as “id”).
- "project_id": integer - Project ID.
- "name": string - Attribute value.
- "count": integer - The number of attributes.
- "createdAt": string - The time the attribute was created.
- "updatedAt": string - The last time a user updated the attribute.
Updated 11 months ago