AWS integration
Create integration
Create an AWS integration with SuperAnnotate to add items from your AWS S3 bucket(s) to SuperAnnotate. SuperAnnotate will have read-only access to your data; your items are stored in your AWS S3 buckets and are only displayed in SuperAnnotate.
Step 1: Begin integration setup
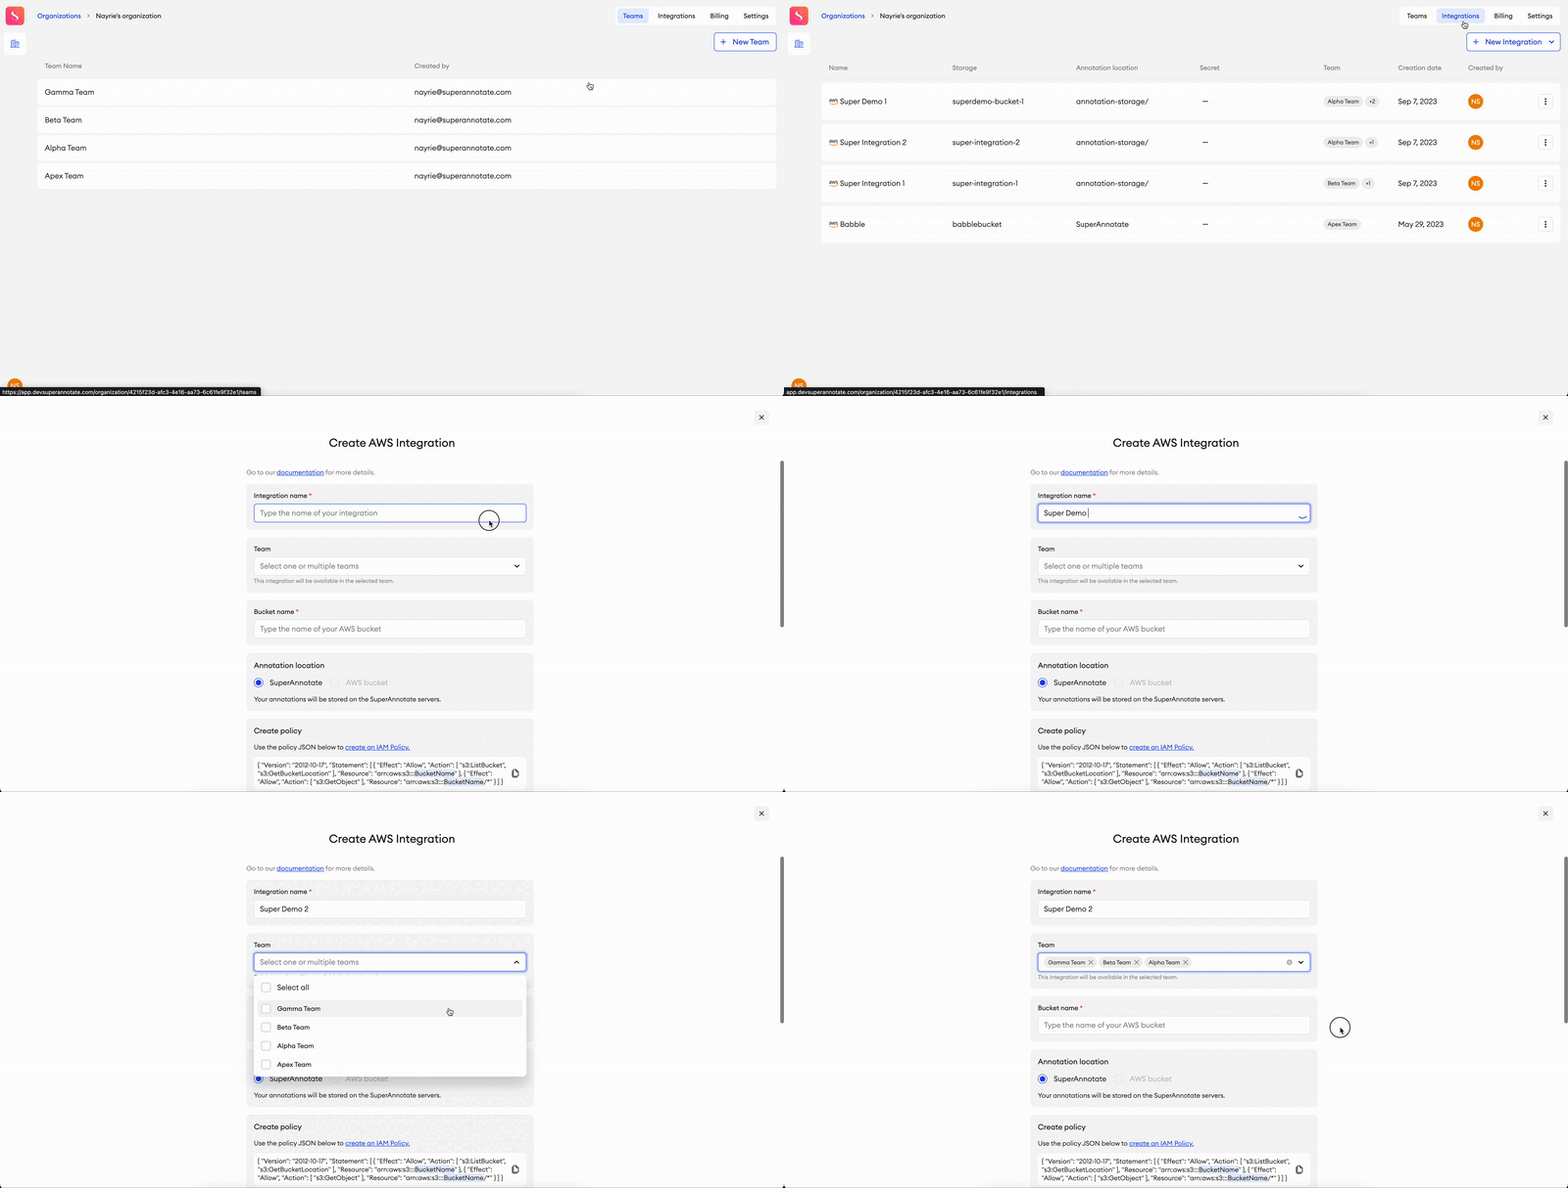
- Click on your Organization.
- Go to the Integrations tab.
- Click New Integration.
- Select AWS.
- In the Create AWS Integration pop-up, type the name of your integration under Integration Name.
- Under Team, you can add the integration to one or multiple teams (optional). The integration will be available in the selected team(s) only.
It is also possible for Team Owners and Team Admins to set up an integration through the Team Setup tab.
- Only Organization Owners can set up an integration from the Organization tab.
Step 2: Generate the policy JSON in SuperAnnotate
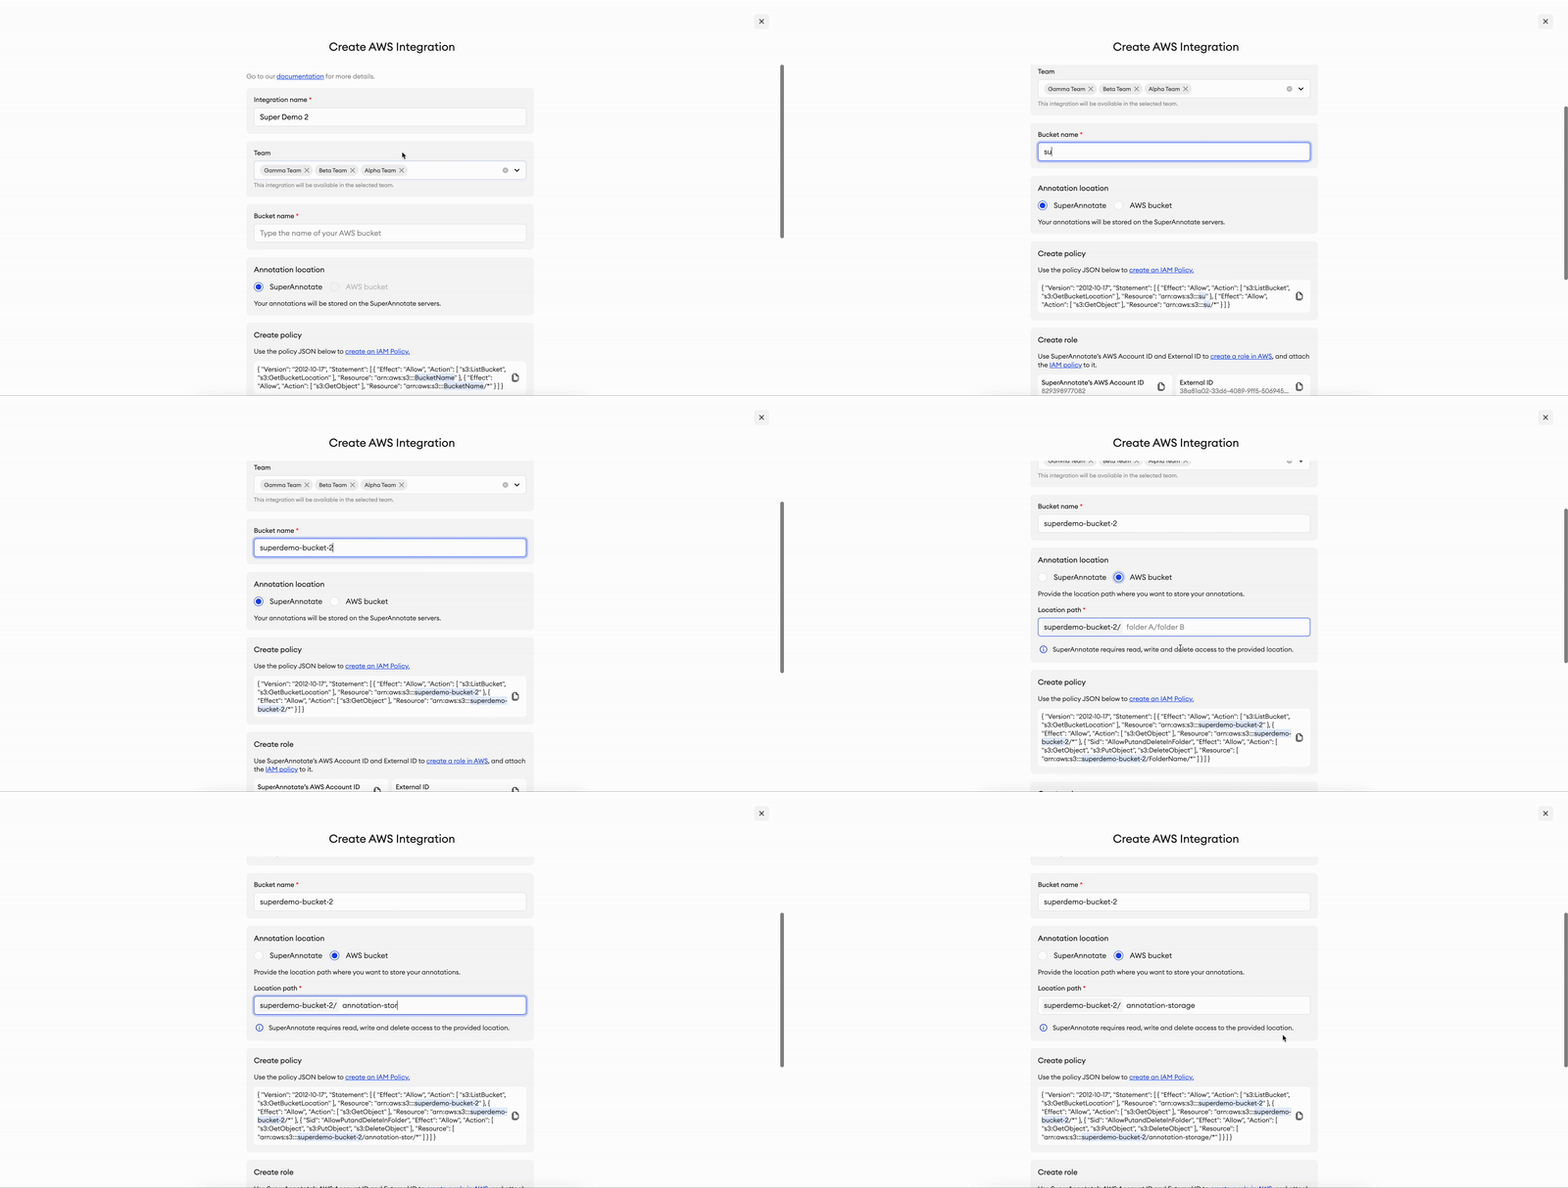
Next, you will need to choose a bucket name and an annotation storage location. These will automatically modify the Create policy JSON, which is required in Step 3.
- Under Bucket name, type in the name of an existing S3 bucket (max 120 characters).
- Choose whether or not Transfer Acceleration is enabled. If you do enable it, be sure that the same setting is enabled on your AWS bucket.
- Choose an Annotation location. This will decide where your annotation data will be stored:
- SuperAnnotate - your annotation data will be stored on our servers.
- AWS bucket - type in the location path where the annotations will be stored. SuperAnnotate requires read, write and delete access to the provided location.
- Choosing an annotation location allows you to maintain an extra level of project privacy and security by ensuring that all annotation data will be stored in a location of your choice. If the provided location doesn’t exist, it will be created when you annotate an item from that bucket. The path to the annotated JSON file will be as follows:
BUCKET_NAME / ANNOTATION_LOCATION / data / TEAM_ID / ANNOTATION_JSON.json- Please note that if your annotation JSON file is too large, it’ll have to be temporarily downloaded and processed to make it available, then deleted after 24 hours. For video projects, this applies to files that exceed 5MB. For other project types, this applies to files that exceed 15MB.
Future upload methods will be defined based on the annotation location type of the chosen integration. Learn more.
The Explore, Insights and Analytics features will be unavailable for any project that uses integrations whose annotations aren’t stored on SuperAnnotate’s servers.
Step 3: Create an IAM policy
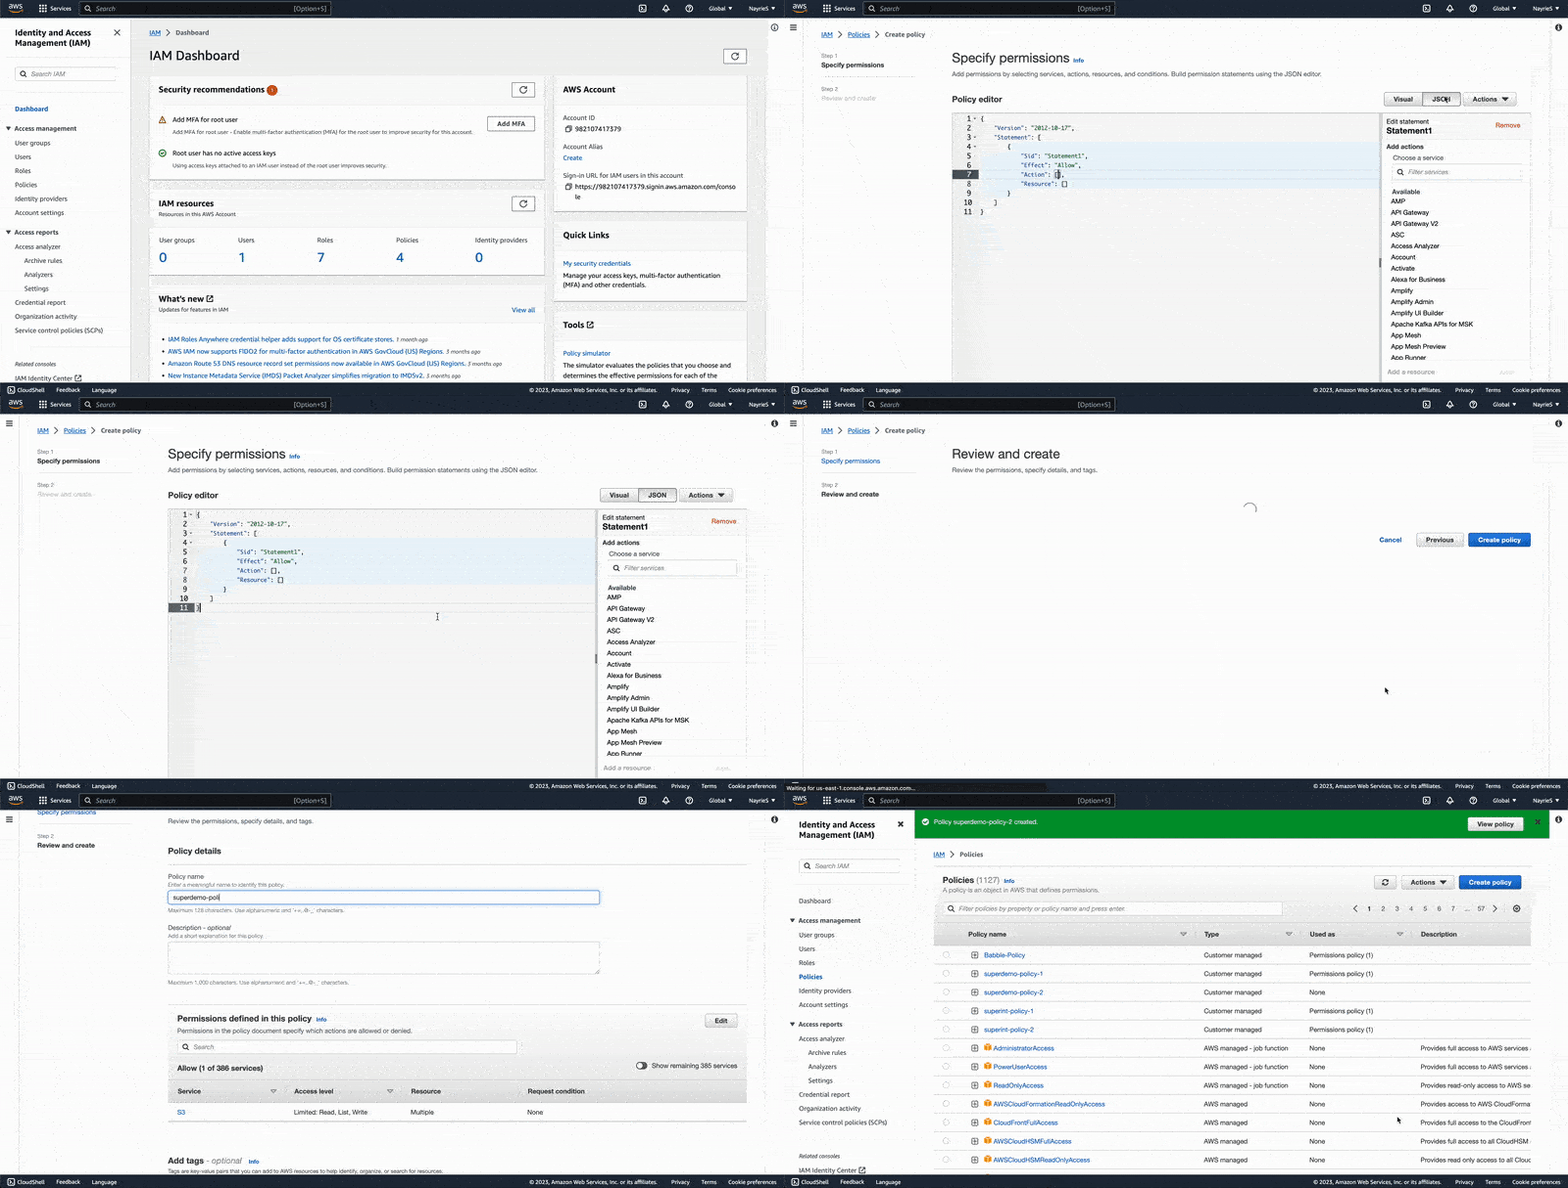
This policy gives SuperAnnotate read-only access to your bucket.
- Go to your IAM console.
- From the left panel, click Policies under Access management.
- In the Policies tab, click Create Policy.
- Go to the JSON tab.
- Replace the existing code with the JSON generated in Step 2.
- Click Next.
- Type in a policy name.
- Click Create policy.
JSON when storing on SuperAnnotate servers
{
    "Version": "2012-10-17",
    "Statement": [
        {
            "Effect": "Allow",
            "Action": [
                "s3:ListBucket",
                "s3:GetBucketLocation"
            ],
            "Resource": "arn:aws:s3:::<bucket_name_here>"
        },
        {
            "Effect": "Allow",
            "Action": [
                "s3:GetObject"
            ],
            "Resource": "arn:aws:s3:::<bucket_name_here>/*"
        }
    ]
}
JSON when storing in the AWS bucket
{
    "Version": "2012-10-17",
    "Statement": [
        {
            "Effect": "Allow",
            "Action": [
                "s3:ListBucket",
                "s3:GetBucketLocation"
            ],
            "Resource": "arn:aws:s3:::<bucket_name_here>"
        },
        {
            "Effect": "Allow",
            "Action": [
                "s3:GetObject"
            ],
            "Resource": "arn:aws:s3:::<bucket_name_here>/*"
        },
        {
            "Sid": "AllowPutandDeleteInFolder",
            "Effect": "Allow",
            "Action": [
                "s3:GetObject",
                "s3:PutObject",
                "s3:DeleteObject"
            ],
            "Resource": [
                "arn:aws:s3:::<bucket_name_here>/<folder_name_here>/*"
            ]
        }
    ]
}
Step 4: Create an AWS role
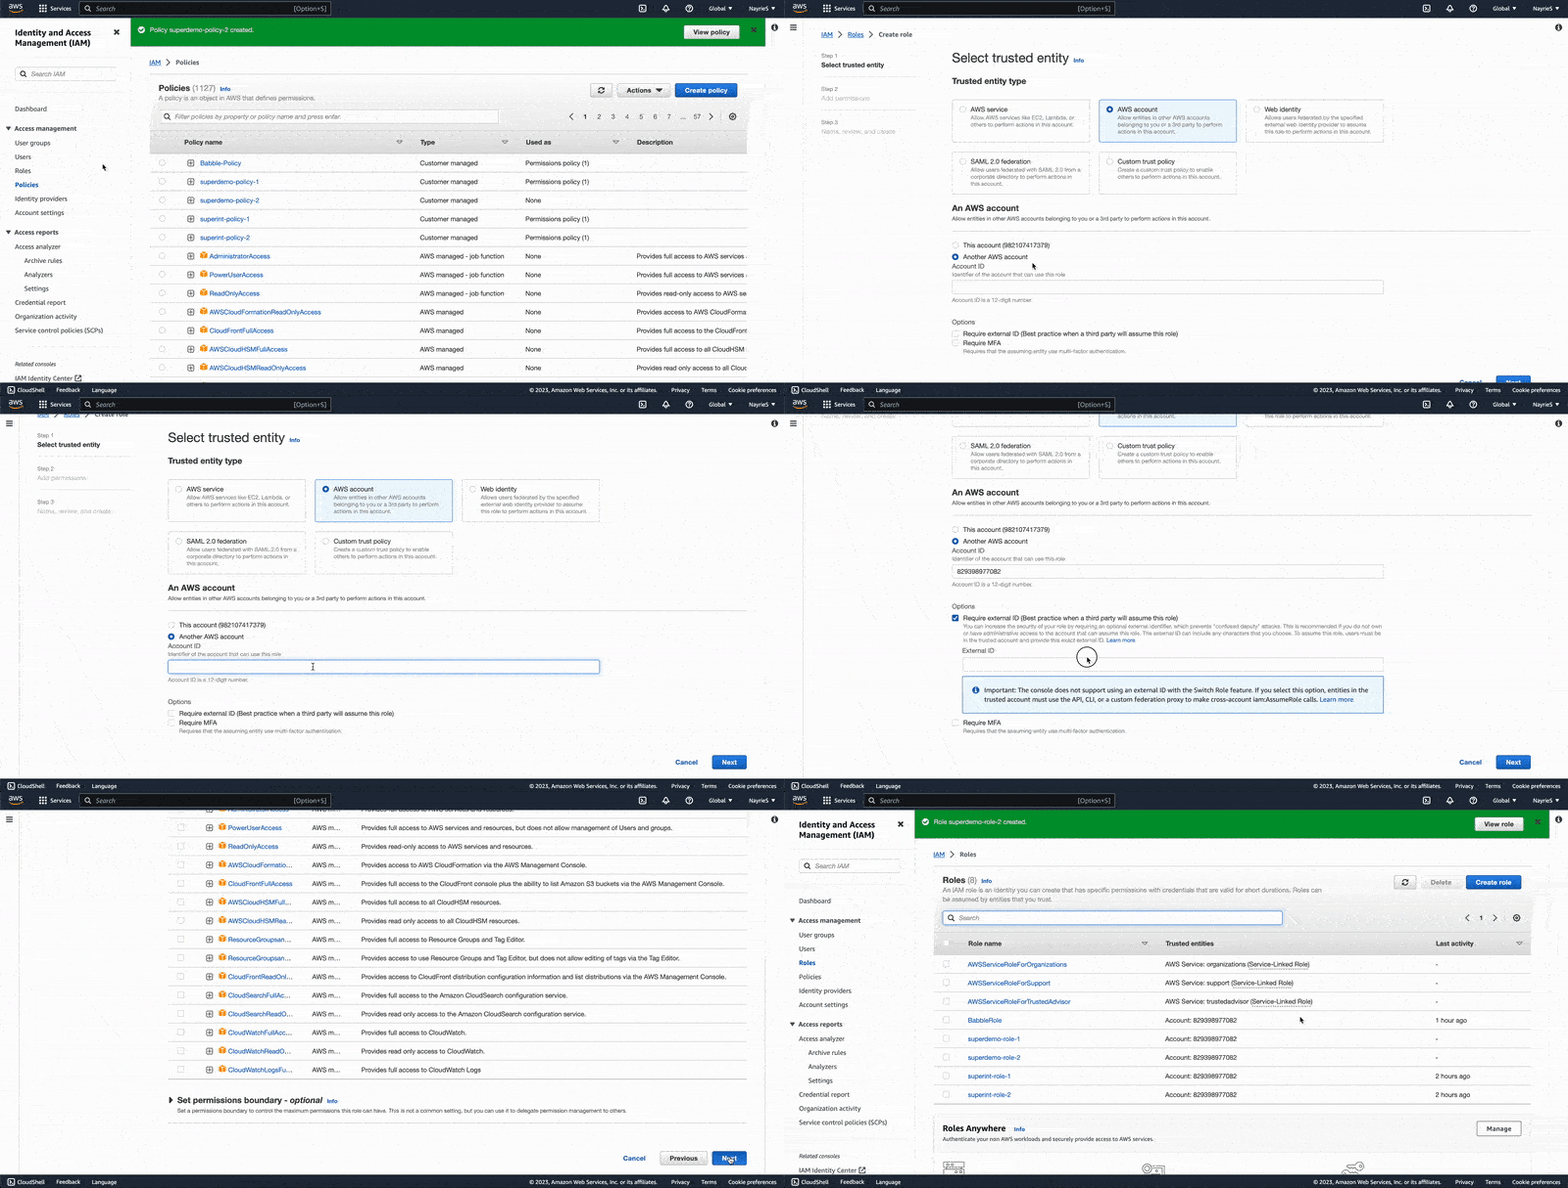
Next, you will need to create a role through your IAM console.
- From the left panel, click Roles under Access management.
- In the Roles tab, click Create role.
- Select AWS account.
- Below, click Another AWS account.
- In the field, enter the Account ID (you can find it in SuperAnnotate’s integration popup, under SuperAnnotate’s AWS Account ID).
- Under Options, check the Require external ID box and enter the integration's unique External ID (you can find it in SuperAnnotate’s integration popup, under External ID).
- Click Next.
- Under Permission policies, select the policy you created in Step 3.
- Click Next.
- Under Role details, enter a role name.
- Click Create role.
Alternative methodIn this step, under line 3, you may select Custom trust policy instead. Replace the field below with the JSON provided under Edit trust relationship in the integration setup page. Then, select the policy you created in Step 3. After creating the role, skip to Step 6.
Step 5: Edit trust relationship
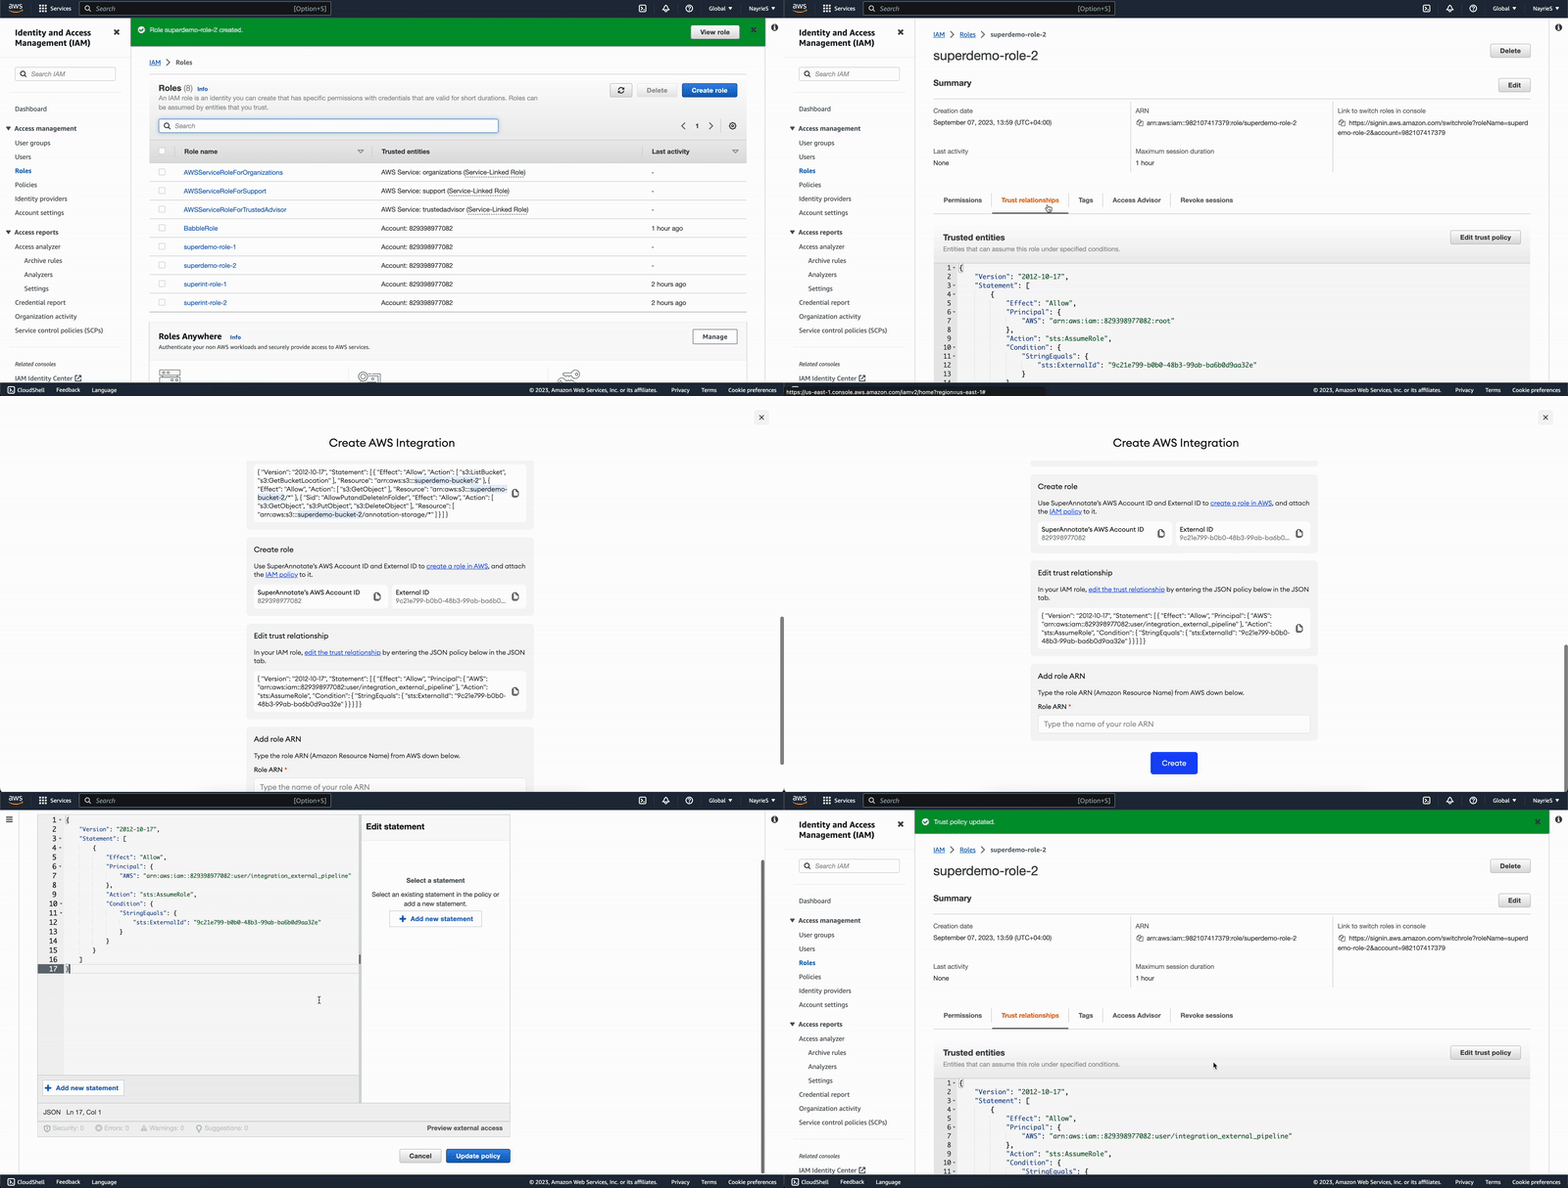
After clicking Create role, you’ll be redirected to a page with all your roles.
- Select the role you just created.
- Go to the Trust relationships tab.
- Click Edit trust policy.
- Delete the policy document in the JSON tab and replace it with the policy JSON in SuperAnnotate’s AWS integration setup in the Edit Trust Relationship section.
- Click Update Policy.
Trust policy JSON sample
{
    "Version": "2012-10-17",
    "Statement": [
        {
            "Effect": "Allow",
            "Principal": {
                "AWS": "arn:aws:iam::829398977082:user/integration_external_storage_prod"
            },
            "Action": "sts:AssumeRole",
            "Condition": {
                "StringEquals": {
                    "sts:ExternalId": "<external_ID_here>"
                }
            }
        }
    ]
}
Using the same role for multiple integrations
If you're incorporating the same role into more than one integration, then you only need to copy over the object inside the "Statement" array. Remember that external IDs are unique for each integration you create.
Example:
{
    "Version": "2012-10-17",
    "Statement": [
        {
            "Effect": "Allow",
            "Principal": {
                "AWS": "arn:aws:iam::829398977082:user/integration_external_pipeline"
            },
            "Action": "sts:AssumeRole",
            "Condition": {
                "StringEquals": {
                    "sts:ExternalId": "<external_ID_of_first_integration_here>"
                }
            }
        },
        {
            "Effect": "Allow",
            "Principal": {
                "AWS": "arn:aws:iam::829398977082:user/integration_external_pipeline"
            },
            "Action": "sts:AssumeRole",
            "Condition": {
                "StringEquals": {
                    "sts:ExternalId": "<external_ID_of_second_integration_here>"
                }
            }
        }
    ]
}
Step 6: Add the role ARN
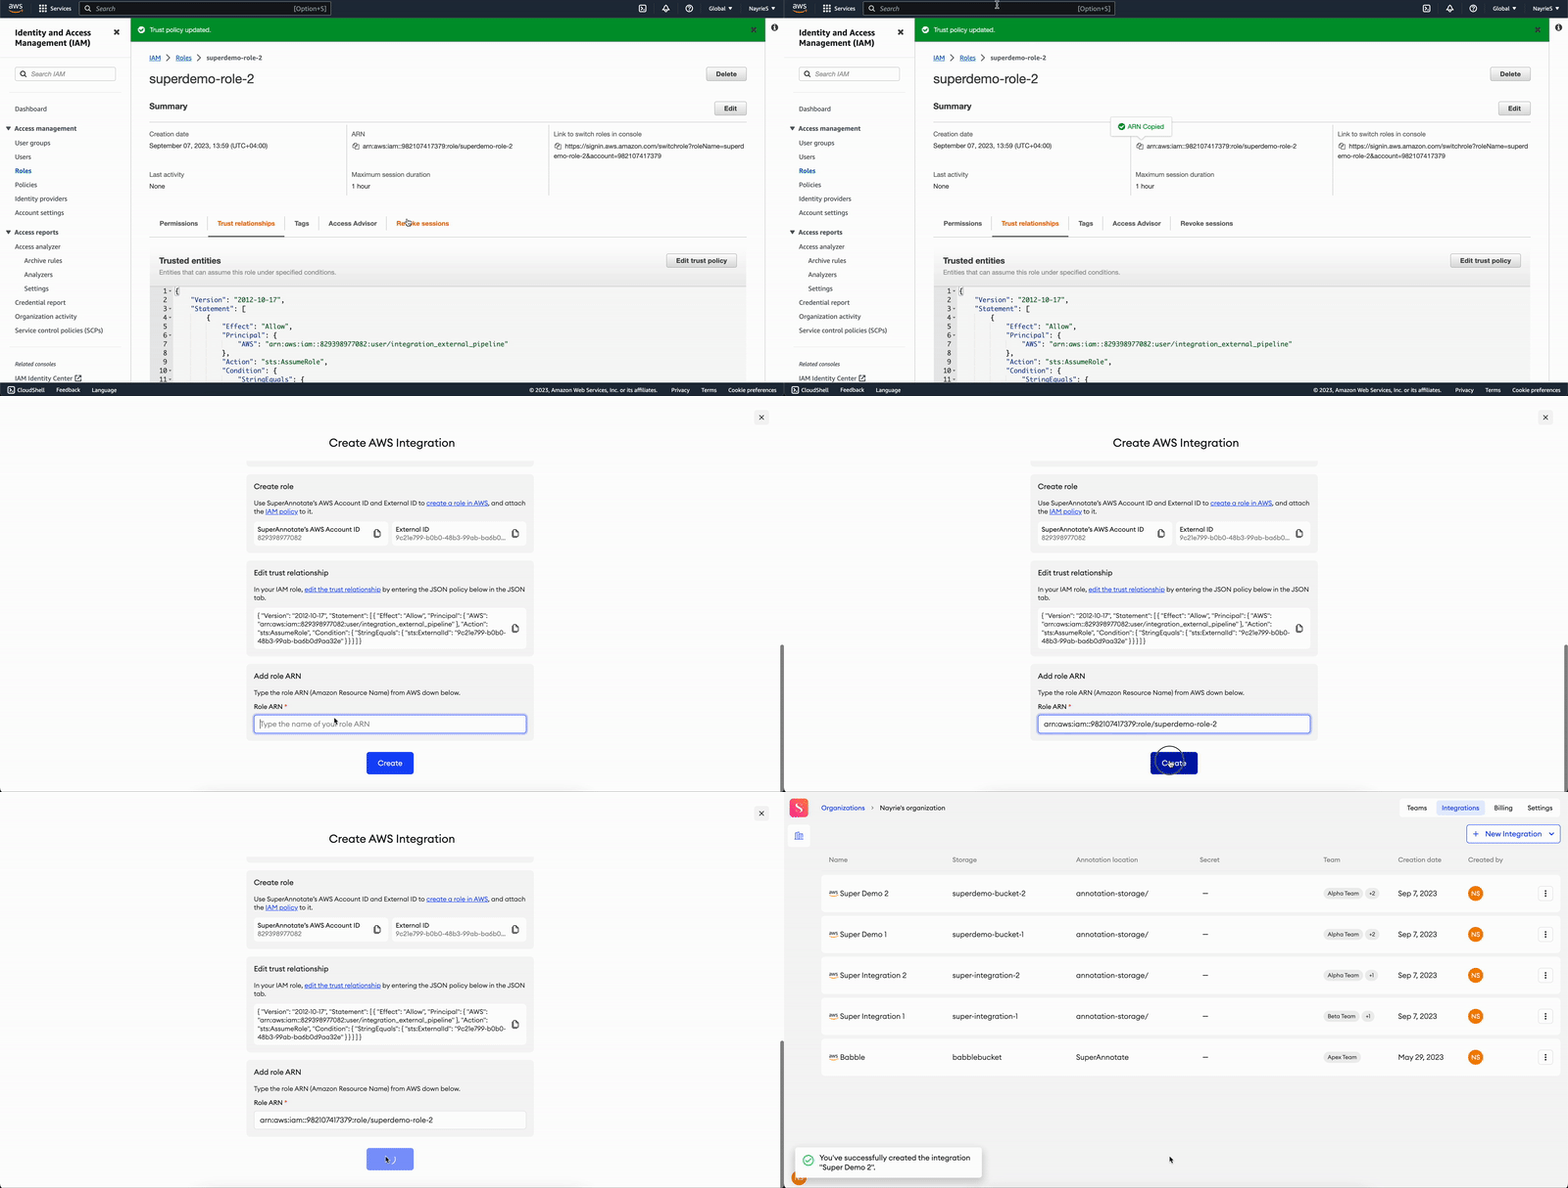
- Copy the ARN from the newly created role's summary page.
- Go back to SuperAnnotate’s integration setup page.
- Under Add role ARN, paste the ARN in the field.
- Click Create.
Validate integration
To validate your AWS integration:
- In Integrations, find your integration.
- Click the three dots
⋮. - Select Check connection.
Edit team
If you need to make your integration available for more teams, or you want to revoke a team's access to it, you may edit the permissions accordingly.
To add or remove an integration to one or multiple teams:
- In Integrations, find your integration.
- Click the three dots
⋮. - Select Edit team.
- Add one or multiple teams from the dropdown, or remove a team by clicking the X on their name. To add all teams, choose Select all. To remove all teams, click the X on the right side of the field.
- Click Save.
Delete integration
To delete an integration:
- In Integrations, find your integration.
- Click the three dots
⋮. - Select Delete Integration.
- In the popup, click Delete.
Please note that by deleting the integration, any items uploaded to your projects from this integration will no longer be accessible.
Add items with AWS integration
You can add items from your AWS S3 bucket(s) to your projects (excluding Tiled Imagery).
- In Data, click Add.
- Select Upload Images, Upload Videos, or Upload Documents (depending on your project type).
- Go to External Storage.
- In Integrations, choose an integration (mandatory) and type a folder path (optional).
- Click Upload.
About folders
- Note that when you type in a folder path, all items within that folder will be uploaded. You won't be able to select and choose specific files from the folder.
- SuperAnnotate supports a two-level folder structure. This means that you can have items and folders in a project, but you can’t create or upload subfolders. For example, let’s say you want to upload a folder from your cloud storage to the root folder of your project. If that folder has several items and a subfolder, the subfolder will be excluded. If you want to upload items from that subfolder, you’ll have to specify its location path:
FOLDER 1 / SUBFOLDER
Enable CORS for Text ProjectsYou’ll need to enable CORS in your storage to be able to make use of your items in the Text Editor. Learn more.
When you add items from an integrated AWS bucket to SuperAnnotate, you can’t:
- Export in the COCO format
- Set the upload quality in Settings
Updated 3 months ago