Manage items
Move items to folder

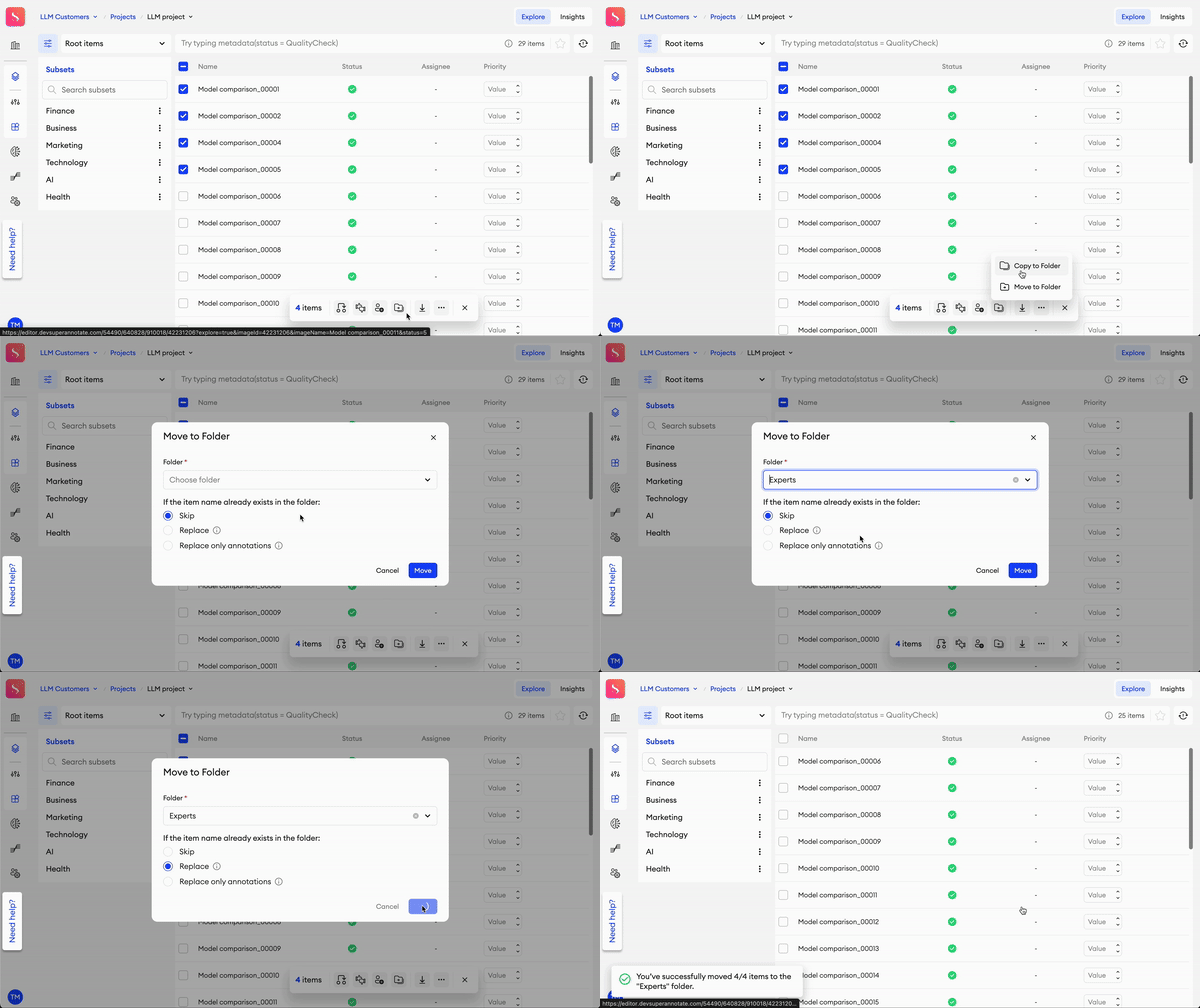
To move items to a folder:
- In Explore or the Data tab, select the folder you want to move items from.
- Select one or multiple items.
- On the floating bar, click on Move/Copy to Folder.
- Select Move to Folder.
- From the Folder dropdown, select the destination folder.
- Choose what to do in case the destination folder has items with the same name:
- Skip: The items will not be moved to the new folder.
- Replace: Any existing items with the same names will be replaced with the new ones, including their assignments, annotations, and all other data.
- Replace only annotations: Only the annotations will be replaced. The rest of the existing item’s data will remain unchanged.
- Click Move.
About Moving
- Moving items to a different location will transfer with it the following item information: Item Status, Annotation, Assignee, Priority Score, Approval State, Pin State, Custom Metadata, Category, and the item’s corresponding Working hours in Analytics.
- The items that you move will only retain their assignments if the assignees have access to the destination folder.
- When you move an item from one folder to another, the item's annotation time is displayed in the Analytics tab of the previous folder. Learn more.
Limitations
- You can't move folders.
- Items with existing names will be skipped and will remain in their source folder.
- Items that exceed the folder limit won't be moved.
Copy items to folder

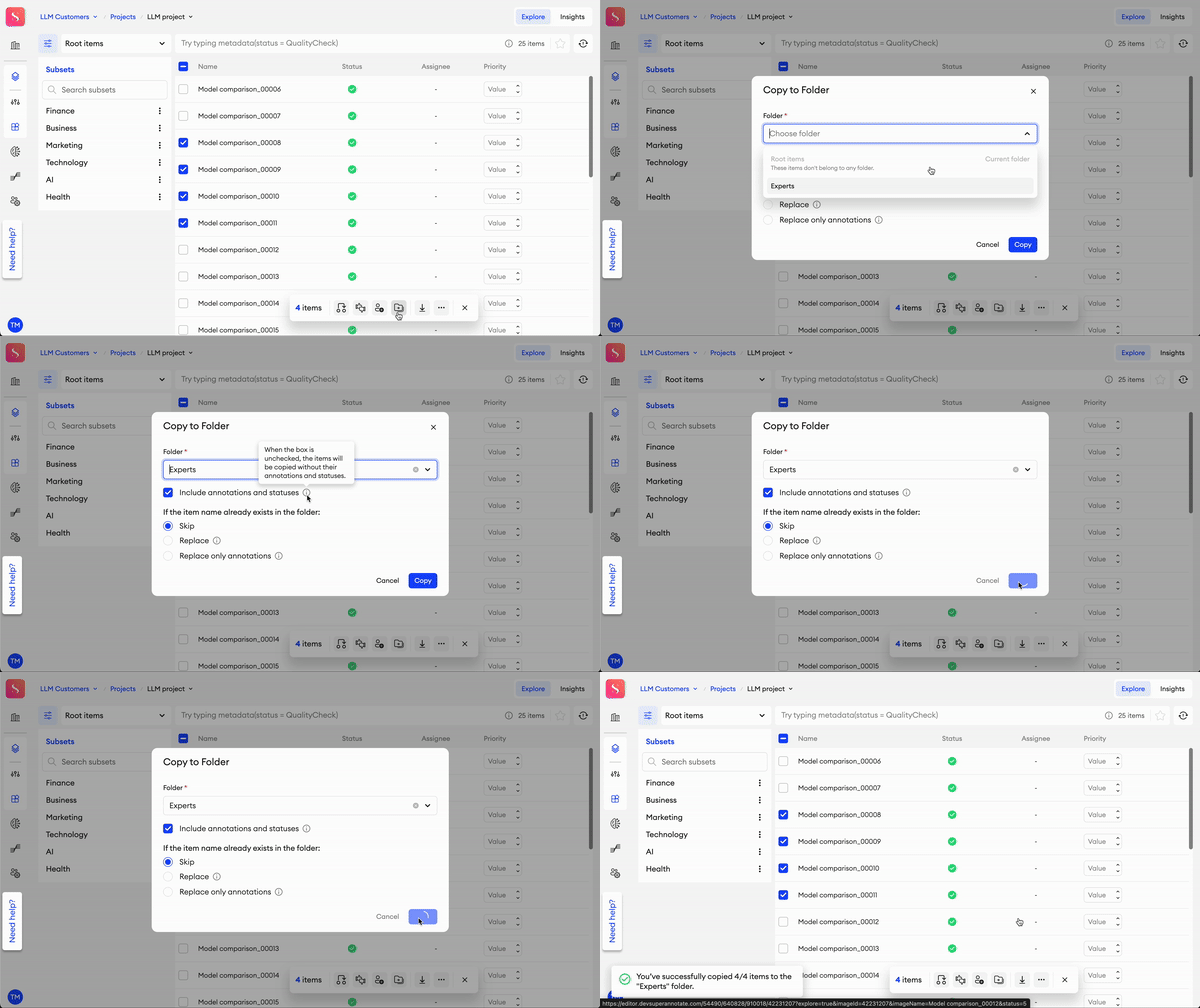
To copy items to a folder:
- In Explore or the Data tab, select the folder you want to copy items from.
- Select one or multiple items.
- On the floating bar, click on Move/Copy to Folder.
- Select Copy to Folder.
- From the Folder dropdown, select the destination folder.
- Choose whether you want to Include annotations and statuses in the copied items (optional). If you leave this box unchecked, skip step 6.
- Choose what to do in case the destination folder has items with the same name:
- Skip: The items will not be copied to the new folder.
- Replace: Any existing items with the same names will be replaced with the new ones, including their assignments and annotations.
- Replace only annotations: Only the annotations will be replaced. The rest of the existing item’s data will remain unchanged.
- Click Copy.
About CopyingWhen Include annotations and statuses is checked, copying items to a different location will transfer with it the following item information: Item Status, Annotation, Priority Score, Approval State, and Category.
Limitations
- You can't copy items and folders at the same time.
- Items with existing names will be skipped.
- Items that exceed the folder limit won't be copied.
Add/Remove category
Through Explore, you can add categories to items in bulk. If you don’t have any categories, you can create one in this manner. This feature must be enabled for the project in order to use it. Learn more.
To add a category to your items:
- Select one or multiple items.
- On the floating bar, click Categorize.
- Click Add Category.
- Select an existing category from the dropdown list, or type in a name to create a new one.
- Click Save.
You can also create new categories without adding them to any items right away and manage your categories from the project settings.
To replace an item’s category, you can simply follow these steps again and add a new one.
Category Limitations
- Each item can only have one category at a time.
- A project can only have 2000 categories maximum.
- The character limit for a category name is 200.
- When choosing a name for your category, make sure it is unique and keep in mind that category names are case-insensitive. This means that ‘name’ and ‘Name’ will be considered the same.
- Category names can contain alphanumeric characters and underscores
_only.- Category names can’t only contain the following reserved words (case-insensitive): Or, And, Contains, OrderBy, and Random.
To remove a category from your items:
- Select one or multiple categorized items.
- On the floating bar, click Categorize.
- Click Remove Category.
- In the pop-up, click Remove.
Manage categories with SDK
To set item categories, you can use the following function: set_items_category()
To remove item categories, you can use the following function: remove_items_category()
Run model

You can run a connected model on a number of items.
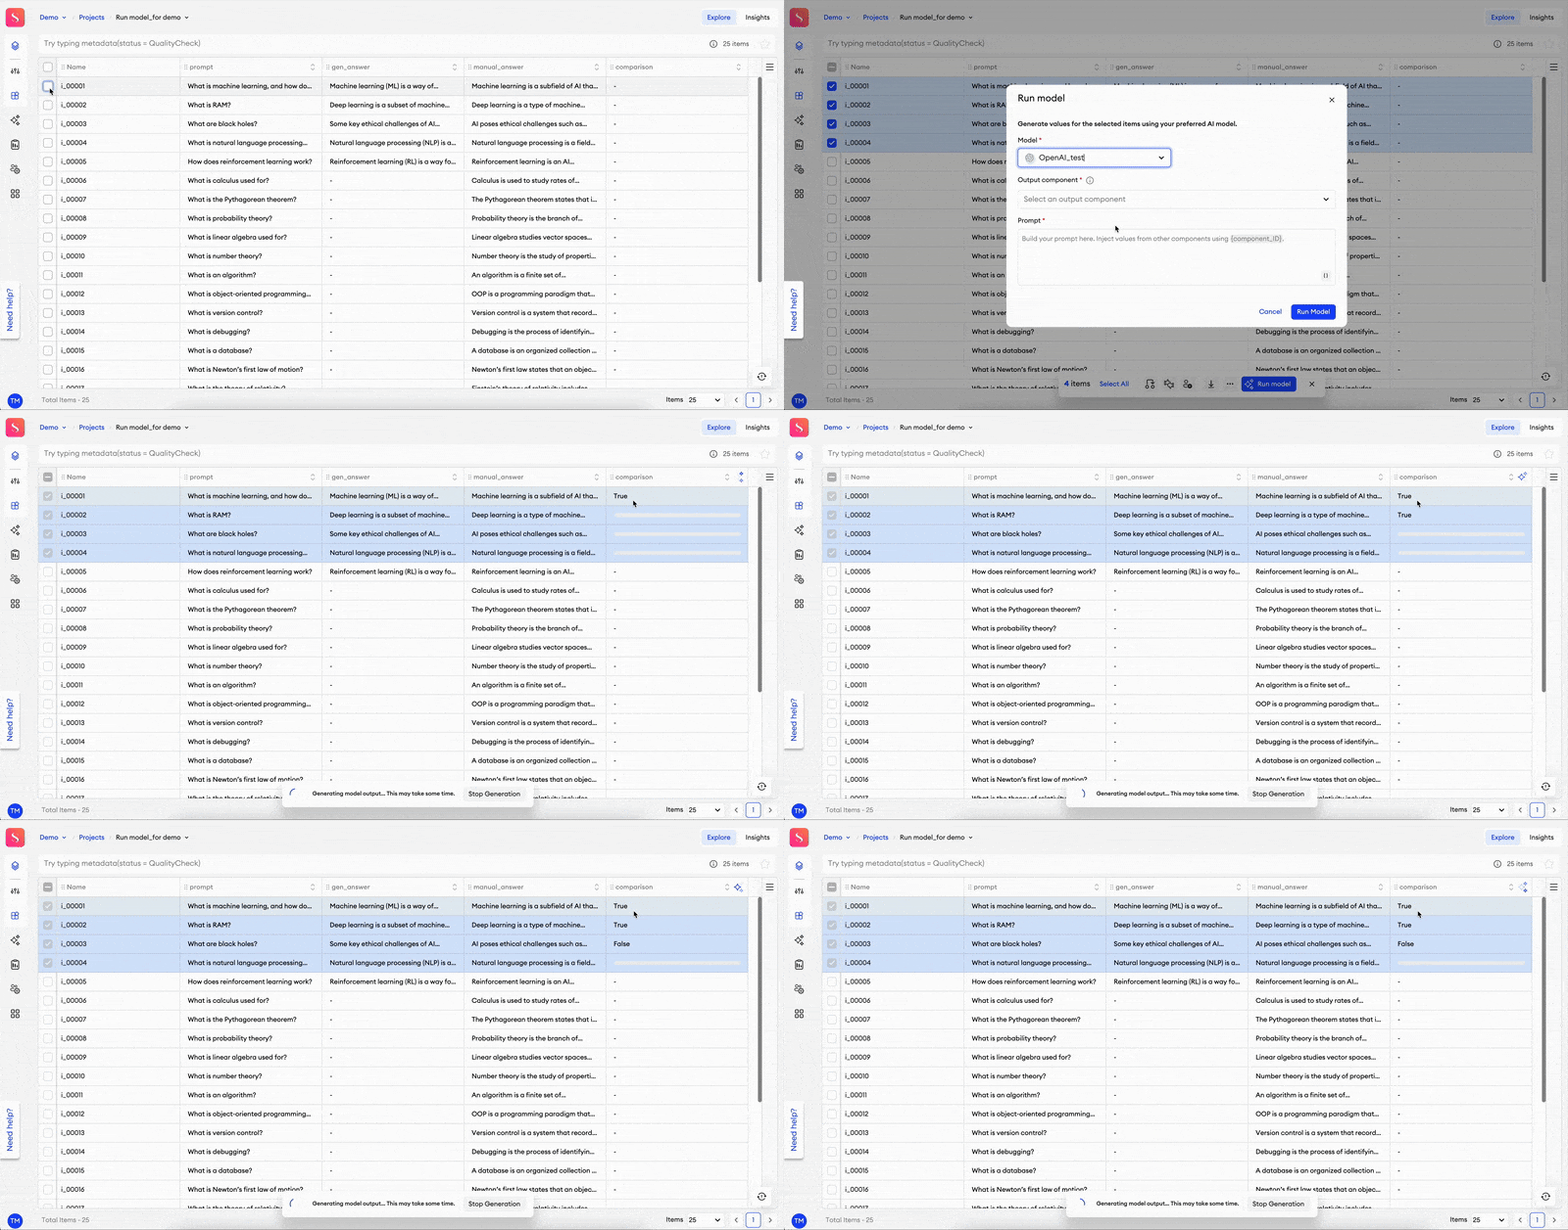
To run a model:
- In Explore, select one or multiple items.
- Select a connected model from the dropdown.
- Depending on what is applicable to your selected model, you may indicate its:
- Temperature - a slider to define how precise or creative its response should be. Lowering the temperature results in less random completions. As the temperature approaches zero, the model will become deterministic and repetitive.
- Reasoning effort - Minimal, Low, Medium, or High. Reducing reasoning effort can result in faster responses and fewer tokens used on reasoning in a response. Increasing reasoning effort can result in slower, but higher quality responses, using more tokens.
- Verbosity - Low, Medium, or High. Lower levels yield shorter answers.
- Under Output component, select a component from the form that will serve as the model’s output and display the answer completion in full.
- Under Prompt, enter the prompt you want to give the model. Include the value of a component you want to use in the prompt. If done through the Add variable button, it’ll be added automatically. If done manually, then format it in the prompt as follows:
{component_ID} - Click Run Model.
Output components
- The Output component dropdown list will display all of the following component types: Text Input, Text Area, Markdown, Code, Paragraph, Number, Slider, Rating, Voting, and Web component.
- Components that are either contained within a Group component or excluded from export won’t be visible.
- If the generated response is in a value type that doesn’t correspond to the output component, the response can be set as
null.
After running the modelIf you decide to stop the model from generating a response, you may click Stop Generation at the bottom of the screen while it’s still in progress. You’ll get a pop-up where you’ll have to confirm your decision.
Find Items
To find an item, go to Data and type the name of the item in the search bar.
Sort documents
In Data, you can click on Name, Status, or Priority to sort all videos in ascending ^ or descending v order.
Status is sorted by: Not started, In progress, Returned, Quality Check, Completed, and Skipped.
The sorting order is preserved when you open an item in the editor.
Filter items
In Data, you can filter your items by Approval state, Annotation status, Category, and Assignee:
- Click on the Filter button beside the search bar.
- Pick one or multiple filters from the following categories:
- Approval state (multi-select): Approved, Disapproved, No Approval.
- Annotation status: Any, Not started, In progress, Quality Check, Returned, Completed, Skipped.
- Category: No Category, and any category that exists in the project.
To filter by Assignee, you can click on the assignee's avatar (or icon) next to the search bar.
- Filters from all categories can be applied at the same time.
- To clear filters, you can click on your selections again to remove them, or simply click Reset Filters.
Delete items
To delete one or multiple items:
- In Data, select one or multiple items.
- Click Delete on the floating bar.
- Click Delete.
Only Team Owners, Team Admins, and Project Admins (with permission) can delete items in bulk.
Download items
You can download your project in two ways: from the Downloads tab in FineTune, or by clicking Download on the floating bar in Explore.
About CSV exportsThe SuperAnnotate CSV format export is only supported for components whose values are a string or number, as CSV files don’t support complex data types.
About File Upload components
- If the items you’re downloading contain a File Upload component and have files attached to them, then the exported files will include signed URLs of each file. The URL is structured as follows:
https://assets-api.superannotate.com/api/v1/storages/download/{token}- where{token}is a signed and time-limited token used to securely authorize file downloads.- These links will be valid for 7 days only, and they’ll remain available even if any corresponding items are deleted.
- If an item includes multiple attached files, the URLs will be shown as such follows, depending on the download type:
- JSON - A list of objects under the
“attributes”key. Each object contains the”name”key, whose value is the signed URL.- JSONL - An array of strings under the
”value”key.- CSV - A single field containing an array of strings.
From FineTune
To download your project:
- Go to the Downloads tab.
- Click Prepare Download.
- Select a format: SuperAnnotate JSON, SuperAnnotate JSONL, or SuperAnnotate CSV.
- In the pop-up, type in a name.
- Select the folders you want to include in your download.
- Select one or multiple statuses to filter which items to include in your download.
- If you’ve selected the SuperAnnotate CSV format, and you’d like to include the update and creation timestamps for instances in your exported CSV file, check the corresponding box.
- Once you’re done, click Prepare.
- After the download is prepared, click Download. You can cancel the preparation stage by clicking Cancel instead.
From Explore
- When in your project, go to Explore.
- Select the items whose annotation data you want to download.
- Click Download on the floating bar.
- Select a format: JSON, JSONL or CSV.
- Find the download being prepared in the Downloads tab in FineTune.
- When the annotation files are ready, click Download.
Download annotation CSV
You can download your project’s annotations in CSV format from the project’s Downloads tab. You can choose to download the whole project or specify parts of it. The exported CSV file will follow the exact same format, and it will only include components of the Input, Select, and Media types that haven’t been excluded from export.
Projects Admins (with download permission) and users with higher roles will be able to download the
_item_categoryand_folderin the SuperAnnotate CSV format.
With SDK
You can also prepare your download with the following SDK functions: prepare_export() and download_export()
Examples
client = SAClient()

export = client.prepare_export(
    project = "Project Name",
    folder_names = ["Folder 1", "Folder 2"],
    annotation_statuses = ["Completed","QualityCheck"])


client.download_export("Project Name", export, "path_to_download")client = SAClient()
export = client.prepare_export(
project = "Project Name",
folder_names = ["Folder 1", "Folder 2"],
annotation_statuses = ["Completed","QualityCheck"],
export_type = "CSV")
client.download_export("Project Name", export, "path_to_download")Updated 11 days ago