
Bulk actions
In the Explore tab, actions that you can normally perform on individual items or instances can be done in bulk. This means that you can select multiple items that you can choose to apply the same action to, such as status changes, tags, and more. There are some limitations to some of the actions based on which view or project type you are in, as listed below.
Run Model
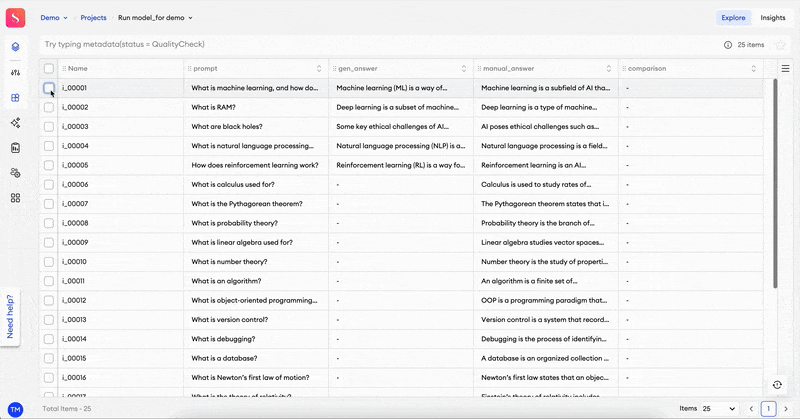
You can run a connected model on a number of items.
To run a model:
- In Explore, select one or multiple items.
- Select a connected model from the dropdown.
- Depending on what is applicable to your selected model, you may indicate its:
- Temperature - a slider to define how precise or creative its response should be. Lowering the temperature results in less random completions. As the temperature approaches zero, the model will become deterministic and repetitive.
- Reasoning effort - Minimal, Low, Medium, or High. Reducing reasoning effort can result in faster responses and fewer tokens used on reasoning in a response. Increasing reasoning effort can result in slower, but higher quality responses, using more tokens.
- Verbosity - Low, Medium, or High. Lower levels yield shorter answers.
- Under Output component, select a component from the form that will serve as the model’s output and display the answer completion in full.
- Under Prompt, enter the prompt you want to give the model. Include the value of a component you want to use in the prompt. If done through the Add variable button, it’ll be added automatically. If done manually, then format it in the prompt as follows:
{component_ID} - Click Run Model.
Output components
- The Output component dropdown list will display all of the following component types: Text Input, Text Area, Markdown, Code, Paragraph, Number, Slider, Rating, Voting, and Web component.
- Components that are either contained within a Group component or excluded from export won’t be visible.
- If the generated response is in a value type that doesn’t correspond to the output component, the response can be set as
null.
After running the modelIf you decide to stop the model from generating a response, you may click Stop Generation at the bottom of the screen while it’s still in progress. You’ll get a pop-up where you’ll have to confirm your decision.
Add comments
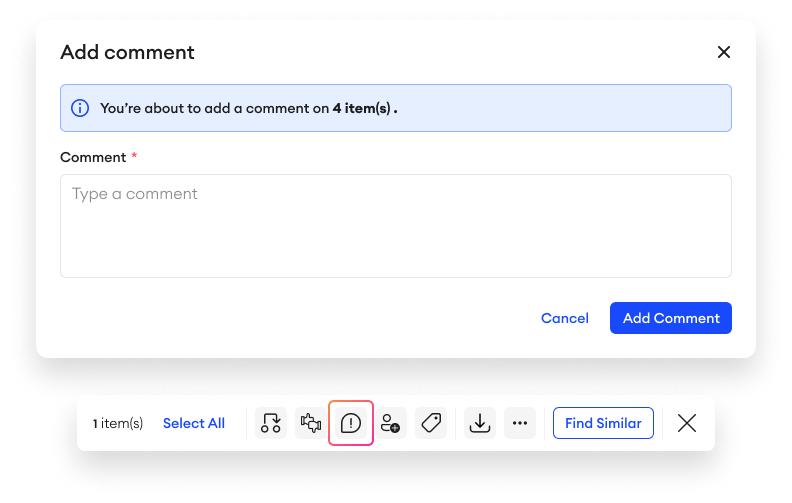
To add comments to one or multiple items:
- Select one or multiple items.
- Click Comment in the menu at the bottom of the page.
- In the popup, type a comment.
- Click Add Comment.
Change status
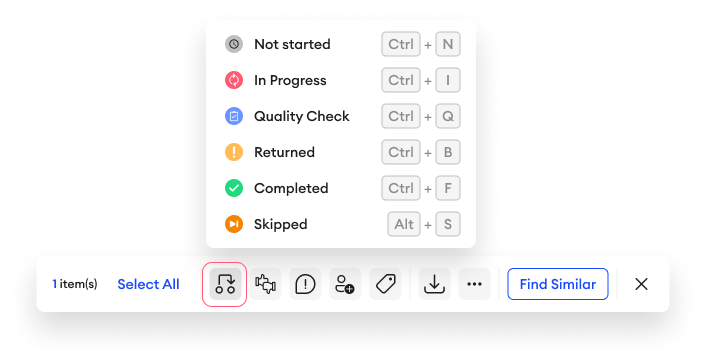
You can change the status of the item(s) that appear as a result of your query.
To change the status of one or multiple items:
- Run a query.
- Select one or multiple items.
- On the floating bar, click Change Status.
- Choose a status.
- Click Change.
Move items

To move items in bulk:
- Select the folder you want to move items from.
- Select one or multiple items.
- Click Move/Copy to Folder on the floating bar.
- Click Move to Folder.
- Choose the destination folder.
- Click Move.
About Moving
- Moving items to a different location will transfer with it the following item information: Item Status, Annotation, Assignee, Priority Score, Approval State, Pin State, Custom Metadata, and the item’s corresponding Working hours in Analytics.
- The items that you move will only retain their assignments if the assignees have access to the destination folder.
- When you move an item from one folder to another, the item's annotation time is displayed in the Analytics tab of the previous folder. Learn more.
Limitations
- You can't move folders.
- Items with existing names will be skipped and will remain in their source folder.
- Items that exceed the folder limit won't be moved.
Copy items
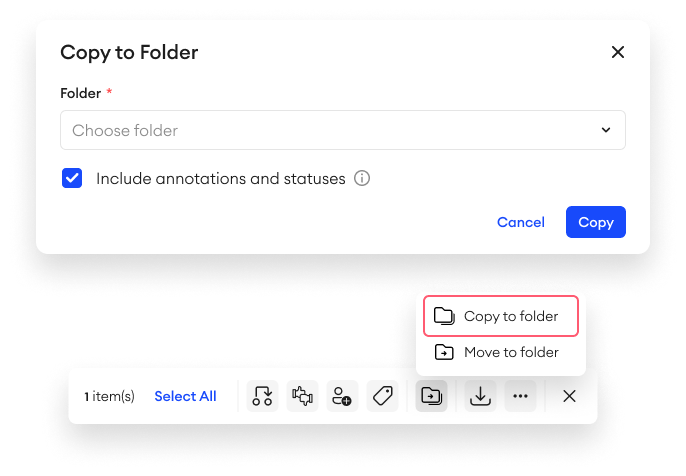
To copy items in bulk:
- Select the folder you want to move items from.
- Select one or multiple items.
- Click Move/Copy to Folder on the floating bar.
- Click Copy to Folder.
- Choose the destination folder.
- Check the Include item data box if you want to copy the images with their item data included, as listed below (optional).
- Click Copy.
About CopyingWhen Include item data is checked, copying items to a different location will transfer with it the following item information: Item Status, Annotation, Priority Score, and Approval State.
Limitations
- You can't copy items and folders at the same time.
- Items with existing names will be skipped.
- Items that exceed the folder limit won't be copied.
Assign items
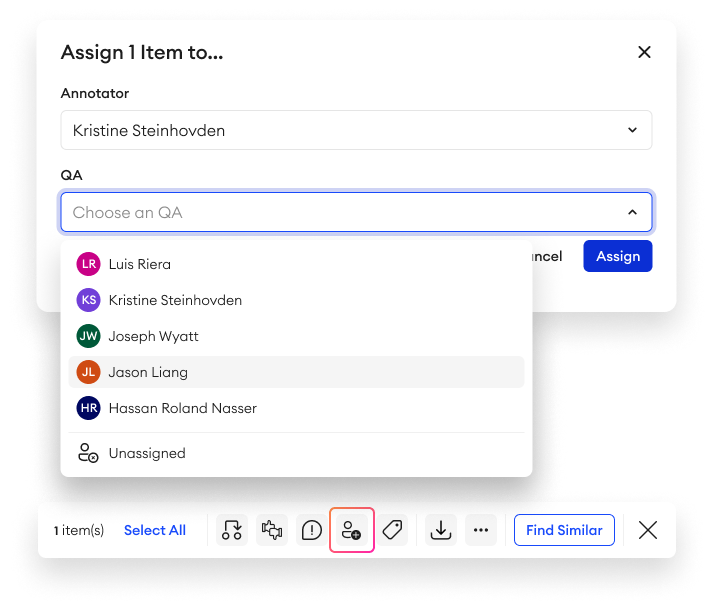
To assign one or multiple items:
- Select one or multiple items.
- On the floating bar, click Assign.
- Select contributors for the roles you want to assign.
- Click Assign.
To unassign one or multiple items:
- Select one or multiple items.
- On the floating bar, click Assign.
- Find the role you want to unassign.
- In the drop-down list, select Unassigned.
- Click Assign.
Approve/Disapprove items
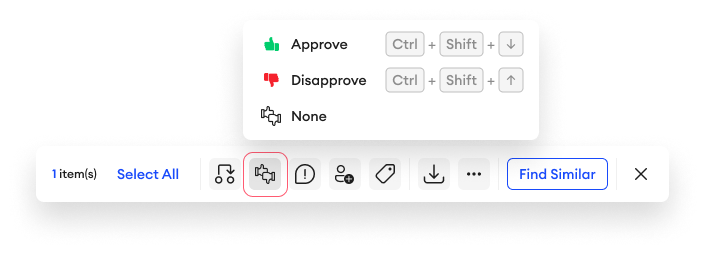
To change the approval status of an item or multiple items:
- Select one item or multiple items.
- On the floating bar, click the Approve/Disapprove Items.
- Choose the status: Approve, Disapprove, or None.
- Click Change.
Run pipeline

You can trigger an event from the Explore tab to run a pipeline on one or multiple items. Only pipelines that have the Fired in Explore event can be run this way.
To run a pipeline:
- In the Explore tab, select one or multiple items.
- On the floating bar, click the three dots
…. - Click Run pipeline.
- Select an event that’s used in the pipeline you want to run.
- Click Run.
Set priority scores
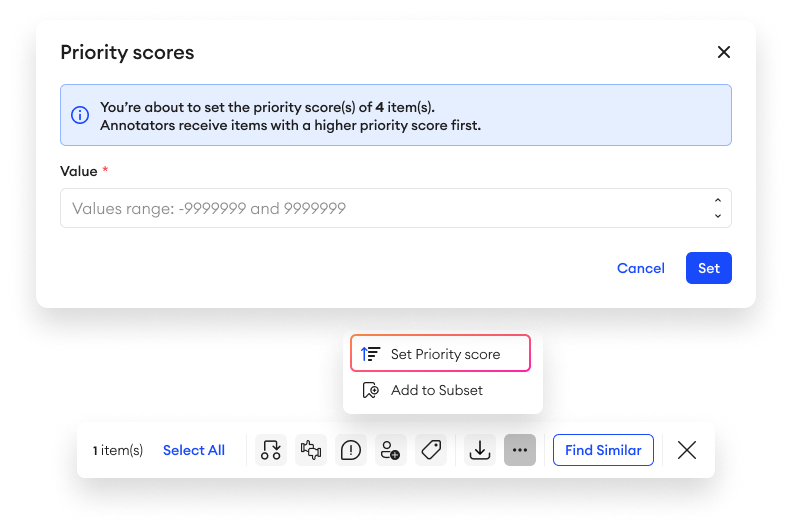
To set the priority scores in bulk:
- Select multiple items.
- On the floating bar, click the three dots
.... - Click Set Priority Scores.
- Choose a value.
- Click Set.
Download items
You can download specific items from your project in bulk rather than download the whole project.
To download specific items in a dataset:
- Select one or multiple items.
- On the floating bar, click the Download button.
- Select an option from one of the two sections:
- Annotation Data
- Explore Data
- Select an option from one of the two sections:
- If you’ve selected an option from the Annotation data section, you’ll be redirected to the Downloads tab in FineTune, where you can download your data when it’s prepared.
- If you’ve selected an option from the Explore data section, you’ll see a pop-up where you can specify what Explore-specific data you want to download. Once you’re done, click Download. The file will be prepared and downloaded accordingly.
From the available download options, the following information is provided exclusively with the Explore Data option: item annotation and approval statuses, assignments, score components, and web component keys.
Updated 6 days ago