
Snowflake integration
You can use your Snowflake integration to upload items into your Multimodal projects by using SQL queries via key pair authentication.
The authentication method relies on a pair of keys: a public key and a private key. The username is required to ensure that the private key corresponds to the correct user. The account identifier specifies the Snowflake account you are connecting to. The warehouse name defines the computing resources for executing queries. Finally, the private key is used to securely authenticate the connection for a successful Snowflake integration.
About private and public keysThe public key associated with your private key is assigned to a Snowflake user. When the application attempts to authenticate using the private key, Snowflake retrieves the corresponding public key using the provided username. This allows Snowflake to verify that the private key matches with the stored public key assigned to that username. If the verification is successful, Snowflake establishes trust and allows the application to proceed with the authenticated connection.
Step 1: Begin integration setup
To set up the integration:
- Go to Integrations from your Organization tab or through Team Setup.
- Click + New Integration.
- Select Snowflake.
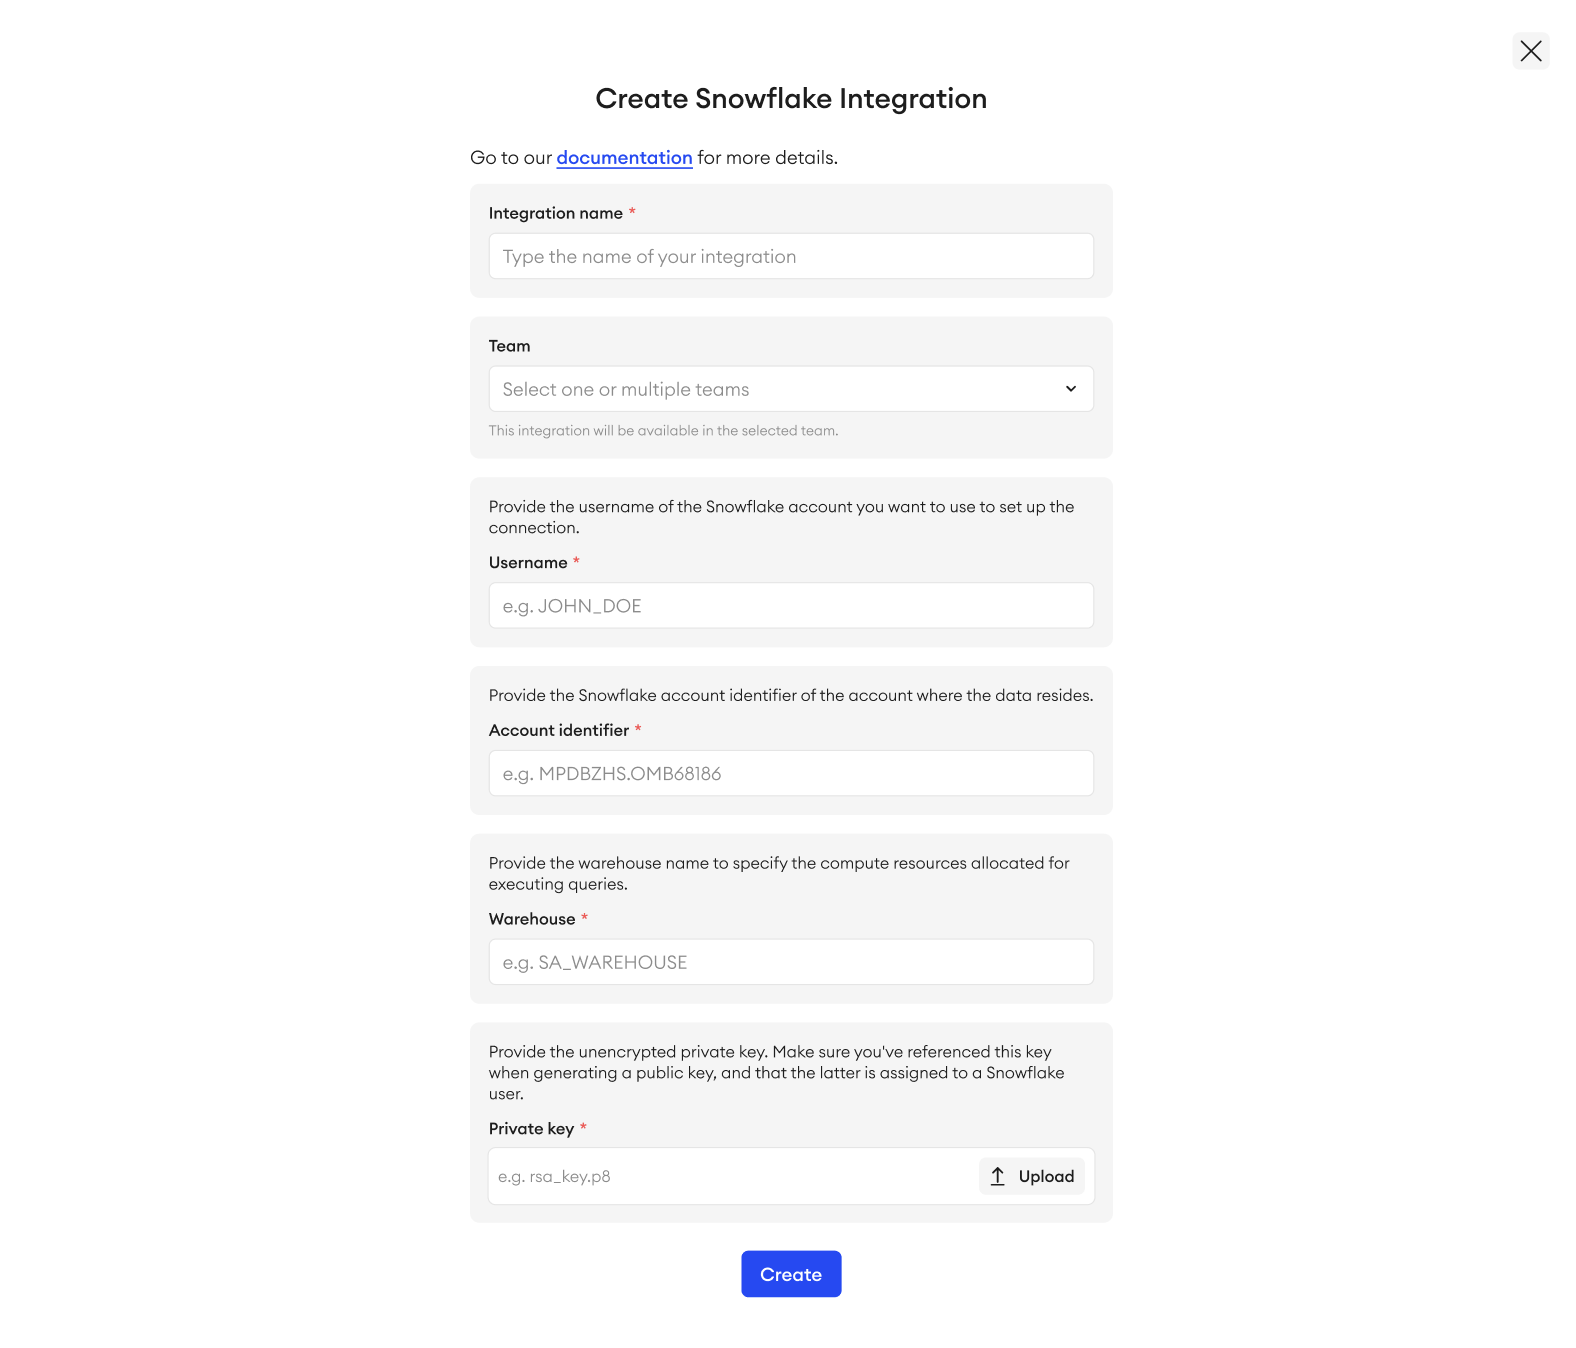
- In the Integration name field, type in a unique name for your integration.
- Under Team, you can add the integration to one or multiple teams (optional). The integration will be available in the selected team(s) only.
It is also possible for Team Owners and Team Admins to set up an integration through the Team Setup tab.
User Role Permissions
- Only Organization Owners can set up an integration from the Organization tab.
Step 2: Account identification
Provide your Snowflake account’s username, which is used to identify the user who needs to be authenticated with the provided private key. The username ensures that you connect with the appropriate context and permissions:
-
From Snowflake, go to My profile from the bottom left, copy the corresponding Username in the account.
-
In the integration setup page, paste the copied username into the Username field.
-
From Snowflake, find the account through the account selector and copy the account identifier. It should be in the
[ORG_NAME].[ACCOUNT_NAME]format.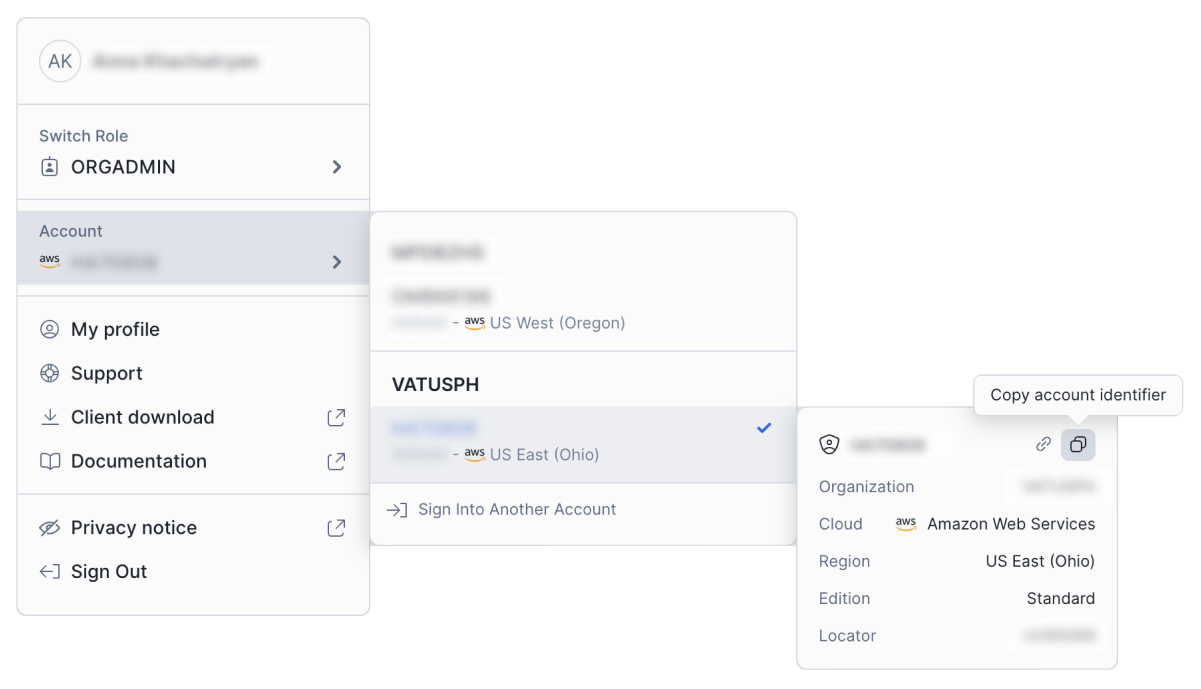
-
In the integration setup page, paste the copied account identifier into the Account identifier field.
About user rolesThe username you enter here must have a default role that can at least access and query data from databases.
Step 3: Warehouse name
Next, you’ll need to provide the warehouse name to specify the compute resources allocated for executing queries. One of the ways you can find it is through Warehouses, which can be found under the Admin section in the left panel in Snowflake.
Step 4: Private and public keys
In order to establish the key pair authentication, you must generate a private key and a public key.
Private key
To generate an unencrypted private key, use the following command on the command line:
openssl genrsa 2048 | openssl pkcs8 -topk8 -inform PEM -out rsa_key.p8 -nocryptYou’ll receive a file with the name rsa_key.p8, which contains your private key in PEM format, as follows:
-----BEGIN PRIVATE KEY-----
MIIBIjANBgkqh...
-----END PRIVATE KEY-----
Public key
Next, you need to create a public key which references the private key file rsa_key.p8 that you received in the previous step.
To generate a public key, use the following command on the command line:
openssl rsa -in rsa_key.p8 -pubout -out rsa_key.pubYou’ll receive a file with the name rsa_key.pub, which contains your public key in PEM format as follows (you’ll need it in Step 5):
-----BEGIN PUBLIC KEY-----
MIIBIjANBgkqh...
-----END PUBLIC KEY-----
Step 5: Assign the public key to a user
You must assign the public key to the same username that you’ve listed in the integration setup page.
To assign the public key to a user, use the following command in Snowflake:
ALTER USER username SET RSA_PUBLIC_KEY='MIIBIjANBgkqh...';
- The value for
RSA_PUBLIC_KEYmust be the public key you copy from thersa_key.pubfile.- In the command, replace
usernamewith the username you’re using during the integration setup.- You must exclude the
BEGINandENDdelimiters from your public key when copying it from the.pubfile.- Only owners of a user, or users with the
SECURITYADMINrole or higher, can alter a user.
Step 6: Verify the user’s public key fingerprint
- Execute the following command in Snowflake to retrieve the user’s public key fingerprint:
DESC USER username; SELECT TRIM((SELECT "value" FROM TABLE(RESULT_SCAN(LAST_QUERY_ID())) WHERE "property" = 'RSA_PUBLIC_KEY_FP'), 'SHA256:'); - Next, run the following command on the command line:
openssl rsa -pubin -in rsa_key.pub -outform DER | openssl dgst -sha256 -binary | openssl enc -base64 - Compare the two outputs. If they match, then you’ve correctly configured the public key.
In the first command, replace
usernamewith the username you’re using during the integration setup.
For more details on how to set up your private and public keys, check out Snowflake’s documentation.
Step 7: Upload the private key and finalize
- Next, you must upload the
rsa_key.p8file that you created into the Private key field of the integration setup page. - Once that’s done, click Create.
Validate Integration
To validate your Snowflake integration:
- In Integrations, find your integration.
- Click the three dots
⋮. - Select Check connection.
Edit team
If you need to make your integration available for more teams, or you want to revoke a team's access to it, you may edit the permissions accordingly.
To add or remove an integration to one or multiple teams:
- In Integrations, find your integration.
- Click the three dots
⋮. - Select Edit team.
- Add one or multiple teams from the dropdown, or remove a team by clicking the X on their name. To add all teams, choose Select all. To remove all teams, click the X on the right side of the field.
- Click Save.
If you remove a Snowflake integration from the team, any data you’ve uploaded from it will remain accessible in your projects.
Delete integration
To delete an integration:
- In Integrations, find your integration.
- Click the three dots
⋮. - Select Delete Integration.
- In the popup, click Delete.
If you delete a Snowflake integration, any data you’ve uploaded from it will remain accessible in your projects.
Add items with Snowflake integration
You can add items into your Multimodal project by selecting the integration upon upload:
- In Data, click Add.
- Select Upload Items.
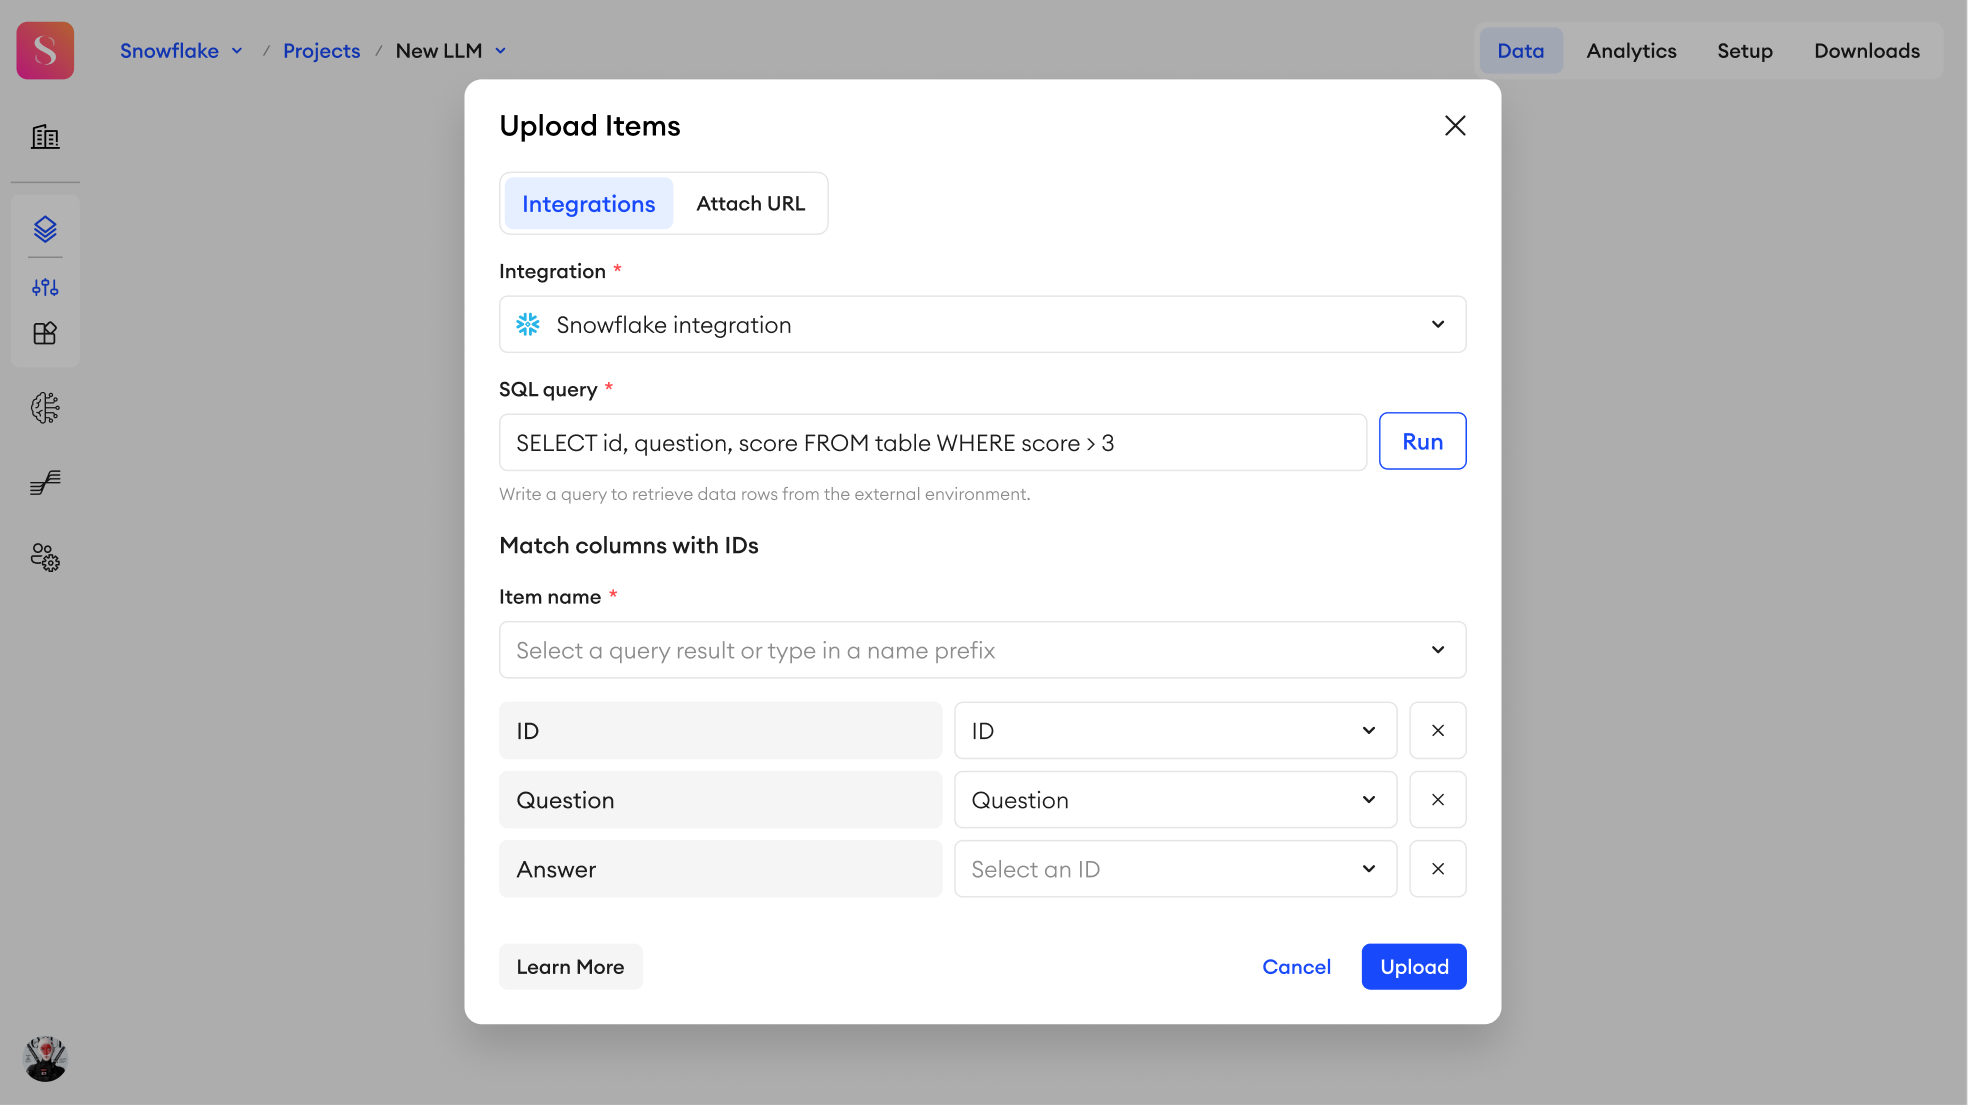
- Select your Snowflake integration you want to upload from.
- Type in the SQL query to retrieve data rows from your external environment.
- Click Run to get the queried table column names. After the query is successfully executed, you’ll see two columns: The first column shows you the column names you queried, and the second column contains dropdown lists for the component IDs of specific types.
- Under Item name, you must either select a query result from the list, or type in a name prefix:
- Query result - from your query results, you can select the column name, whose values will become the names for your uploaded items. In case of any duplicate item names, only the first of that name will be uploaded.
- Name prefix - you can manually type in a name prefix. A randomly generated, 10-character suffix will be added to it automatically.
- Select an ID that exists in your project from the dropdown list, and map it to the corresponding column name from your queried table.
- In this dropdown, you’ll only see component IDs of the Input, Select, or Media component types that haven't been excluded from export.
- If the column name matches the component ID exactly (case-insensitive), then those IDs will be automatically selected.
- To map the category of a column, select the
_item_categoryID from the dropdown.
- Once you’re done, click Upload.
After uploading, each row from the mapped columns will become an item with a defined name. All of the values of the mapped columns will be uploaded to their corresponding component IDs.
Any Single- or Multi-select values that don’t exist in the project will be skipped during the upload.
In the case of Select components, the options in your table should be provided as a list of strings, as shown below:
["Partially complete, needs review", "Incomplete"]- For Range sliders -
[2,5]
You can only map each component ID to one column at a time. If you try to map a component ID that has already been mapped to another column, then the previous mapping will be removed.
Updated over 1 year ago