Manage projects

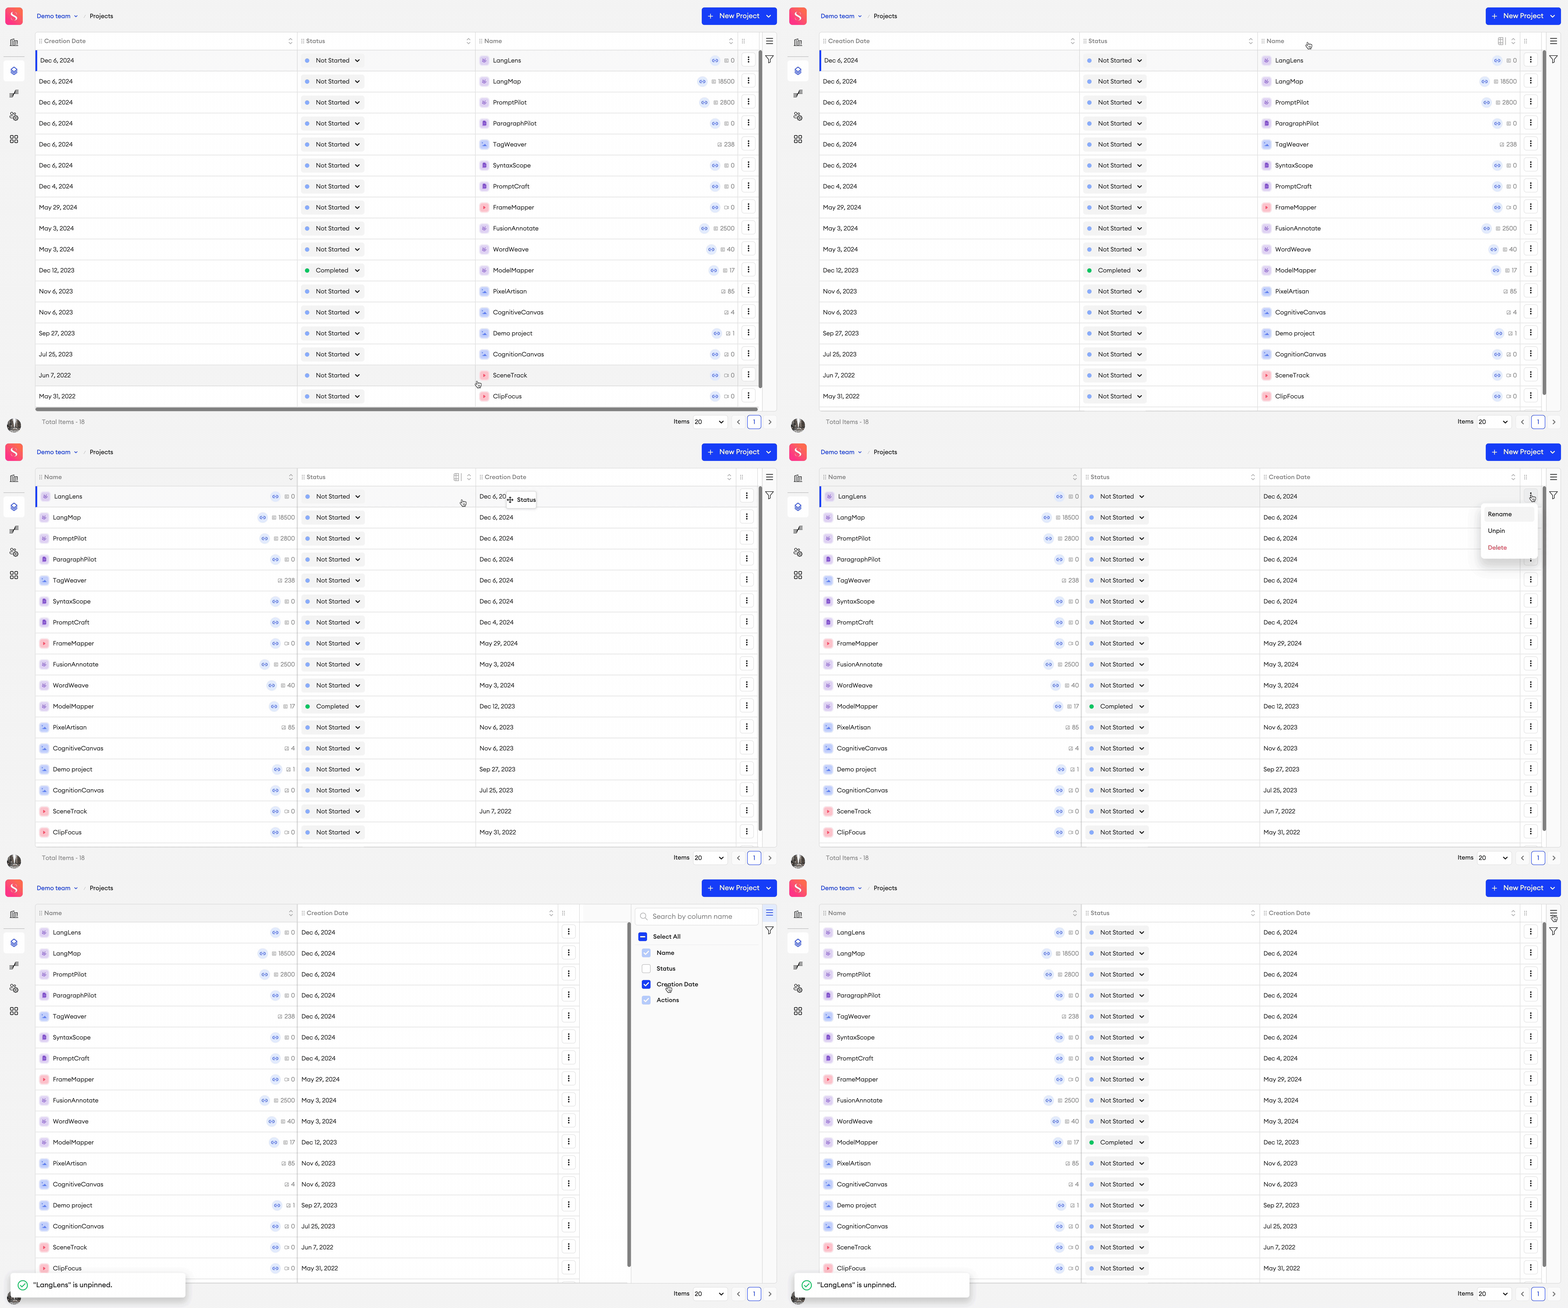
In the Projects section of the platform, you'll see a tabled list of all the projects within your team, displayed with their relevant data in columns. In this table, you'll see a project's Name, your Role within that project, the project's Creation Date, and its current Status.
There are various ways you can manage your columns:
- Resize - Click and drag the edge of any column to resize.
- Freeze - To freeze a column in a static position on the left side of the table, hover over the column and click the Freeze icon in the header.
- Move - Click and drag the header of any column to move and reorder it.
- Sort - You can click the up or down arrows on a column's header to sort its corresponding data by ascending or descending order, respectively. By default, the table is sorted by Creation Date.
If you Resize, Freeze, and Move your columns, the state of your Projects table will be saved for you. Any time you refresh or revisit the Projects table, it will maintain your latest changes.
Who can see your modifications?Any modifications you apply to the table in this way will only be visible to you.
Columns
From the Column menu ☰, you can select and deselect columns to toggle their visibility on the table. As well as this, you may create Custom Columns to display custom metrics that you can apply to projects.
Custom Columns
You can create a Custom Column with the desired data type, whose values can be assigned from the project’s Setup tab.
To create a custom column:
- Open the Column menu
☰from the right panel. - Click Add Column
+. - In the pop-up, enter the column name.
- Select the type of data you want to display in the column:
- Text - This is an input field.
- Numeric - This is a numeric input field. You may specify the minimum and maximum values, the increments to increase or decrease them by, and what suffix to apply to the value.
- Single-select - You must provide at least two options to choose from.
- Multi-select - You must provide at least two options. Multiple options can be selected at a time.
- Date picker - You can select a specific date.
- Define the Project Admin’s access:
- View custom field - The ability to view this column’s data in the Setup tab of all projects available to them.
- Edit custom field - The ability to edit this column’s data directly from the Setup tab of all projects available to them.
- Click Add.
- You can create up to a maximum of 20 custom columns per team.
- For each Single-select column, you can create up to 300 options.
- For each Multi-select column, you can create up to 300 options.
- The maximum character count of each option is 64 characters.
- The maximum character count of the Text column’s value is 120 characters.
- You can select up to 20 options in a Multi-select column.
To enter a custom value for a project:
- In Projects, find the project you want to edit the value of and click on it.
- Go to the Setup tab.
- Hover over the value you want to change and click Edit.
- Make your changes accordingly.
- Click Save.
- Only users with the role of Team Admin and above can create, view and manage a Custom Column from the Column menu in Projects.
- By default, the value of custom fields can only be changed by users with the role of Team Admin and above in the project’s Setup. Project Admins may also view and edit the value as long as these permissions were defined during the custom column’s creation.
Manage columns
From the column menu, you can change or delete any of the custom columns that exist within your team.
To edit your custom column:
- Open the Column menu
☰from the right panel. - Hover over the name of the column you want to change and click Edit.
- Make your changes accordingly based on the column’s data type:
- All data types - you can change the column name and the Project Admin’s access.
- Numeric - you can edit all configurations.
- Single-select and Multi-select - you can delete existing options and add new ones.
- Click Save.
Copy valuesYou can copy a project’s name by hovering over the text in the corresponding table cell and clicking the Copy button.
To delete your custom column:
- Open the Column menu
☰from the right panel. - Hover over the column you want to remove and click Delete.
- In the pop-up, click Delete.
Deleting options will remove them from any projects where they were applied.
Filter

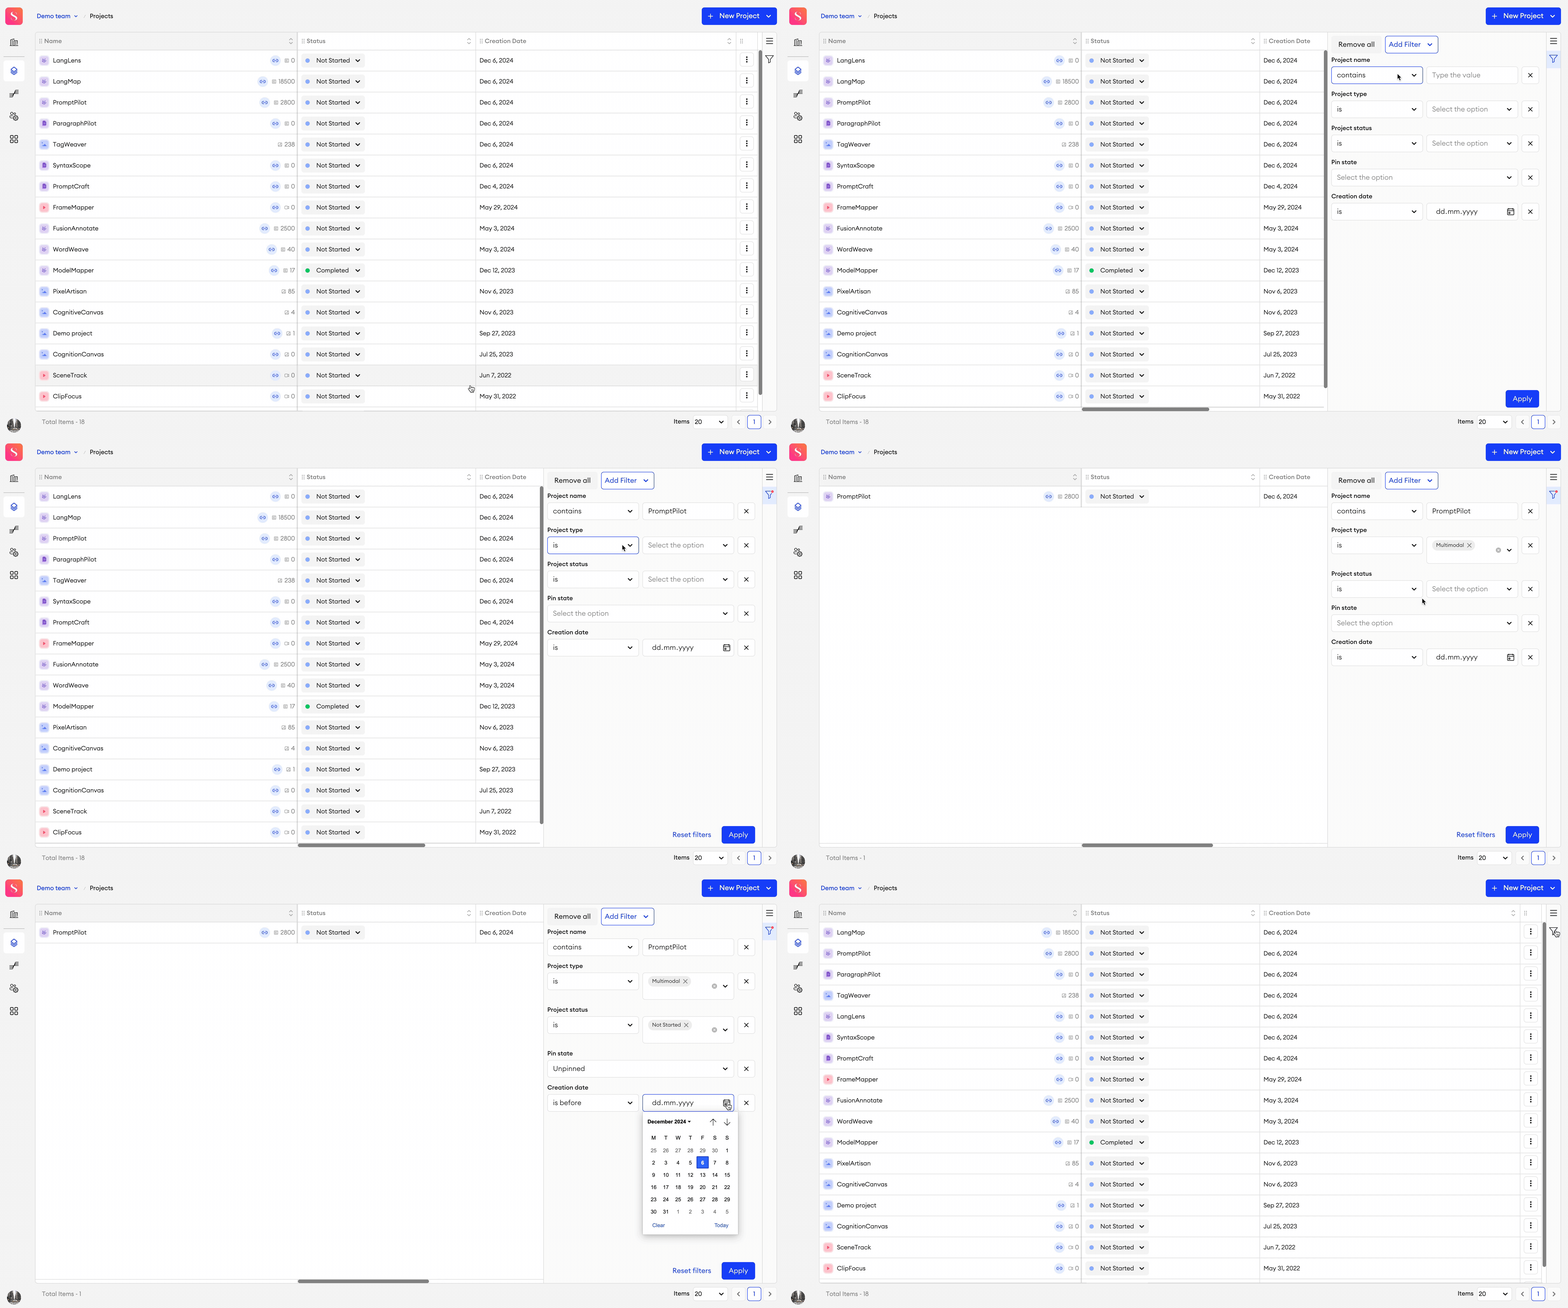
You can use filters to display your projects based on specific criteria that you can set with the use of operators.
Add filter options
To add a filter option:
- In the Projects tab, click on the Filter icon in the right panel.
- Click Add Filter.
- Check the filter option you want to add.
- Repeat these steps to add more options.
Filter options
These are the filter options available, and what operators you can use for them:
- Project name:
- Operator: contains, does not contain.
- Option: Type the project name you're looking for.
- Project type:
- Operator: is, is not.
- Options: Select All, Multimodal, Image, Video or Audio, Text, Image (Legacy), and Tiled Imagery.
- Project status:
- Operator: is, is not.
- Options: Not Started, In Progress, Completed, On Hold, and Custom Statuses.
- Pin state: Pinned, or Unpinned.
- Creation date:
- Operators: is, is before, is after.
- Option: Enter the relevant date.
Remove all
Clicking Remove all will remove the filter rows you've added.
Reset filters
Clicking Reset filters will return all filter options to their original empty state without removing them.
Rename project
To rename a project:
- Go to Projects.
- Select the three dots
⋮on the project you want to rename. - Select Rename.
- Type in a new name.
- Click Save.
Who can rename projects?Only Team Owners, Team Admins, and Project Admins can rename projects.
SDK function
To rename a project:
sa.rename_project(
    project = "Project Name",
    new_name = "New Project Name")
Pin or unpin project
To pin or unpin a project:
- Go to Projects.
- Select the three dots
⋮on the project you want to pin or unpin. - Select Pin or Unpin.
Who can pin or unpin projects?Only Team Owners and Team Admins can pin or unpin projects.
Change status
To change the project status:
- Go to Projects.
- Select the status that corresponds to the project whose status you want to change.
- Choose a status from the drop-down list.
Who can set a project’s status?Only Team Owners, Team Admins, and Project Admins can view and set their project’s status.
A project can have one of 4 statuses:
- Not Started: The project has not started yet. By default, all the newly created projects have a Not Started status.
- In Progress: The project is in progress.
- Completed: The project is completed.
- On Hold: The project is paused or stopped until further notice.
Existing projects have the Undefined status. Once you change the Undefined status, it won’t be available anymore.
Delete project
To delete a project:
- Go to Projects.
- Select the three dots
⋮on the project you want to delete. - Select Delete.
- In the popup, click Delete.
Who can delete projects?Only Team Owners and Team Admins can delete projects.
SDK function
To delete a project:
sa.delete_project(project = "Project Name")Upload priority scores (Active Learning)
The priority scores feature helps you determine the items that you need to annotate first to improve your model training. It's a key active learning feature that speeds up your annotation time.
To upload priority scores:
- Go to Setup → Settings → General.
- Enable Priority scores.
- Go to Data, click Add, and select Upload Priority Scores.
- Drag and drop or choose a CSV file from your computer.
Who can upload priority scores?Team Owners, Team Admins, and Project Admins (with permission) can upload priority scores.
- Items whose names don’t match the ones in the CSV file or have no priority scores will be skipped.
- Items that don't have names or priority scores won't be uploaded.
After the upload is complete, a priority score appears next to each item. You can sort your items by their priority values.
If the Priority scores task assignment setting is enabled for your project, then contributors will receive items by priority score.
Download this file and use it as a guide to create a CSV file.
SDK function
To upload priority scores:
project_name = 'Project Name'
scores = [
    {
        "name" : "image_1.png",
        "priority": 0.567
    },
    {
        "name" : "image_2.png",
        "priority": 0.789
    }
]

sa.upload_priority_scores(
    project = project_name,
    scores = scores
)
Bulk actions
To simplify project management and save time when working with large sets of projects, Team Owners and Team Admins can now perform the following actions on multiple projects at once — without needing to open each project individually.
Pin/Unpin
- In the Projects table, select the projects you want to pin or unpin.
- In the floating bar, click Pin/Unpin.
- Click Pin or Unpin.
Change status
- In the Projects table, select the projects you want to pin or unpin.
- In the floating bar, click Change status.
- Choose the status that you want to set for these projects.
Change custom field value
- In the Projects table, select the projects you want to change a custom field value.
- In the floating bar, click Change custom field value.
- Click Change value.
- Choose which custom field you want to change the values of.
- Make your changes according to the custom field type and its specifications, if any.
- Click Save.
For multi-select optionsWhen updating a multi-select column in bulk, the options you choose will replace the existing ones for all selected projects. This means you can’t use the Change value action to simply add a new option across projects—it will overwrite what's already there. To keep existing values, reselect them along with any new ones you want to add.
Remove custom field value
- In the Projects table, select the projects you want to remove a custom field value from.
- In the floating bar, click Change custom field value.
- Click Remove value.
- Select one or more custom fields to remove their values from the selected projects.
- In Remove.
Updated about 2 months ago