
Members
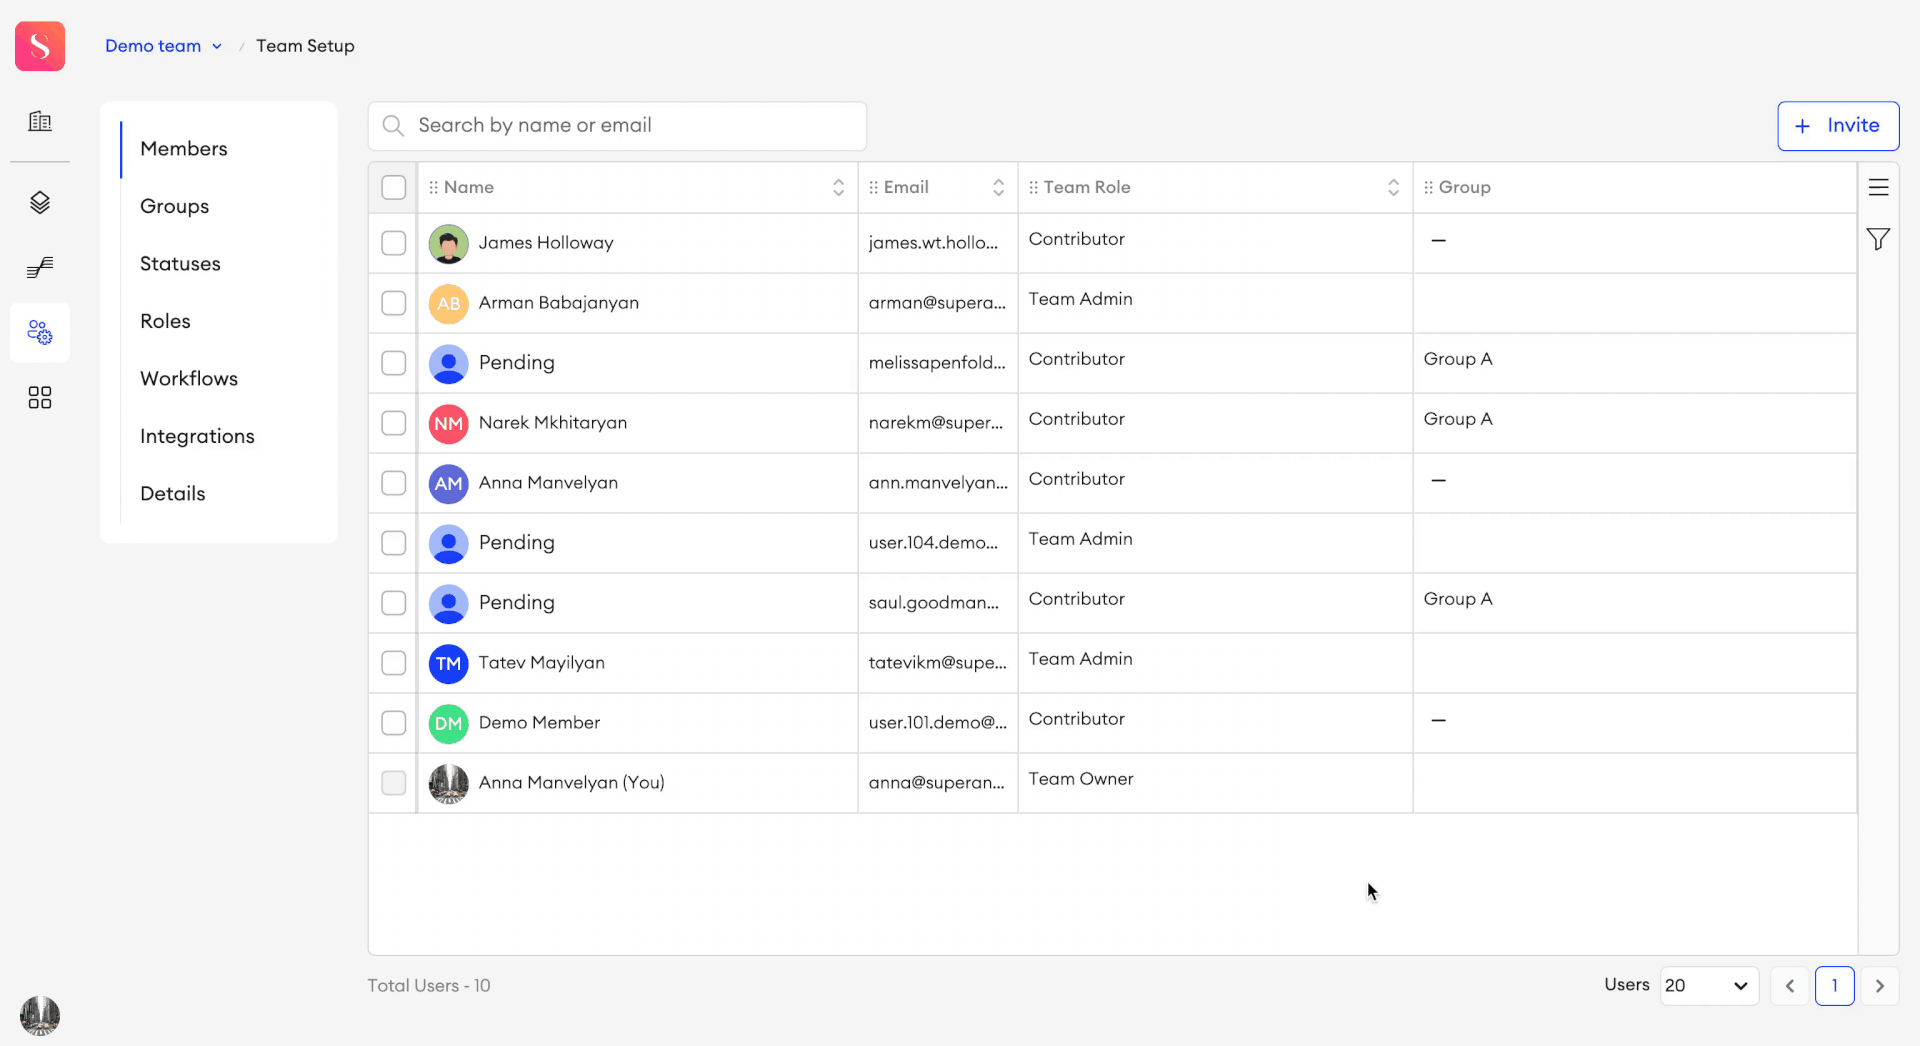
In the Members section of the Team Setup tab, you'll see a tabled list of all the invited members within your team, displayed with their relevant data in columns. In this table, you'll see a team member’s Name, Email, Team Role, the Group that the user is in (if any), as well as any custom columns you might create.
Changing member detailsYou can change a member's Team Role and Custom data by double-clicking on its respective cell in the table, or through the member's page.
There are various ways you can manage your columns:
- Resize - Click and drag the edge of any column to resize.
- Freeze - To freeze a column in a static position on the left side of the table, hover over the column and click the Freeze icon in the header.
- Move - Click and drag the header of any column to move and reorder it.
- Sort - You can click the up or down arrows on a column's header to sort its corresponding data by ascending or descending order, respectively. By default, the table is sorted by invitation date, with the most recently invited user shown at the top.
If you Resize, Freeze, and Move your columns, the state of your Members table will be saved for you. Any time you refresh or revisit the Members table, it will maintain your latest changes.
Who can see your modifications?Any modifications you apply to the table in this way will only be visible to you.
Columns
From the Column menu ☰, you can select and deselect columns to toggle their visibility on the table. As well as this, you may create Custom Columns to display custom metrics that you can apply to members.
Custom Columns
You can create a Custom Column with the desired data type, whose values can be assigned from the table or the member's page.
To create a custom column:
- Open the Column menu
☰from the right panel. - Click Add Column
+. - In the pop-up, enter the column name.
- Select the type of data you want to display in the column:
- Text - This is an input field.
- Numeric - This is a numeric input field. You may specify the minimum and maximum values, the increments to increase or decrease them by, and what suffix to apply to the value.
- Single-select - You must provide at least two options to choose from.
- Multi-select - You must provide at least two options. Multiple options can be selected at a time.
- Date picker - You can select a specific date.
- Define the Team Contributor’s access:
- View custom field - Gives the user the ability to view this column's data in their own user profile within the team.
- Edit custom field - Gives the user the ability to edit this column's data in their own user profile within the team.
- Click Add.
- You can create up to a maximum of 20 custom columns per team.
- For each Single-select column, you can create up to 900 options.
- For each Multi-select column, you can create up to 900 options.
- The maximum character count of each option is 64 characters.
- The maximum character count of the Text column’s value is 120 characters.
- You can select up to 20 options in a Multi-select column.
To enter or change a custom value for a member:
- In Members, find the member whose data you want to edit.
- Click on their name to open their page and find the custom field, or simply double click the custom field's corresponding cell on the table.
- Make your changes accordingly.
- If you're making changes from the page, click Save. If you've double-clicked the cell, hit
Enteror click anywhere else to save your changes.
- Only users with the role of Team Admin and above can create, view and manage a Custom Column from the Column menu in Members.
- If a user's role was changed from Team Admin to Contributor, or vice versa, any custom fields applied to their corresponding page will remain.
- Custom columns, and by extension their fields, can be added to members of all roles except for the Team Owner.
- By default, the value of custom fields can only be changed by users with the role of Team Admin and above in the Members tab. Contributors may also view and edit the value as long as these permissions were defined during the custom column’s creation.
Manage columns
From the column menu, you can change or delete any of the custom columns that exist within your team.
To edit your custom column:
- Open the Column menu
☰from the right panel. - Hover over the name of the column you want to change and click Edit.
- Make your changes accordingly based on the column’s data type:
- All data types - you can change the column name and the team member’s access.
- Numeric - you can edit all configurations.
- Single-select and Multi-select - you can delete existing options and add new ones.
- Click Save.
Deleting options will remove them from any member pages where they were applied.
To delete your custom column:
- Open the Column menu
☰from the right panel. - Hover over the column you want to remove and click Delete.
- In the pop-up, click Delete.
Deleting columns will remove their data from any member pages where they were applied.
Member page
By clicking on a member in the table, their page will pop up on the right-hand side.
In this panel, users will be able to see any information on the selected member as is visible on the table, as well as their project data.
The member page will have two different structures that depend on whether the user is a Contributor or Team Admin, as described below.
Contributor page
For Contributors, this information is divided into two tabs:
- General - shows the user's role, if they're a part of any group, what permissions they have in the team, and any custom fields added to them.
- Projects - shows the projects that the user has access to, what their role is in those projects, as well as their activity status in them.
Team Admins can directly edit a user's information from this page, including their roles, groups, permissions, and any projects they might be a part of. They can add or remove users from projects, and even define their group's scope of the project if it hasn't been defined yet.
Team Admin page
A Team Admin's page will show their role, their permissions as given by the Team Owner, and any custom fields added to them.
Manage members
Copy valuesYou can copy a user’s name or email by hovering over the text in the corresponding table cell and clicking the Copy button.
Setting a Team Admin’s Permissions
As a Team Owner, you can choose to provide your Team Admins access to use the Orchestrate feature and to view the team’s SDK Token.
To modify a Team Admin’s permissions:
- Go to the Members tab of your team.
- Click on the Team Admin you want to modify the permissions of.
- In the Permissions section, click on the Edit button.
- Check the box for Orchestrate and/or View SDK Token.
- Click Save.
You can also revoke their permissions by following these steps and unchecking the corresponding boxes.
Setting a Contributor's permissions
Team Owners and Team Admins can set permissions for Contributors in addition to the permissions they already have, provided the respective features are enabled for their organization. These additional permissions are:
- Manage Contributors’ permissions - This provides a Contributor the ability to manage other Contributors' permissions. It also provides the rest of the permissions in this list.
- Contributors can’t manage the permissions of others who also have this permission, but they can still see who else has it.
- Contributors with this permission can’t provide it to other Contributors.
- Invite Contributors to team - This permission allows a Contributor to invite users to the team at Contributor level from Team Setup. They may also invite these users to any project where they are a Project Admin.
- If the Contributor is ungrouped, they can’t add users to any groups.
- If the Contributor is grouped, the invited users are automatically added to the same group.
- Contributors can’t invite any user who is already in the same team.
- Remove Contributors from team - This permission allows a Contributor to remove other Contributors from the team, even those with the Manage permission.
- Contributors with this permission can also remove any other Contributor from the team, even if they aren’t in the same projects.
- If this permission is granted to a grouped Contributor, they can only remove Contributors that are part of the same group.
- View Contributors’ custom field values - This permission allows a Contributor to view other Contributors’ custom field values in the Team Members table. They’ll also be able to view these values in their ‘My Profile’, regardless of the permissions set when creating the custom field.
- Providing this permission will make it possible to provide the ‘Edit’ permission as well.
- If this permission is granted to a grouped Contributor, they can only view the custom fields of their group members.
- Edit Contributors’ custom field values - This permission allows a Contributor to edit other Contributors’ custom field values in the Team Members table. They’ll also be able to edit these values in their ‘My Profile’, regardless of the permissions set when creating the custom field.
- A Contributor can only be granted this permission if they already have the ‘View’ permission.
Important to knowIf you grant a Contributor any of these permissions, and they are a Project Admin in any projects, they’ll be able to manage other Contributors’ access in those projects from the Team Members table.
There are three ways to provide these permissions:
- From the Contributor’s respective cell in the Team Members table.
- From the Contributor’s member page.
- As a bulk action when selecting a few members at a time.
From the table
To manage permissions from the Members table:
- Find the Contributor whose permissions you want to manage.
- Double-click the cell in the Permissions column.
- Select one or multiple permissions from the list.
From a Contributor’s member page
To modify a Contributor’s permissions:
- Go to the Members tab of your team.
- Click on the Contributor you want to modify the permissions of.
- In the Permissions section, click on the Edit button.
- Check or uncheck the permissions as needed.
- Click Save.
User activity
As a Team Admin (or above), you have the possibility of pausing a member’s activity in any given project. This means that within the project that they’ve been paused in, they won’t be able to:
- Request new tasks,
- Open any items available to them or work on them in the editor,
- Be assigned new items and folders.
Once a user’s activity is resumed, these actions will be available to them again.
Users with the role of Project Admin or higher may also manage multiple users' activity in bulk from the Project Contributors table.
This user must have a role that can receive task assignments (i.e. Annotator, QA, or any custom contributor role).
To pause a user’s activity:
- Go to the Members tab of Team Setup.
- Click on the user whose activity you want to pause.
- Go to the Projects tab of their member page.
- Find the project you want to pause this user’s activity in.
- Click on the three dots
⋮. - Click Pause activity.
- In the pop-up, click Pause.
In the Projects list, you’ll see an icon indicating whether a member’s activity has been paused in a project. You can also see this icon in the Contributors list of any given Project’s settings. You may resume a paused user’s activity at any time.
To resume a user’s activity:
- Go to the Members tab of Team Setup.
- Click on the user whose activity you want to resume.
- Go to the Projects tab of their member page.
- Find the project you want to resume this user’s activity in.
- Click on the three dots
⋮. - Click Resume activity.
- In the pop-up, click Resume.
Grouping
You can add or remove members from a group in two ways:
- From the General tab of the member's page.
- From the Members tab as described here.
- You can add ungrouped members in bulk as described here.
Bulk actions
To simplify team management and save time when working with large sets of teams, Team Owners and Team Admins can now perform the following actions on multiple team members at once without needing to handle each user individually.
Removing members from the team
- Select one or multiple members that you would like to remove from the team.
- On the floating bar, click Remove.
- In the pop-up, click Remove.
Manage project access
You can share or remove project access with multiple users at once. These actions won’t have any effect on Team Admins.
To share a project with users:
- Select one or multiple users.
- Click Manage Project Access.
- Click Share project.
- Select a project that you want to share with the specified users.
- Select the role you want the users to have in this project.
- Click Share.
When sharing a project in bulk
- Grouped members will only be able to access the shared project’s data if their group’s data scope for that same project is already defined.
- Selected users who already have access to the shared project won’t be affected by this action. If you select a different role than the one they already have, their existing role will remain unchanged.
To remove users from a project:
- Select one or multiple users.
- Click Manage Project Access.
- Click Remove from project.
- Select the project that you want to remove the specified users from.
- Click Remove.
Change custom field value
You can change the value of a custom field for more than one user at a time.
To change a value:
- Select one or multiple members from the table.
- Click Change Custom Field Value.
- Click Change value.
- Select the custom field you want to change.
- Make your changes accordingly based on the custom field type.
- Click Save.
To remove a value:
- Select one or multiple members from the table.
- Click Change Custom Field Value.
- Click Remove value.
- Select one or multiple custom fields.
- Click Save.
For multi-select optionsWhen updating a multi-select column in bulk, the options you choose will replace the existing ones for all selected users. This means you can’t use the Change value action to simply add a new option across users — it will overwrite what's already there. To keep existing values, reselect them along with any new ones you want to add.
Change admin permissions
Team Owners can set permissions for Team Admins in addition to the permissions they already have, provided the respective features are enabled for their organization. These additional permissions are: Access Orchestrate, and View SDK Token.
Team Admins can’t modify these permissions themselves but they can see what permissions they and other Team Admins have.
To grant permissions:
- Select one or multiple members from the table.
- Click Change Permissions.
- Click Grant permissions.
- Select the permissions you want to grant:
- Access Orchestrate - grants Team Admins access to the Orchestrate section, allowing them to create and monitor pipelines.
- View SDK Token - grants Team Admins permission to view and use the team’s generated SDK Token.
- Click Save.
To revoke permissions:
- Select one or multiple members from the table.
- Click Change Permissions.
- Click Revoke permissions.
- Select the permissions you want to revoke:
- Access Orchestrate - revokes Team Admins’ access to the Orchestrate section, but all pipelines and actions created by this user will still be available.
- View SDK Token - revokes Team Admins’ access to view the SDK token, but they will still be able to use the token they already have. If you want to make that token unavailable, you can revoke it or generate a new one.
- Click Save.
ContributorsPlease note that this action can’t be applied to any selected Contributors and it won’t affect them.
Change contributor permissions
Team Owners and Team Admins can set permissions for Contributors, in addition to the permissions they already have. Some permissions are only available if their respective features are enabled for the organization. Contributors with the Manage permission can also set permissions for Contributors who can’t manage others.
These additional permissions are listed above.
To grant permissions:
- Select one or multiple members from the table.
- Click Change Permissions.
- Click Grant permissions.
- Select the permissions you want to grant.
- Click Save.
To revoke permissions:
- Select one or multiple members from the table.
- Click Change Permissions.
- Click Revoke permissions.
- Select the permissions you want to revoke (Except Manage Contributors’ permissions, as that can’t be revoked in bulk).
- Click Save.
Filter
You can use filters to display your members based on specific criteria that you can set with the use of operators.
Add filter options
To add a filter option:
- In the Members tab, click on the Filter icon in the right panel.
- Click Add Filter.
- Check the filter option you want to add.
- Repeat these steps to add more options.
Filter options
These are the filter options available, and what operators you can use for them:
- Name:
- Operator: contains, does not contain.
- Option: Type the value you want to filter by.
- Email:
- Operator: contains, does not contain.
- Options: Enter one or multiple emails you're looking for. Use commas, semicolons, or press
Enter,Space, orTabto separate multiple entries, or click outside the field. Entered values will appear in the dropdown. Duplicate entries will be ignored. The number of entered emails will be shown in the field.
- Team role:
- Operator: is, is not.
- Options: Team Owner, Team Admin, or Contributor.
- Group:
- Operator: is, is not, is empty.
- Options: You can select one, multiple, or all groups from within the team to filter by.
- Pending state: Pending, Verified.
- Permissions:
- Operator: is granted, is not granted, none is granted.
- Options: Access Orchestrate, View SDK Token.
Remove all
Clicking Remove all will remove the filter rows you've added.
Reset filters
Clicking Reset filters will return all filter options to their original empty state without removing them.
Updated 7 days ago