
Custom workflows
Workflows are a way for you to modify the default annotation cycle by creating your own custom roles and item statuses to align the processes of your team and projects with the platform.
Only members with the role of Team Admin or higher can create a workflow.
Feature compatibility
- If you want to incorporate SuperAnnotate SDK functions into a project with a custom workflow, make sure you use the following SuperAnnotate version or higher:
4.4.25
Existing workflows
On the platform, there are existing roles and statuses that are used in system workflows:
- Roles - Annotator, QA
- Statuses - Not Started, In Progress, Quality Check, Returned, Skipped, Completed
There are two workflows available on the platform that contain these roles and statuses: System Workflow (default), and System Workflow (direct completion). The difference between the two is that the latter allows Annotators to complete items.
The default selected workflow will be used for all projects unless you select otherwise during project creation.
With custom workflows, you can use all existing roles and statuses on the platform, as well as custom ones that you’ve created.
Creating your workflow
You can create a new workflow from Team Setup. There are two ways you can set up a workflow: building it from scratch, or uploading a workflow JSON.
Default permissionsMembers with the role of Project Admin or higher have access to all statuses and can make transitions between any statuses by default.
- You can have a maximum of 2,000 workflows in a team at one time, including system workflows.
- You can see the workflow that’s attached to your project from the General tab of your project’s Settings.
Method 1: Build from scratch
To create a workflow from scratch:
- Go to the Workflows tab.
- Click + New Workflow.
- Type in a name for your new workflow.
- Type in a description of your workflow to explain its structure (optional).
- You may upload and use a workflow JSON file as a starting template and then modify it directly on the canvas instead of editing the JSON file manually (optional). Learn more about creating a workflow JSON.
- Click Next.
- Drag and drop System or Custom statuses from the left panel onto the canvas. Each status can be added to a workflow only once. The order in which statuses appear in projects is defined by the sequence in which they are added to the canvas, and roles are ordered according to the statuses they are assigned to.
- Connect a transition from Start to any status on the canvas to define the default starting status of all items once uploaded.
- Click on the status you’ve added to the canvas and define the Role access to specify which roles can access items with this status (optional). If there are no assignable roles in your workflow, you can skip to step 14.
- Create a transition between two statuses by connecting one status to another. The transition inherits the role access from its originating status. If no role access is defined for the originating status, the transition will be automatically deleted when the workflow is saved.
- Define the type of Transition:
- Manual - A transition that is initiated manually by the user. You may define additional conditions that must be met to allow the transition. These transitions are visible for the assignable users that have access to the originating status.
- Automated - An automated transition that is triggered automatically when a predefined condition is met. These transitions won’t be visible to users in the editor.
- If you’ve selected a Manual transition, name your transition (required) and define its Constraints (optional):
- No required empty - There can't be any required fields whose values are left empty.
- If you’ve selected an Automated transition, you must define its Conditions:
- On Save - Triggers a transition when the item is saved in the editor (default).
- On Revert - Triggers a transition when the Revert button is clicked in the editor.
- When you’re done, click Create.
Multiple transitionsPlease keep in mind that you can’t have multiple auto-transitions with the same condition originating from the same status. You’ll need to change the condition or delete one of the transitions.
Important notes
- The Start node can only be a source of transition and not a destination.
- Statuses and roles will be shown in the project and its corresponding editor based on the sequence in which statuses are added to the canvas.
- System and used Custom workflows can only be opened in
View onlymode.- Changing a workflow’s layout in the editor by modifying status and transition positions will update the layout for all users who have access to that workflow. Changes made in
View onlymode are temporary and do not affect the actual workflow layout.- When the workflow is outside the current viewport, clicking the Focus Workflow button will automatically scroll the canvas and reset the zoom level to the default view to help to avoid excessive manual panning or zooming.
- Deleting a status will remove all related transitions, if any.
Method 2: Using a JSON
To create workflow using a JSON:
- Go to the Workflows tab.
- Click + New Workflow.
- Type in a name for your new workflow.
- Type in a description of your workflow to explain its structure (optional).
- Upload a JSON file that contains your workflow's data. One must be created beforehand.
- Click Next.
- Make sure that the workflow is set up accurately in the workflow canvas. You can make any necessary changes to the flow here.
- When you’re done, click Create.
JSON structure
When creating the JSON file, there's a specific structure you need to follow in order to build a functional workflow.
If you want to incorporate custom statuses or roles, make sure to create them on the platform before creating the JSON file.
{
"roles": [],
"statuses": [],
"start_status":"",
"allowed_resources_to_roles":{},
"transitions":[],
 }
These are the list of parameters you can include:
- "roles" - array of strings - The roles that will exist in your workflow, and subsequently in any project you use the workflow with. You can only include roles that exist in the Roles tab in Team Setup.
- "statuses" (required) - array of strings - The statuses that will exist in your workflow, and subsequently in any project you use the workflow with. You can only include roles that exist in the Statuses tab in Team Setup.
- "start_status" (required) - string - The default starting status of all items. This must be a status that's listed in the workflow's
statusesfield. - "allowed_resources_to_roles" - object - Where you define a role’s permissions to view/request items with the specified statuses. The roles and statuses must already be mentioned in the
rolesandstatusesfields of the workflow JSON. You can read about how to structure this object below. - "transitions" - array of objects - This is where you define the action that the role needs to take to change the item status
fromone statustoanother. The roles and statuses must already be mentioned in therolesandstatusesfields of the workflow JSON. You can read about how to structure this object below.
Status and role ordering
- Please keep in mind that the order in which you enter the role and status names in the workflow’s
rolesandstatusesfields determines the order in which they are displayed in projects that use the workflow and in their corresponding editors. If you add any additional statuses or roles through the workflow editor, they’ll be appended to the end of their respective lists.
Roles and allowed resources
In the “allowed_resources_to_roles” field of the workflow JSON, you can define each role’s permissions to view/request items with specified statuses. Within this object, each key mentioned is the role you want to write permissions for, as is shown in the structure below:
"allowed_resources_to_roles": {
           "<role_name>": {
               "view_items" : {
                   "statuses": [“<status_1>”,” <status_2>”, “<status_3>”],
               }
           }
       }
In this structure:
<role_name>must be replaced with the name of the desired role as it's written in the workflow'srolesfield.<status_1>must be replaced with the name of a status as it's written in the workflow'sstatusesfield. The specified role will have access to view/request items with that status. Each status can only be mentioned for one role at a time.
Missing values
- If you include the
”allowed_resources_to_roles”key, you must have at least one role written within, which includes the”view_items”and”statuses”keys, even if the value for”statuses”is left empty.- If you specify a role, but then leave the nested
”statuses”field under”view_items”empty, then users with that role won't be able to view any items on the platform.- If you specify the statuses that a role can access, but you haven’t allowed it to make any transitions from those statuses, then the role will be able to view the items, but won’t be able to update the item’s status in any way.
Here is an example of how this section should look:
    "allowed_resources_to_roles": {
        "Annotator": {
            "view_items": {
                "statuses": [
                    "NotStarted",
                    "InProgress",
                    "Returned"
                ]
            }
        },
        "QA": {
            "view_items": {
                "statuses": [
                    "QualityCheck"
                ]
            }
        }
    }
Transitions
You can define links between two statuses, as well as the ability for a role to change an item’s status from one to another. These transitions will be visible in the editor for the roles that have access to them.
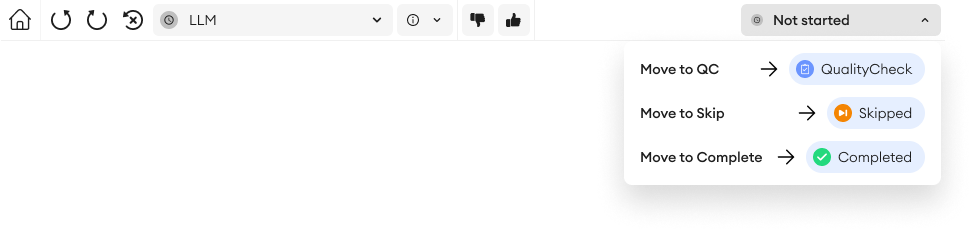
Annotator’s view of the status change in the editor.
Transitions will not be visible to users with Project Admin and higher roles, because they can view and change any status available in the project.
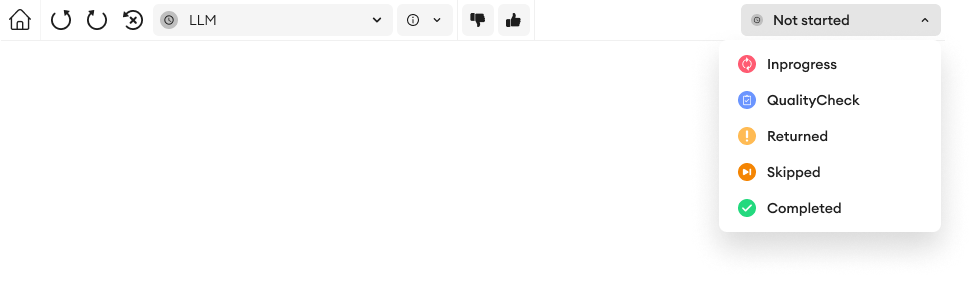
Project Admin’s view of the status change in the editor.
In the transitions field, you can define every transition individually using the following structure:
"transitions": [
    {
        "name": "<transition_name>",
        "from": "<status_1>",
        "to": "<status_2>",
        "allowed_roles": [
            "<role_name>"
        ]
    }
]
Required transition fields:
- "name" - string - The name of your transition (64 characters max). Transition names must be unique and are considered case-insensitive if the corresponding transition shares a
fromvalue with another transition. - "from" - string - The status that the transition starts from, as written in the workflow's
statusesfield. - "to" - string - The status that the transition changes the original status to, as written in the workflow's
statusesfield. - "allowed_roles" - array of strings - This defines which roles are allowed to make the transitions. A role must already have access to view the
fromstatus as written in the workflow’s allowed_resources_to_roles field.
Optional transition fields:
- "automation" (optional) - object - One per transition. This allows you to define two types of automation in your workflow. Transitions with an automation won't appear in the editor's status dropdown list; the same transition must be written again without the automation (and with a unique name) for it to be available. These are the types of automations you can use:
- onSave - Defines the status transition that takes place when the item is saved in the editor. If you only have an automated transition from your item's current state, the status dropdown won't be visible in the editor.
- onRevert - Defines the status transition that takes place when the Revert button is clicked.
- To include it in a transition:
"transitions": [
    {
        "automation": {
            "action": "<automation_type>"
        },
        "name": "<transition_name>",
        "from": "<status_1>",
        "to": "<status_2>",
        "allowed_roles": [
            "<role_name>"
        ]
    }
]
- "constraints" (optional) - array of strings - Each string specifies a condition that a transition might have (Not applicable to users with the role of Project Admin or above). If this condition isn’t met, then the transition can't be made. If you want to include multiple conditions for a transition, they must be included in separate strings, separated by commas. Some constraints are project-specific, but you can still include them all in the same workflow, they'll just only work for the corresponding project types. The constraint you can include is:
- NO REQUIRED EMPTY - There can't be any required fields or attributes whose values are left empty.
- To include it in a transition:
"transitions": [
    {
        "constraints": [
            "<constraint_type>"
        ],
        "name": "<transition_name>",
        "from": "<status_1>",
        "to": "<status_2>",
        "allowed_roles": [
            "<role_name>"
        ]
    }
]
Missing fieldsIf you include the
transitionskey, you must have at least one transition written within, which includes thename,from,to, andallowed_roleskeys, and their values can’t be null or empty.
Requirements and limitations
- You may have multiple transitions that share the same
name, and either the samefromvalue orallowed_rolesvalue. They just can't share all three values at once.- You can’t use the same status for the
fromandtofields in the same transition.- You can't include
"automation"and"constraints"in the same transition.- The maximum number of transitions in a workflow is 200.
Transition examples
Here is an example where an Annotator can change an item’s status from InProgress to QualityCheck, and a QA can change an item’s status from QualityCheck to Returned.
"transitions": [
        {
            "name": "Send to QA",
            "from": "InProgress",
            "to": "QualityCheck",
            "allowed_roles": [
                "Annotator"
            ]
        },
        {
            "name": "Return to Annotator",
            "from": "QualityCheck",
            "to": "Returned",
            "allowed_roles": [
                "QA"
            ]
        }
]
If you want to be able to transition an item’s status from one status to multiple others, you must create a different transition for each one. For example, if you want the Annotator to transition from NotStarted to QualityCheck and Skipped, you must write the transitions as follows:
"transitions": [
    {
        "name": "Send to QA",
        "from": "NotStarted",
        "to": "QualityCheck",
        "allowed_roles": [
            "Annotator"
        ]
    },
    {
        "name": "Skip item",
        "from": "NotStarted",
        "to": "Skipped",
        "allowed_roles": [
            "Annotator"
        ]
    }
]
If you want to incorporate the "onSave" automation - in this example, the item is saved in the NotStarted state, which transitions the status to InProgress.
    "transitions": [
        {
            "automation": {
                "action": "onSave"
            },
            "name": "Automatically move to In Progress",
            "from": "NotStarted",
            "to": "InProgress",
            "allowed_roles": [
                "Annotator"
            ]
        }
    ]
If you want to incorporate the "onRevert" automation - in this example, this transition is fired when a user clicks Revert, undoing all actions and annotations in the file, and reverting the status back to NotStarted.
"transitions": [
    {
        "automation": {
            "action": "onRevert"
        },
        "name": "Revert all",
        "from": "InProgress",
        "to": "NotStarted",
        "allowed_roles": [
            "Annotator"
        ]
    },
    {
        "automation": {
            "action": "onRevert"
        },
        "name": "Revert all",
        "from": "Returned",
        "to": "NotStarted",
        "allowed_roles": [
            "Annotator"
        ]
    }
]
To include constraints in a transition - in this example, the following transition can't be made unless the constraint's condition is met.
"transitions": [
    {
        "constraints": [
            "NO REQUIRED EMPTY"
        ],
        "name": "Send to QA",
        "from": "NotStarted",
        "to": "QualityCheck",
        "allowed_roles": [
            "Annotator"
        ]
    }
]
Sample JSON
As an example, take a look at the JSON below, where Annotators can't complete items.
{
    "roles": [
        "Annotator",
        "QA"
    ],
    "statuses": [
        "NotStarted",
        "InProgress",
        "QualityCheck",
        "Returned",
        "Completed",
        "Skipped"
    ],
    "start_status": "NotStarted",
    "allowed_resources_to_roles": {
        "Annotator": {
            "view_items": {
                "statuses": [
                    "NotStarted",
                    "InProgress",
                    "Returned"
                ]
            }
        },
        "QA": {
            "view_items": {
                "statuses": [
                    "QualityCheck"
                ]
            }
        }
    },
    "transitions": [
        {
            "automation": {
                "action": "onRevert"
            },
            "name": "revert",
            "from": "InProgress",
            "to": "NotStarted",
            "allowed_roles": [
                "Annotator"
            ]
        },
        {
            "automation": {
                "action": "onRevert"
            },
            "name": "revert",
            "from": "Returned",
            "to": "NotStarted",
            "allowed_roles": [
                "Annotator"
            ]
        },
        {
            "automation": {
                "action": "onSave"
            },
            "name": "automaticly to in progress",
            "from": "NotStarted",
            "to": "InProgress",
            "allowed_roles": [
                "Annotator"
            ]
        },
        {
            "constraints": [
                "NO REQUIRED EMPTY"
            ],
            "name": "Send to QA",
            "from": "NotStarted",
            "to": "QualityCheck",
            "allowed_roles": [
                "Annotator"
            ]
        },
        {
            "constraints": [
                "NO REQUIRED EMPTY"
            ],
            "name": "Send to QA",
            "from": "InProgress",
            "to": "QualityCheck",
            "allowed_roles": [
                "Annotator"
            ]
        },
        {
            "name": "Skip item",
            "from": "NotStarted",
            "to": "Skipped",
            "allowed_roles": [
                "Annotator"
            ]
        },
        {
            "name": "Skip item",
            "from": "InProgress",
            "to": "Skipped",
            "allowed_roles": [
                "Annotator"
            ]
        },
        {
            "constraints": [
               "NO REQUIRED EMPTY"
            ],
            "name": "Send to QA",
            "from": "Returned",
            "to": "QualityCheck",
            "allowed_roles": [
                "Annotator"
            ]
        },
        {
            "name": "Skip item",
            "from": "Returned",
            "to": "Skipped",
            "allowed_roles": [
                "Annotator"
            ]
        },
        {
            "constraints": [
                "NO REQUIRED EMPTY"
            ],
            "name": "Mark as Complete",
            "from": "QualityCheck",
            "to": "Completed",
            "allowed_roles": [
                "QA"
            ]
        },
        {
            "name": "Skip item",
            "from": "QualityCheck",
            "to": "Skipped",
            "allowed_roles": [
                "QA"
            ]
        },
        {
            "name": "Return to Annotator",
            "from": "QualityCheck",
            "to": "Returned",
            "allowed_roles": [
                "QA"
            ]
        }
    ]
}
Workflow details
You can review the details of a workflow in its details panel. To access this:
- Go to the Workflows tab.
- Click on a workflow you want to examine.
- In the top right of the canvas, click the Details menu.
From within this panel, you can:
- View the workflow’s statuses, roles, and the defined access between the two.
- Edit a custom workflow’s name and description
- Delete an unused custom workflow
Edit workflow
Edit workflow Editing a custom workflow allows you to add or remove statuses and roles, as well as reconfigure any transitions. Projects using that workflow will be automatically updated accordingly with the corresponding changes.
If you want your changes to be applicable to only a single project, you can change your project’s workflow.
Removing roles and statuses
- Items with the removed status will be given the newly selected status.
- Items whose status was replaced will maintain all item assignments, but users who don’t have access to the new status won’t be able to access them.
- Users whose roles are removed will lose access to projects using this workflow, and any corresponding items assigned to them will be unassigned.
Editing your custom workflow’s editor:
- Open the workflow editor:
- From the Workflows tab in Team Setup, by clicking the workflow.
- From within a project’s Setup tab, by clicking Open Workflow in Editor.
- Make your changes accordingly.
- When you’re done, click Save and a confirmation pop-up where you’ll see a summary of your changes to statuses and roles.
- If you’ve removed any statuses, you’ll need to replace them with new ones from the workflow. Keep in mind that removing a status will also delete any transitions connected to them, as well as removing any role access to that status.
- If you’ve removed a status’s role access, it’ll also remove any transitions originating from that status upon saving the workflow. Therefore, any roles that have access to that status will lose it.
- Click Save again.
Simultaneous editingPlease keep in mind that users can’t edit a workflow simultaneously. If a user makes and saves any changes in the workflow editor while you’re working on it, you’ll lose your progress and will need to reload the editor to load the latest version and make your changes again.
Duplicate a workflow
You can duplicate any existing workflow to use it in a new project or to replace a project’s current one. Duplicates won’t be connected to any projects.
To duplicate a workflow:
- Go to the Workflows tab in Team Setup.
- Find the workflow you want to duplicate.
- Click the three dots
⋮. - Click Duplicate.
- Type a name for the duplicate workflow.
- Click Duplicate.
Download workflow JSON
There are two ways to download your workflow as a JSON file:
- From the corresponding workflow’s three dots
⋮menu in the Workflows tab. - From the selected workflow’s editor.
A JSON file will be downloaded locally, and its name will be the same as the name of the Workflow on the platform.
Delete workflow
There are two ways to delete an unused custom workflow:
- From the corresponding workflow’s three dots
⋮menu in the Workflows tab. - From the Details panel in the editor of the selected workflow.
Deleting used workflows
- Workflows can't be deleted if they're currently in use.
- System workflows can't be deleted.
Updated 29 days ago